Repairing holes in bathroom wall

Joined
12 Dec 2010
Messages
25
Reaction score
1
Location
Dublin
Country
Ireland
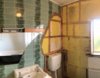
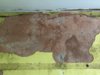
I've been removing some nails from the bathroom wall and it's made a bit of a mess of the finish. It's damaged the skim plaster and - in a lot of cases - the blockwork underneath.

I was just wondering how best to fill those holes: should I use rapid set cement to fill the blockwork and then a layer of joint compound on top OR just go straight for the joint compound and build it up in layers?

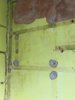
For that area at the top, am I okay to just apply a skim layer of joint compound over it? I know I can't use PVA as a primer in the bathroom, what should I use instead?

Cheers for any advice.
 

Attachments

  • IMG_5172.jpeg
    IMG_5172.jpeg
    291.7 KB · Views: 267
Last edited:
Sponsored Links
the large exposed patch of gypsum browning looks to be damp, and the skim finish below doesn't seem to have taken (stuck) to the base coat of browning - it shelling off.
if dampness has blown the plaster on that wall, or any other wall, then you need to find the cause before trying to repair anything.

if you just want to fill the holes use whatever is handy or buy a small bag of easyfill two coat plaster.
 
Hi @bobasd,

Thanks for your response.

The skim plaster was shelling off, I removed all the loose bits so what's left is all adhered firmly. I've also checked around the room and the rest all seems fine.

I'm wondering whether it might have been because there hasn't ever been an extractor fan used in the bathroom? Also, there was this nasty fake-tile wood stuff stuck on all the walls so I imagine moisture got trapped behind there pretty easily (see first image) as there were small patches of mould on most of the walls when I removed this.

Sorry if this sounds silly but the browning doesn't feel wet or anything; would I be able to feel it if it was damp? Could anything else be causing the discoloration (like dampness in the past)? I'll double check the guttering on the other side of the wall - next time it rains - just to rule that out.

I've attached another image of that specific area - the contrast between the dark and light areas is actually a lot more prononounced in the image than in real life.

Thanks again for your comments and advice.
 

Attachments

  • IMG_5159.jpeg
    IMG_5159.jpeg
    266.7 KB · Views: 227
  • IMG_5183.jpeg
    IMG_5183.jpeg
    419.8 KB · Views: 231

DIYnot Local

Staff member

If you need to find a tradesperson to get your job done, please try our local search below, or if you are doing it yourself you can find suppliers local to you.

Select the supplier or trade you require, enter your location to begin your search.


Are you a trade or supplier? You can create your listing free at DIYnot Local

 
Sponsored Links
Back
Top