Hello
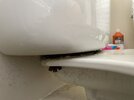
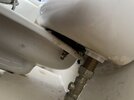
I think the toilet washer between the pan and cistern needs to be replaced, but when I’ve logged at doing this before in another toilet I couldn’t figure out how.
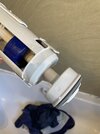
This is what is inside the thing Review on Amazon: Easy https://www.amazon.co.uk/gp/aw/revi...I?ref_=cm_sw_r_apin_dprv_6RJM6D6G889ZSKW5ATV2
Is there is a plastic nut showing but I don’t see this on mine.
Any pointers?
I think the toilet washer between the pan and cistern needs to be replaced, but when I’ve logged at doing this before in another toilet I couldn’t figure out how.
This is what is inside the thing Review on Amazon: Easy https://www.amazon.co.uk/gp/aw/revi...I?ref_=cm_sw_r_apin_dprv_6RJM6D6G889ZSKW5ATV2
Is there is a plastic nut showing but I don’t see this on mine.
Any pointers?