
You are using an out of date browser. It may not display this or other websites correctly.
You should upgrade or use an alternative browser.
You should upgrade or use an alternative browser.
Replacing the bath waste
- Thread starter PetersUk
- Start date
- Joined
- 8 May 2017
- Messages
- 10,652
- Reaction score
- 2,871
- Country

There is a grub screw ,down the hole in the round chrome handle. Remove it ,then pull off the handle. This exposes the nut or bolt that secures the overflow to the bath.
Should be a screw in hole in the top of the knob. Loosen it, then pull knob off. Will be a nut behind knob holding mechanism/overflow to bath.
Too slow.
Too slow.
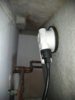
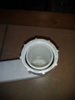
Many thanks for the replies. I have taken out the grub screw that was in the hole but I still can not take off the chrome handle.
I've attached a photo without the grub screw and a reverse photo of the bath tub.
I've attached a photo without the grub screw and a reverse photo of the bath tub.
Attachments
- Joined
- 8 May 2017
- Messages
- 10,652
- Reaction score
- 2,871
- Country
Spray some wd40 down into where the grub screw was. It is a splined shaft ,and only the corrision or build up of limescale is keeping the round handle onto the shaft. Some gentle persuasion is required !!!
Yes, as above. That knob definitely pulls off a shaft, but corrosion can make them difficult to remove. Not any easy thing to get good grip on with hand, so may need to hook something on opposite sides of each other under lip and pull/wiggle off. Being careful not to damage surface.
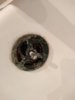
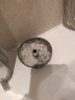
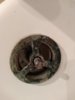
You need to turn the whole circular piece which sits proud of the bath surface anti-clockwise to unscrew it. Put some grips, etc on the 'x' formation pieces that go from splined shaft out to the circular edge to turn. Then the assembly behind bath with just drop off unless siliconed on. You don't need to turn the splined shaft.
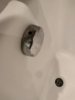
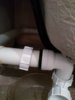
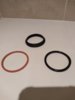
Thanks for the suggestion. I've moved further along with sorting out the bath waste. It's now installed fine but I can not stop a leak from the connection between it and the pipe.
Any suggestions would be welcome. I already have an o ring in place but I can not seem to find a space for a rubber washer as shown on the opposite end of the pipe (see two photos)
Any suggestions would be welcome. I already have an o ring in place but I can not seem to find a space for a rubber washer as shown on the opposite end of the pipe (see two photos)
Attachments

- Joined
- 8 May 2017
- Messages
- 10,652
- Reaction score
- 2,871
- Country
There should be a rubber seal between the trap and the waste. It is not shaped like the one at the other end ,and it is not an " O" ring either. Its flat faced. And ideally you should have fitted a new one before connecting the trap to your new waste.
Edit screwfix do code 40512, " trap seal kit " , and it contains one of what you need. Around two quid.
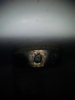
By the way get rid of the ptfe tape it is not required. It may just be a trick of the light ,but photo looks like the nut is cross threaded. Take care it is aligned properly.
Edit screwfix do code 40512, " trap seal kit " , and it contains one of what you need. Around two quid.
By the way get rid of the ptfe tape it is not required. It may just be a trick of the light ,but photo looks like the nut is cross threaded. Take care it is aligned properly.
Last edited:
Thanks for the reply Terry,
I have bought a similar trapkit from b and q. Which of the rubber seals from the photo should I use and how exactly does it fit as there does not seem much spare space at the top of the trap for it.
Also if the waste is not vertical and is cross threaded how bad a problem is it? Would I have to redo the bath waste connection to the bathtub?
Attachments
- Joined
- 8 May 2017
- Messages
- 10,652
- Reaction score
- 2,871
- Country
I can see the seal in your trap and its twisted. Pull down the plastic nut on the trap ( the one that Screw's onto the waste. You will see the seal ,and the ledge it sits against. Dont think there is one in your bq kit. Its square and flat faced black rubber seal.
Last edited:
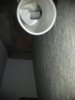
Ok, I'm not sure which item here you recommend I use
https://www.screwfix.com/p/floplast-replacement-trap-seal-black-40mm-4-pcs/40512?_requestid=559728
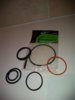
I think what I bought at b and q is the same item (see photo).
I can certainly redo the seal and untwist it.
https://www.screwfix.com/p/floplast-replacement-trap-seal-black-40mm-4-pcs/40512?_requestid=559728
I think what I bought at b and q is the same item (see photo).
I can certainly redo the seal and untwist it.
Attachments
- Joined
- 8 May 2017
- Messages
- 10,652
- Reaction score
- 2,871
- Country
Your first pic only showed 3 seals ,the one you just posted has More ,and the one you need is the black rubber one lower mid pic. Anyway take the old one out it will be obvious. Dont try to re use the twisted one.
DIYnot Local
Staff member
If you need to find a tradesperson to get your job done, please try our local search below, or if you are doing it yourself you can find suppliers local to you.
Select the supplier or trade you require, enter your location to begin your search.
Please select a service and enter a location to continue...
Are you a trade or supplier? You can create your listing free at DIYnot Local
Similar threads
- Replies
- 5
- Views
- 7K
- Replies
- 1
- Views
- 2K