router table

Joined
5 Feb 2014
Messages
88
Reaction score
2
Location
Kent
Country
United Kingdom
Hi all,
Im making a router table and wanted 9mm mdf for mounting plate, but woodyard was oit so grabbed a 6mm sheet.
im not sure if this will be thick enough. Any thoughts before i waste my rime. It was only couple quid and can use it to make plates for wheel cutouts for table Anyway.
 
Sponsored Links
Im making a router table and wanted 9mm mdf for mounting plate, but woodyard was oit so grabbed a 6mm sheet.
im not sure if this will be thick enough.
If you are using it as an insert plate than ypou'll need 15mm MDF because it bends under the weight of the router. Far better to get some 8 to 10mm phenolic plastic (e.g. Tufnol)
 
Ok, I did get 18 mm for top. Wasn't planning on using 6 for whole board, just mounting plate. I wanted plastic/ perspex just don't know where to get it from? And can it be routed easily?
 
I wanted plastic/ perspex just don't know where to get it from? And can it be routed easily?
First off try any of the local signwriters/signage firms - and maybe ask if they would let you have offcuts/scrap out of the skip (free - good for practicing if nothing else). You never know. Problem is that most acrylic used for signage is 4 to 6mm thick - for a router table insert you need 10mm + - any less and the insert will bow under the weight of the router. Want new? Then try Amari Plastics - branches all over the UK. If you want phenolic plastic ask Tufnol in Birmingham who their local stockists are. It's also held by some engineering firms as well, so maybe worth a ring round a few locally

As to routing, yes acrylic (Perspex is a brand name, like Hoover) is easily routed. Trim as near as you can with a jigsaw or hacksaw first, rout with a reduced spindle speed but high feed speed. The idea is to produce a true chip stream off the cutter rather than dust which will tend to melt back (weld itself onto the surface of the material you are cutting). It's a good idea to rig up a vacuum cleaner to the router to remove the waste - this will help keep things cooler as well. The trick to working acrylic successfully is to try to keep the cutter and plastic as cool as possible.
 
Sponsored Links
Thanks once again JK. I hunted around an industrial estate and was pointed towards a signwriters. Managed to score a 10mm x 150mm x 1m sheet of clear acrylic for (couple pounds for tea jar).
I am looking forward to playing with it tommorow.
what is the easyest shape to cut? Round or square. Table top is 18mm x 600 x 700 mdf. What is standard size for mounting plate?
 
Wat is the easyest shape to cut? Round or square. Table top is 18mm x 600 x 700 mdf. What is standard size for mounting plate?
There's no such thing as a standard size, TBH. Perhaps you should look at the sizes of the standard ones

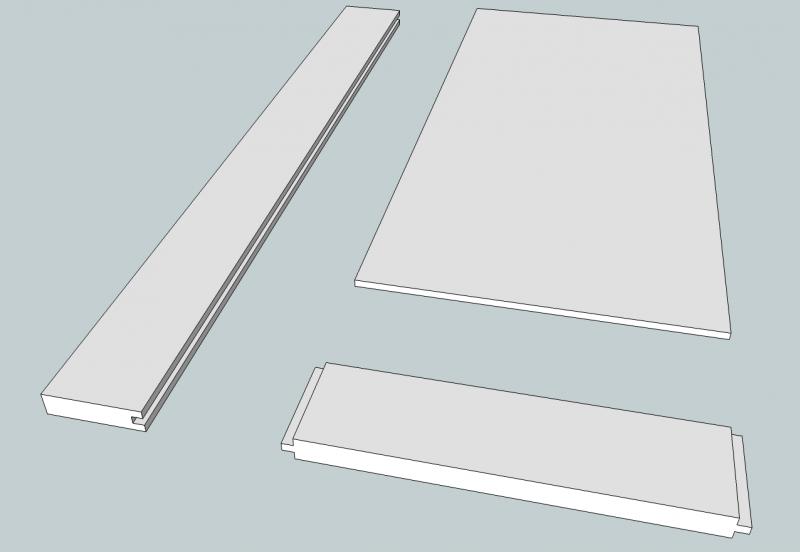
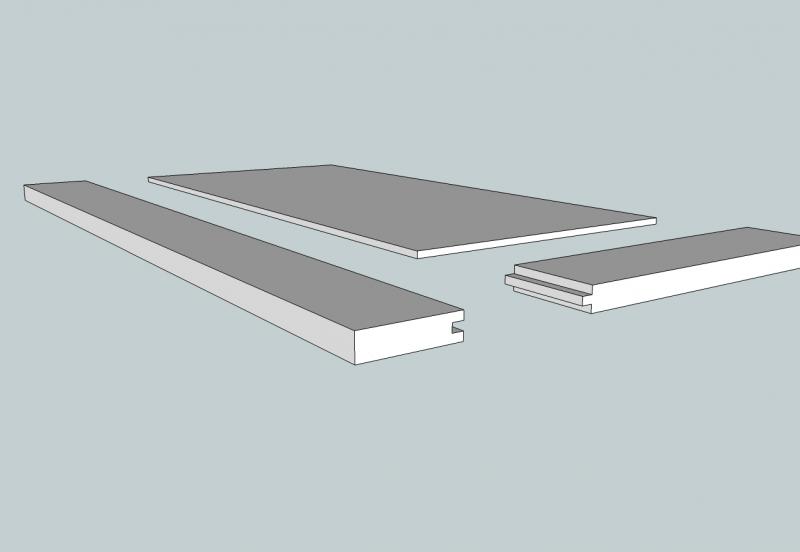
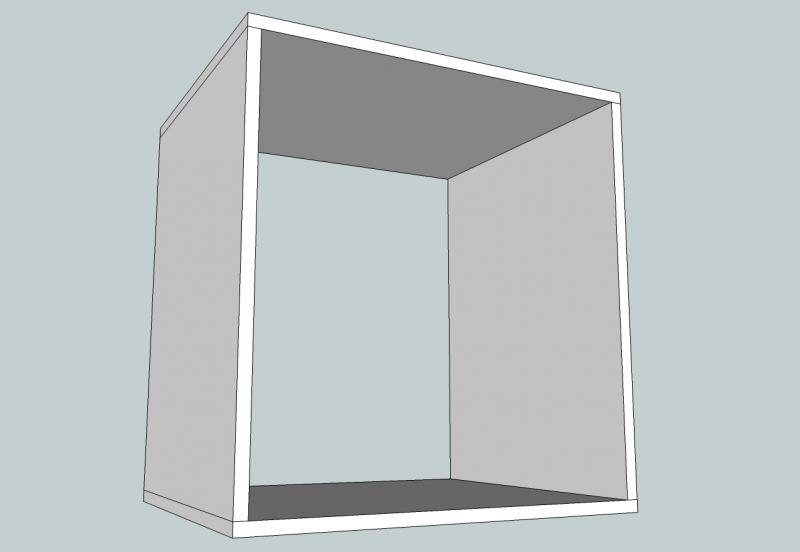
The basic router table I was envisioning is something like this:


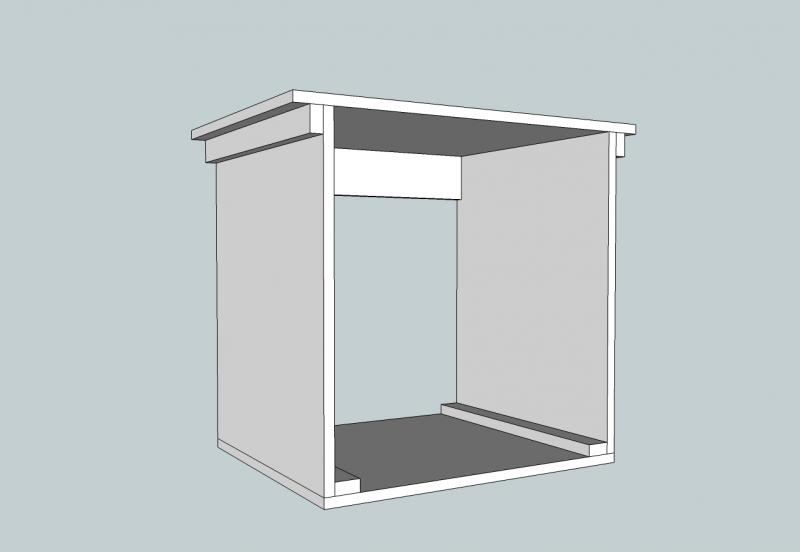
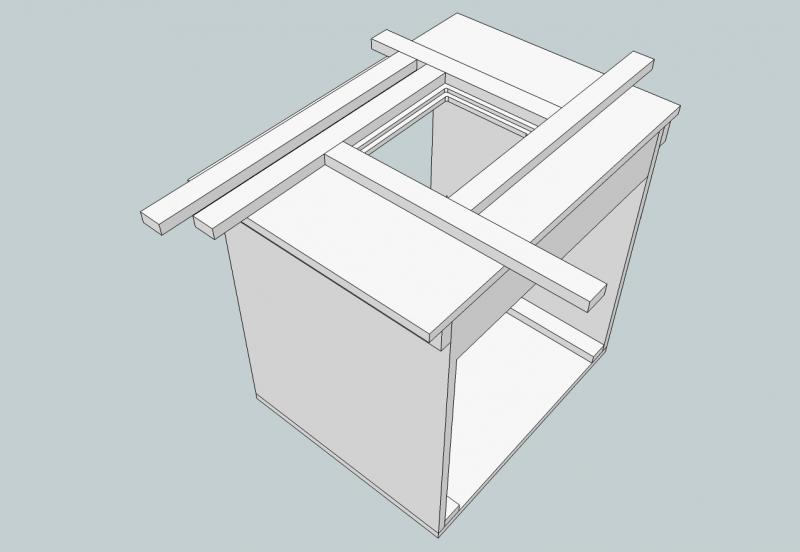
To make it stronger I'd make a small overhang for the top and add 2 x 1 PAR softwood cleats in the corners, plus an MDF brace (shown 100mm wide) at the back:


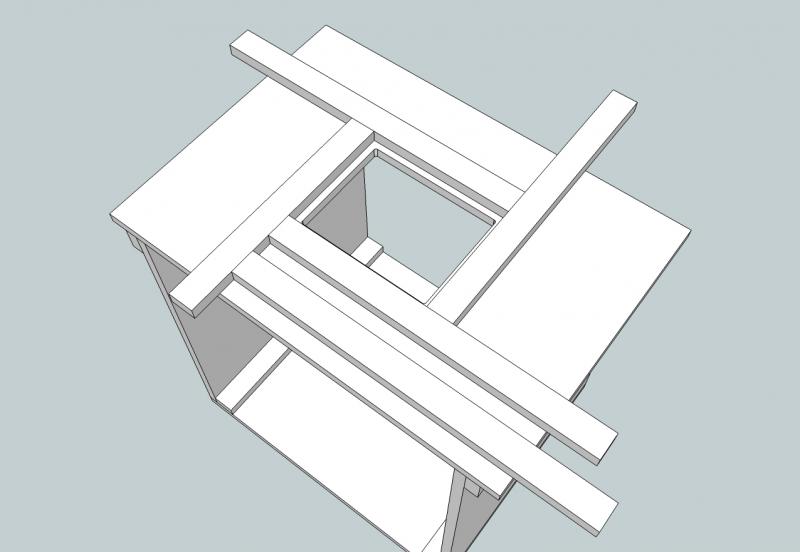
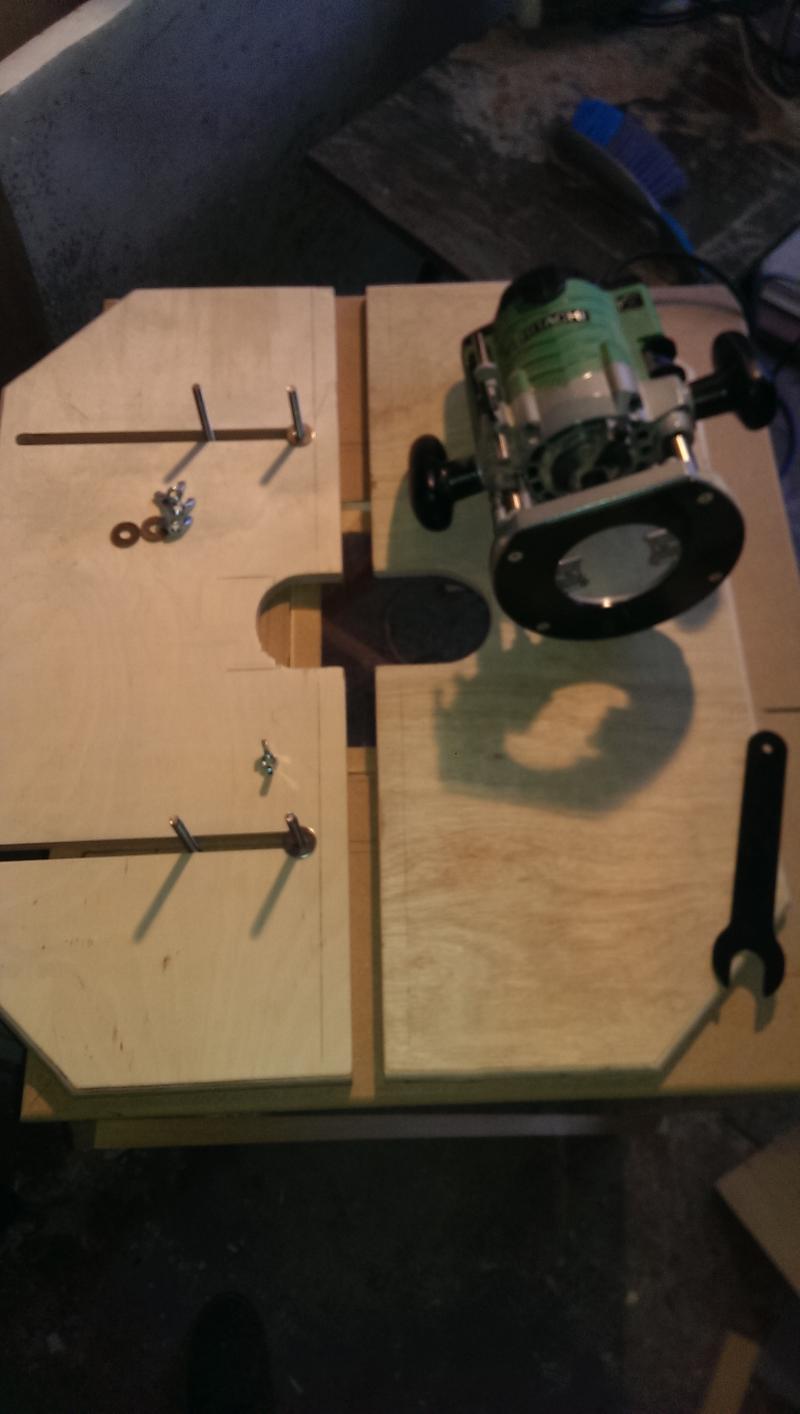
To rout-out for a router plate fix four 2 x 1in softwood cleats to for a template around where you want the opening to be. In this case I've opted to show it for an opening to be cut-out made using a 30mm guide bush and an 8mm cutter so giving a distance between the template and the opening of 11mm (30 - 8 / 2):


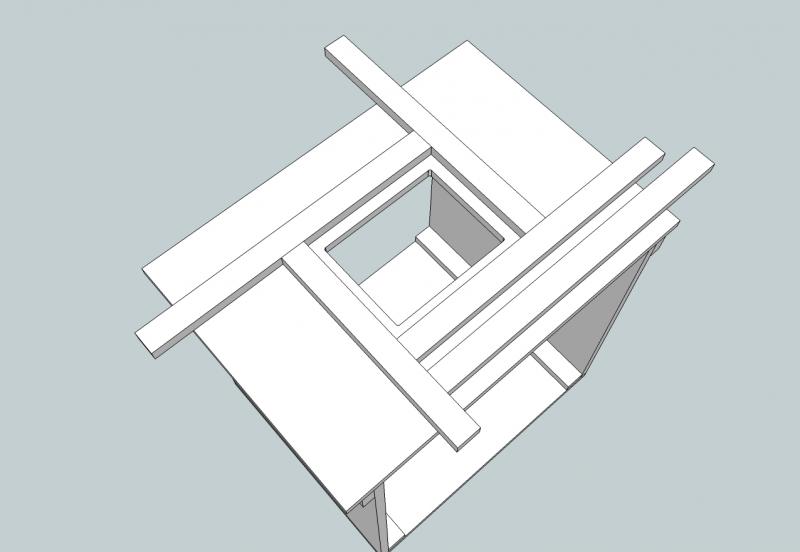
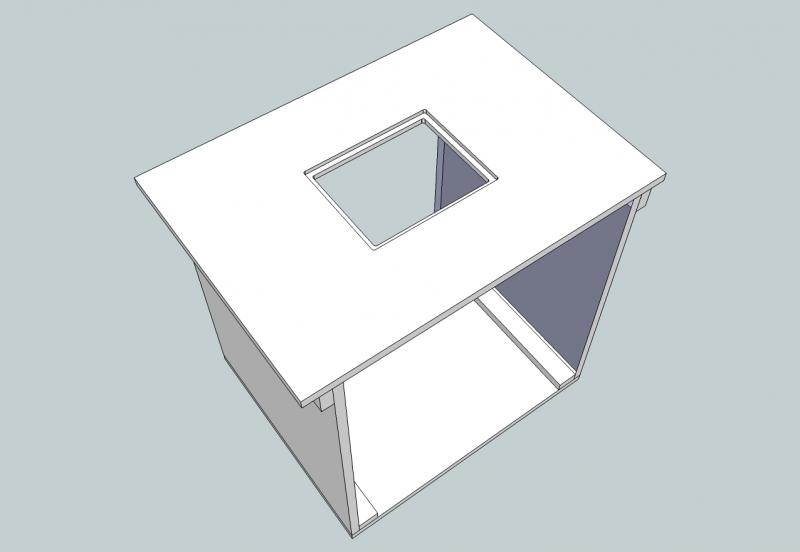
If it helps you to balance the router, double-up the cleats (one only shown). Here it's shown after the cut-out is done:


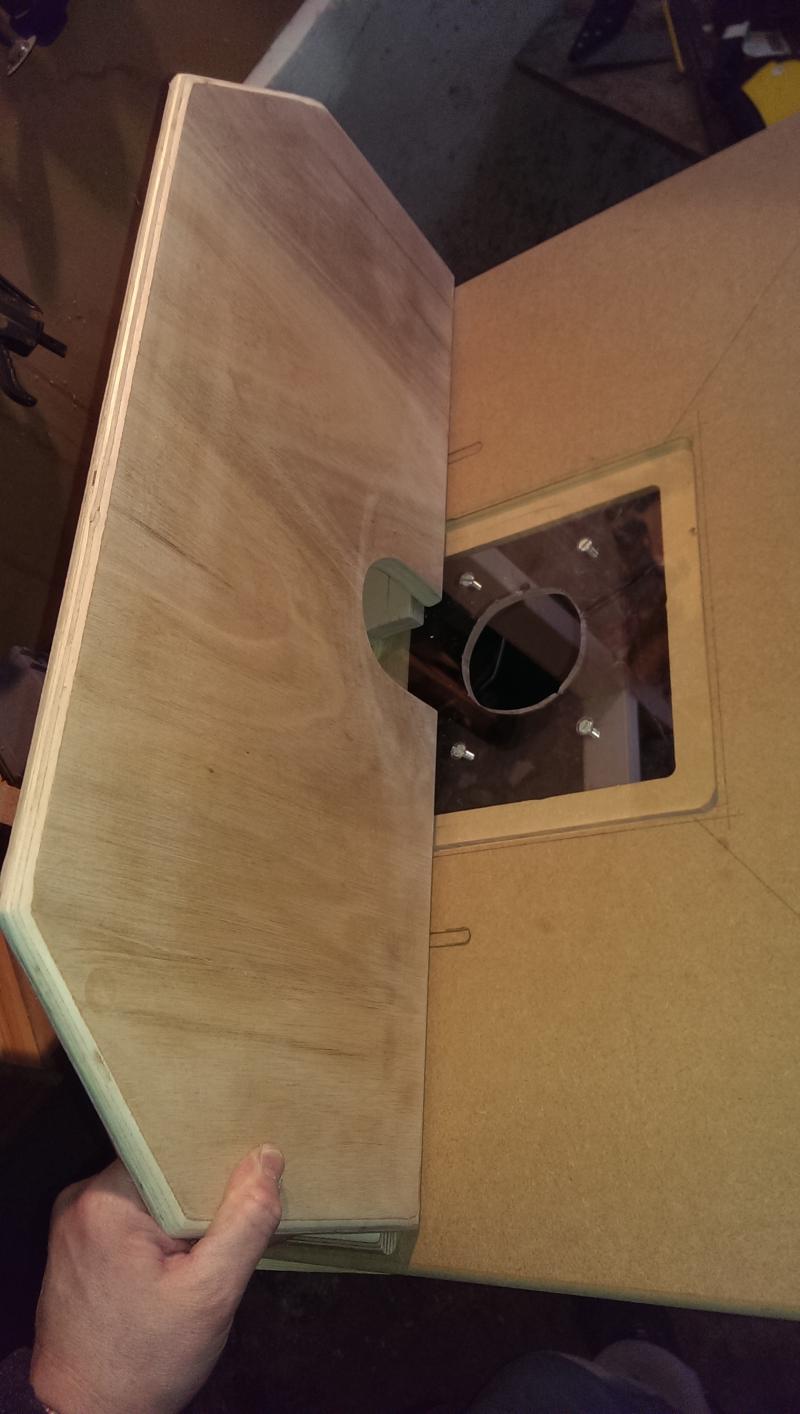
Next move the cleats out by 10mm to form a 10mm rebate ledge:


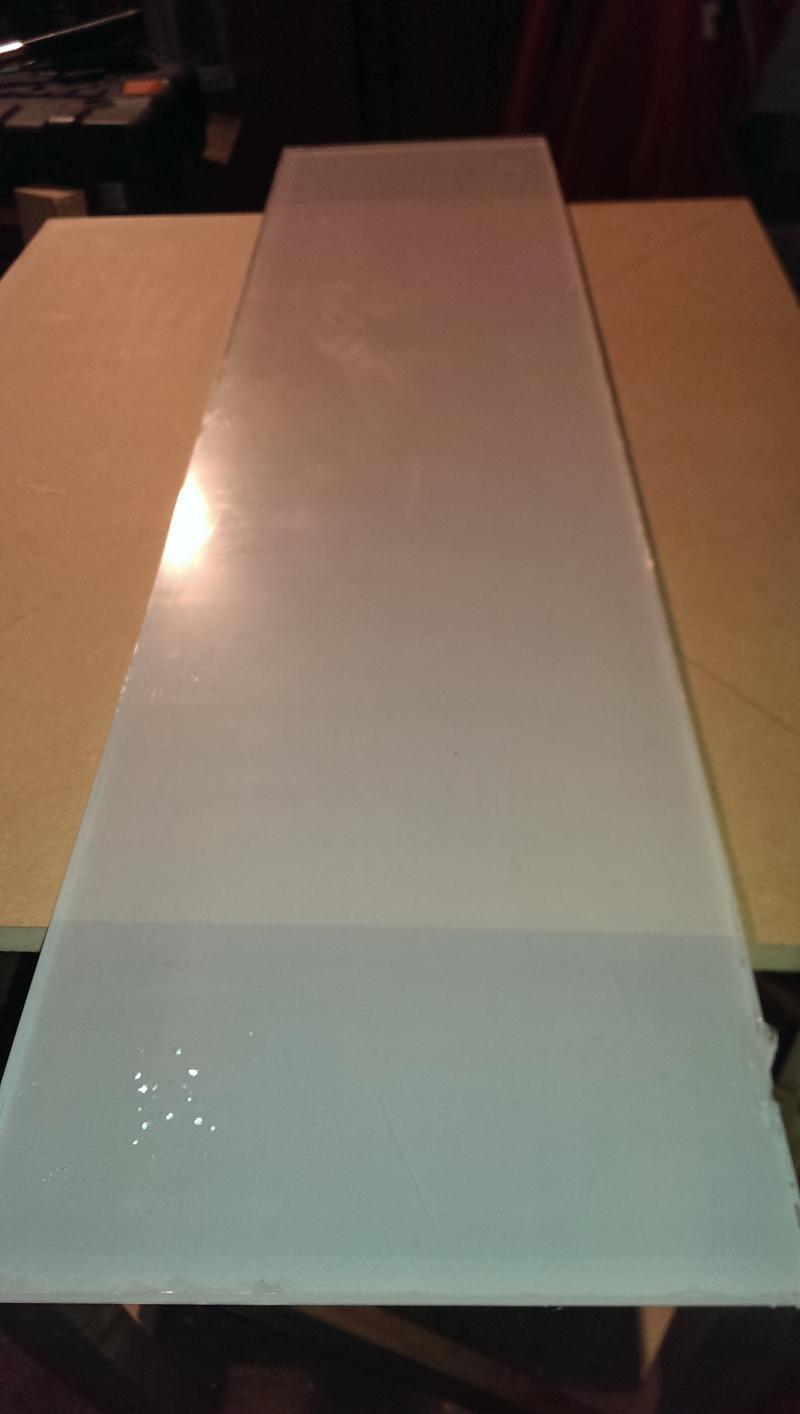
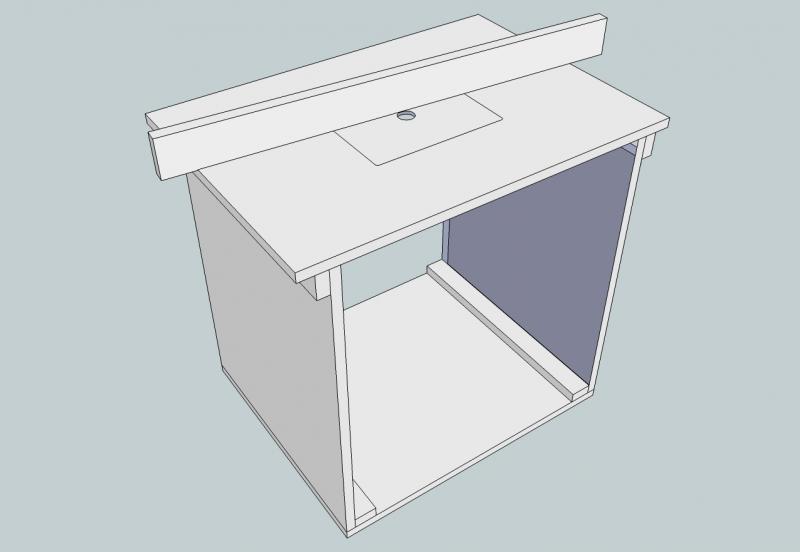
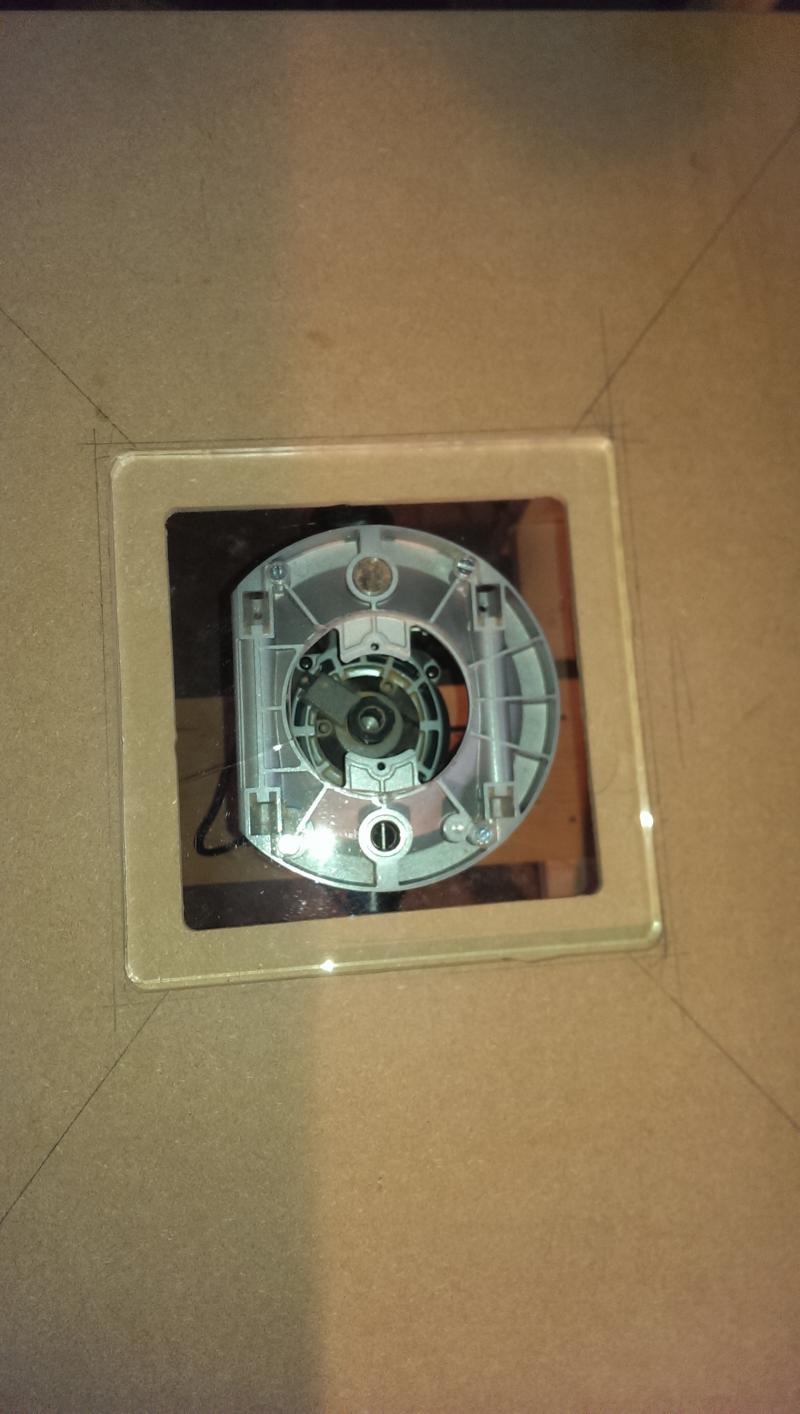
Set-up to route the rebate using the same cutter/guide bush setting. To set the depth pop your router on the template and without the motor plunge until the cutter stops at the surface of the MDF. Withdraw the depth stop flag, insert an offcut from the corner of your 10mm acrylic (remove the protective plastic) between the depth stop flag and the depth turret and drop the flag down onto the plastic. Tighten the depth stop flag. You've now set your depth of cut to match the material you'll be sinking into the top. Now rout-out the rebate to hold the router plate taking care not to tip the router:


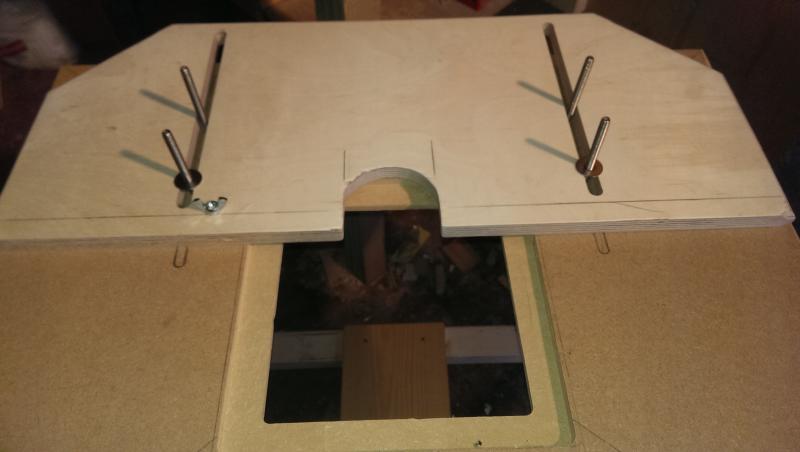
Remove the cleats and clean-up the top:


A hole should be drilled in the top near the edge on the same centre line as the router base plate to take a coach bolt. The fence (in this case a piece of 3 x 2in PAR softwood on edge) is also drilled and held to the worktop by drilling a hole for an 8 or 10mm coach bolt through the softwood and the worktop:


By pivoting the fence on the coach bolt the width of cut can be varied. the other end of the fence is secured using a G-cramp when making cuts. This is really basic and simple, but TBH it suits 80%+ of my needs

Sorry no photos - I chucked the last one away after it got a soaking, but I normally don't bother with the router plate, just drill a hole through the top for the cutter plus two smaller ones to screw the router to and away I go, so I can't really help with a plate size. I also have been known to use the scissor jack out of the van with a circular MDF "handwheel" as a cheap and cheerful router lift

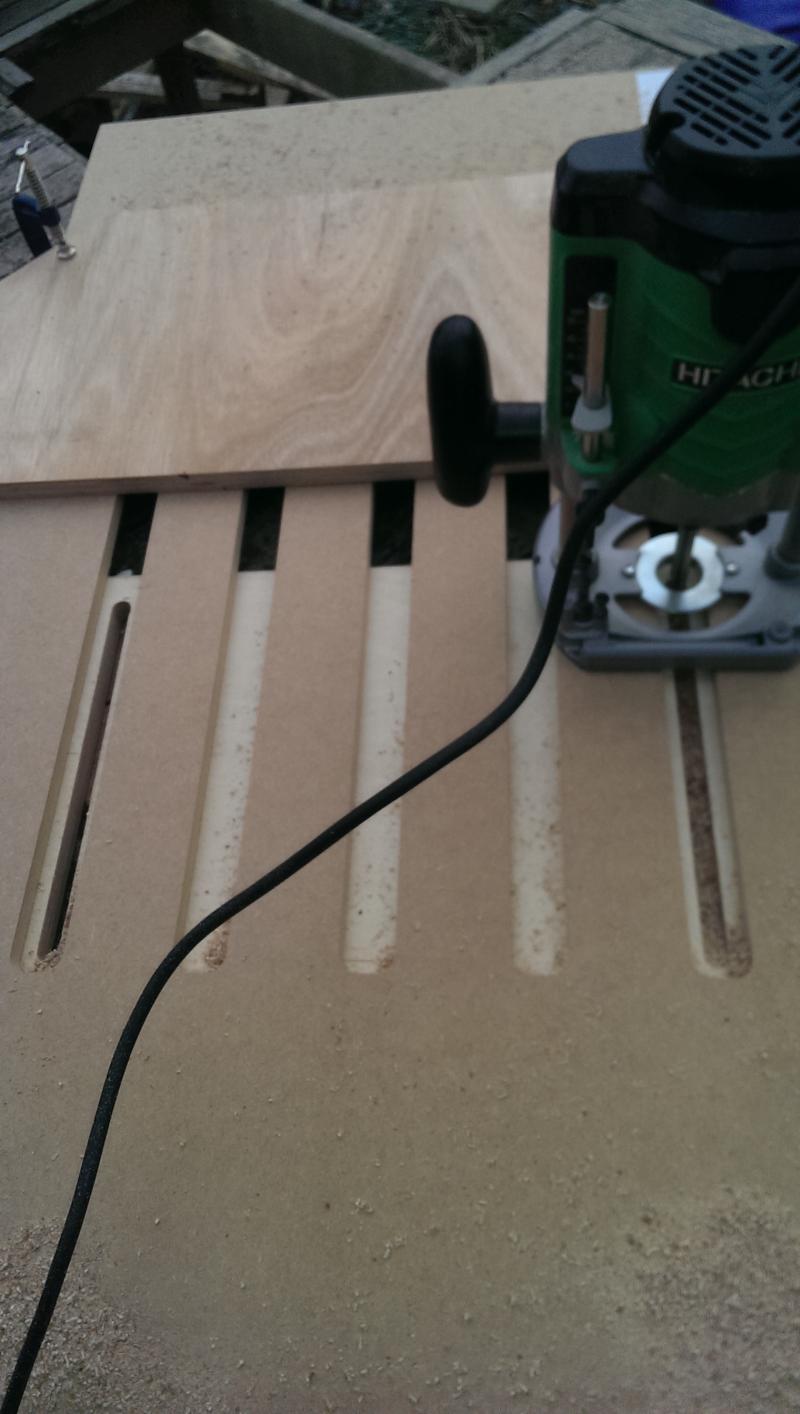
As to the insert I'd do the initial cutting with a hacksaw or jigsaw with a metal blade (needs fine teeth) after you've done the rebate - then use your router and a piece of MDF as a guide with a bearing template bit to trim the edges. Leave the plastic protective film on the acrylic while you route-it to protect and keep the amount you trim off down to 2 or 3mm width, no more, if you can. The corners can be rounded with a hand file to fit.

You can do the cut-out to act as a template, but that means buying two or three guide bushes and cutters - this way, whilst a bit more quick and dirty will get you up and working fast without buying much or anything extra
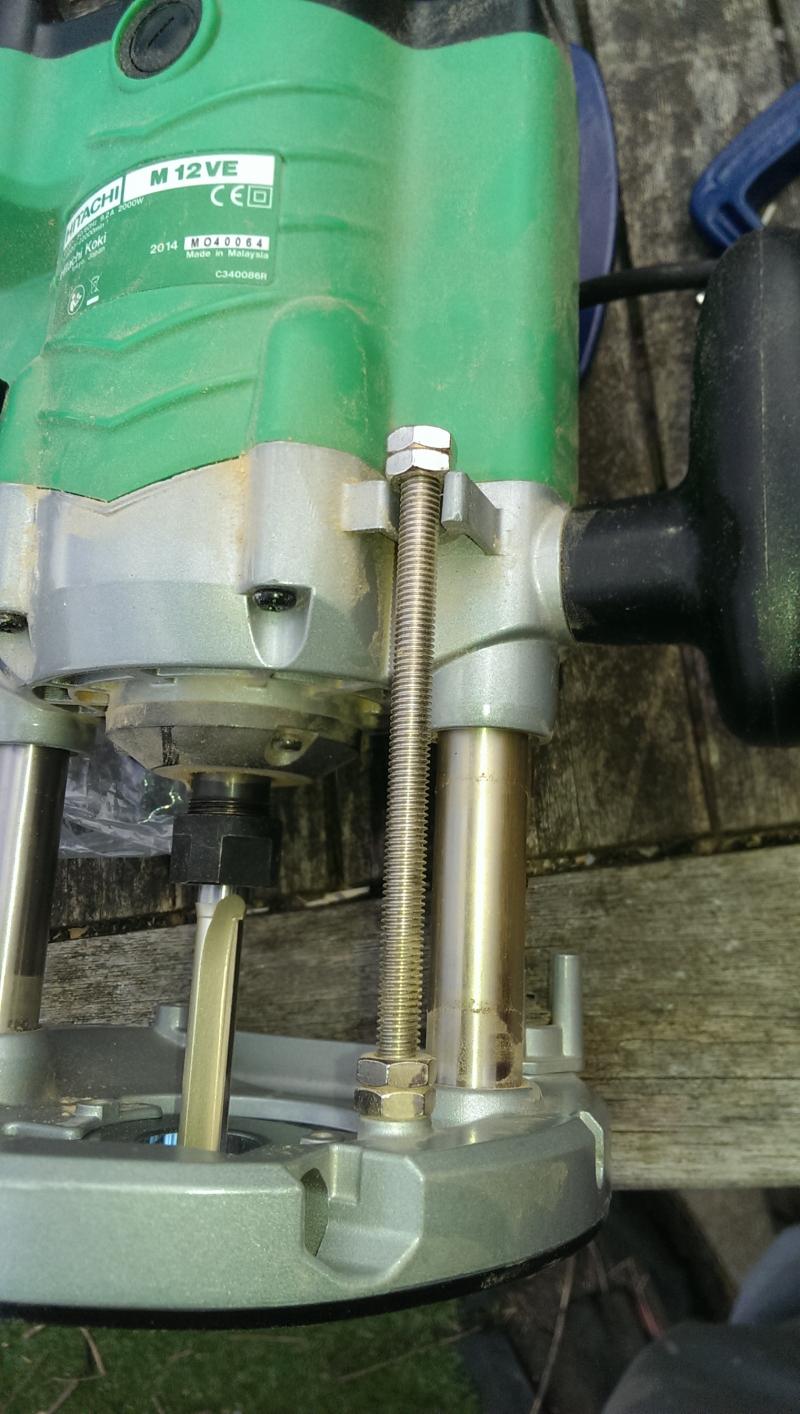
 
Well here she is so far. sorry about poor pics.
The table is sturdy and sound although cobbled together quick as lack of time and bad weather hampered progress. Im looking out for that spare car jack, and have shelf at the bottom for it.

I made mistakes, but am happy i learnt from them. And am getting well aquainted with my m12.
Thanks again JK, i was going to build a fence with two parallel cuts secured by 4 bolts, however your idea of one bolt swiveling makes sense.

Can i ask what the threaded column is for? :eek:

Also would anybody mind pointing me in the right direction of a nvr switch which does not need wiring as I am not au fai with electrics. There are loads available but most seem to be just the on off swithches!
 
Can i ask what the threaded column is for? :eek:
Threaded column??? What did I say???

would anybody mind pointing me in the right direction of a nvr switch which does not need wiring as I am not au fai with electrics. There are loads available but most seem to be just the on off swithches!
As you are so close, Axminster might have just what you need (£20)

Nice to see you've almost got there. Looking good! BTW what size top did you go for|?
 
Sorry, I wasnt very clear about that. I mean the threaded column on my router, manual says something about locking in depth? I wasnt refering to anything you said! Could column be used as lift tgrom top? I thought I saw a thread on it before...
:confused:
Switch ordered,thanks.
I am a little worried about size of top now, it was an offcut at woodyard. Just over 600 X 700.

I want to cut some wheels for back of table(good excuse to practice making and using circle jig), as i like to work outside when possIble due to lack of space as much as the sun. But cant quite figure how to keep stability when routing?
maybe a brake or way of lifting when not using. Any ideas?
 
Sorry, I wasnt very clear about that. I mean the threaded column on my router, manual says something about locking in depth? I wasnt refering to anything you said! Could column be used as lift tgrom top? I thought I saw a thread on it before...
Sorry for the confusion. As far as I'm aware there isn't a fine depth adjuster (like this one for the Elu MOF96) available for your router, although Trend technical in Watford might be able to assist. If you measure the diameter of the depth stop "flag" I can take a look at my kit to see if a DW part might fit. The Hitachi M12VE (your router) doesn't have a built-in fine depth adjuster, unlike the M12V2 (a different router which does have this feature). The through the top adjuster you refer to is probably the "Router-Raizer" - imported by Woodworkers Workshop at £80. You'll have to check about your model as it's not sold in the USA, so they don't list compatibility, but I cant see why it couldn't be made towork. TBH I'd just go with a CarJak router lift (TM) for now as £10 versus £80(?) makes financial sense to me - at least to start with

I am a little worried about size of top now, it was an offcut at woodyard. Just over 600 X 700
Why? I make them about that size, or possibly a bit smaller, depending on what I can cadge up.

But cant quite figure how to keep stability when routing?
maybe a brake or way of lifting when not using. Any ideas?
I presume you mean that the router is tilting when not supported. I'll give you two approaches:-

Approach One: Make-up a circle template full size, use the template to mark out the wheel on MDF, rough out your blank with a coping saw/jigsaw/bandsaw a couple of millimetres oversize - no more, fix the template to the top of the rough blank (two small screws or hot melt glue), set-up the router in the table with a panel trim cutter (I suggest diameter 19mm or 12mm, no smaller) and trim to size. Watch your fingers! A clear guard above the cutter is a good idea. Material is fed in from your right and rotated anti-clockwise. I suggest that you go no smaller than 100mm diameter.

A circle template can be made by screwing an empty can onto a piece of plywood (trimmed slightly oversize) and using that to create a plywood template in the router table as above

By using a router tabkle for copy routing you side-step the tipping issue

Approach Two: Make-up some router skis from two pieces of silver steel rod and two identical end supports out of 10mm acrylic. Harry over at the other place has posted quite a bit about router skis
 
Yes i am going to go with the scissor jack option, looks like it works well, is cheap and easy.

I did have a mini panic about the size but good to hear you have no problems with it.

This is the threaded rod I mentioned, im just not so sure what its purpose is. I did find the guide showing how to convert it into a top adjusting lift, but apart from voiding the warranty it looks much more complicated for me right now.

apologies again for not being clear, I have a habit of that when I lack the knowledge and terminology of some of you guys. The wheels I wanted are just two on the rear end so i can easily move the heavy table outside. But my concern is if I mount wheels on it will it be unstable when I am not moving it. If so how can I keep it steady. Does that make sense?
Im thinking some kind of easy brake or way of lifting the wheels up or down when needed.

I decided to go for parallel rails for fence, as I have seen this done and liked it. Being worried about getting them accurate I thought i would use my drainage jig with guide bush to form them, I mounted a block on end for correct distance. I used round over bit on edges to keep it neat and stop snags.

I am now waiting for dowel jig to arrive so I can join fence at 90°, if i get impatient I will try to biscuits them with router, and nvr switch as I wouldn't want to test it without.
Then I can practice until I have found my design for my kitchen cupboards.
 
This is the threaded rod I mentioned, im just not so sure what its purpose is. I did find the guide showing how to convert it into a top adjusting lift, but apart from voiding the warranty it looks much more complicated for me right now
Ahhhh. Right. What diameter is the thread? Looks like you could install a fine adjuster like the one sold for the DW625 and other routers (there are different thread sizes, so you'll need to measure):

The home made alternative is a nut welded into one end of a cheap tube wrench with a handle glued on at the other end ;) The nuts (a nut and a locknut) are there so that you can set a depth and lock it in if you are doing a lot of repetitive cuts, e.g. massses of repeat rebates, etc, with no risk of the depth being changed accidentally. The DW system with a sprung sliding nut is more sophisticated - but then you are paying another £70 or so for their router

The wheels I wanted are just two on the rear end so i can easily move the heavy table outside. But my concern is if I mount wheels on it will it be unstable when I am not moving it. If so how can I keep it steady. Does that make sense?
If you have two wheels on one side and two feet on the other with rubber covers (bits of rubber matting stapled on) the weight on the unit plus the friction of the rubber should go some way towards curing that. As will a bag of builders sand in extremis (a bag of that really does stop my lathe dancing around the cellar)

As to the fence the bolt and clamp approach is a "site solution", i.e. quick and dirty, but effective and cheap. And I thought that you were on a restricted budget originally.......
 
And I thought that you were on a restricted budget originally.......
yup? I wanted to have kitchen done by now. Have been saving for long time and keep having to shell out on other bits!
Cupboards are an ongoing project as an when I can aford wood.
Weight... yea I guess a bit of balast would solve that. It may not be a problem yet, will let you know. And measure bolt when I can. Hospital tommorow with my baby girl, may not be till weekend.

Your a diamond sir and a gent, your advice has been invaluable.
 
So, i have made fence which is secured by 4 bolts to adjust it.

I now need to make a rail to cut tounges for cabinets. Have any of you got any thoughts or tips as to best way to achieve this with accuracy. I am concerned it will be off square and ruin table.
I thought cutting a parallel groove to fence using router guide rail then attaching a block to a rail running in groove perpendicular. But am worried about strength of rail and achieving the accuracy needed.
I hope this makes sense.
 
I'm not reallly sure what you need to cut. When you say tongues do you mean as in tongue and groove joints (as per frame and panel doors), or something else?


If it is then I'd seriously recommend getting yourself a T&G set. Other than that a single 6mm groover with appropriate bearings should do the job on 18mm MDF, albeit with a bit more fiddling and multiple passes. IIt's always safest to work with the material flat on the bed of the router table

If you need some means to push a rail across the cutter, then a squared piece of MDF run against the fence will do the job - just cut a 12in square piece off the corner of a sheet and screw a bit of 2 x 1in softwood on top to act as a knob
 

DIYnot Local

Staff member

If you need to find a tradesperson to get your job done, please try our local search below, or if you are doing it yourself you can find suppliers local to you.

Select the supplier or trade you require, enter your location to begin your search.


Are you a trade or supplier? You can create your listing free at DIYnot Local

 
Sponsored Links
Back
Top