Shower Floor/Rotten CaberDek on Posi Joists

Joined
1 Jul 2019
Messages
24
Reaction score
1
Country
United Kingdom
Hi.

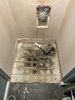
I live in a 2019 newbuild. Timber frame construction with Posi Joists and Caberdek upstairs flooring. I have a recessed shower cubicle and have noticed the shower pan (plastic/polystyrene) has cracked. I dismantled the shower cubicle and pulled up the failed pan (only siliconed around the edge). It appears Mr H Basher the plumber chucked a bit of plastic under the tray so it hasn't sat perfectly level, likewise there has obviously been a leak which has made the floor go moudy. The floor is sufficiently damaged and will need replacing.

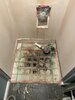
My question is about cutting the Caberdek out. I can do this (I have a picture from first fix so know where the plumbing/cabling below is) but the stud walls forming the enclosure do not sit on joists and sit ontop of the Caberdek. I really don't want to remove the stud walls if I can help it. The recess has two joists running through it on 600mm centres. So if I remove the whole area of the recess, how do I support a piece of ply on the two unsupported edges?

Photo including one I've editted to show the Caberdek edges and joist locations.
 

Attachments

  • Untitled.jpg
    Untitled.jpg
    402.1 KB · Views: 116
  • Untitled2.jpg
    Untitled2.jpg
    404.6 KB · Views: 123
Sponsored Links
How bad is the chipboard - yes it is black, but is it badly swollen and punky (soft)? Do you think there is any possibility that it could be dealt with by using a wood hardener?

I thought it was odd that there are no noggins in there, so I went off and looked at the Mitek web site, finding a downloadable PDF file here called "The Posi-Joist Technical Handbook". On page 16 of that handbook is what I reckon is your solution:

Posi Joist Non-Load Bearing Wall Noggin.png

From that, I gather that there should be noggins in there beneath the wall. If there aren't, you'll have to put them in - an awkward task, but doable, and you'll also need to fishplate the existing floor so that you can carry the edge of the new floor:

Post Floor Repair 001.jpg
Post Floor Repair 002.jpg
Post Floor Repair 003.jpg

Post Floor Repair 004.jpg
Post Floor Repair 005.jpg


I'd consider taking the floor out in small sections so that you can get individual noggins in whilst some of the floor supports the rest of the stud wall (pink). The noggins will need to be the same thickness as the top timbers of the Posi-Joists - I'd fix by angle drilling pilot holes with countersinks and screwing (something like 5.0 x 100mm) as it will be impossible to retrofit a Z-clip beneath the glued-down floor. You should use Z-clips in the area where the floor is to be replaced and where you have clear access (you are supposed to use them at both ends). BTW, this is a Z-clip, It is designed to add load to the joist through the top:

Z-Clip.JPG


The fishplate (green) is 18mm plywood, about 120 to 150mm wide, and needs to be glued and screwed to the underside of the existing floor beneath the stud walls. This is a very awkward task to perform but can be performed with an angle impact driver and a lot of bad language! Alternatively an impact driver and an angle adaptor will also work (but the adaptor may fall apart quite quickly)

The new section of flooring (bright blue) is glued and screwed to the tops of the existing joists as well as to the tops of the fishplates. I'd recommend a low expansion PU flooring glue, but the Posi-Joist probably have a recommended adhesive in their handbook

Not the easiest job to do, but I think it is do-able without too much disruption. An alternative, depending on what the position of the services is (or if you find that you cannot do it from above), would be to remove a section of the ceiling below and work through the opening, although that is somewhat messier and involves making good a ceiling afterwards
 
Last edited by a moderator:
A 2019 new build - surely this is the developers problem to fix?
 
Why don't you just glue a bit of 18mm ply onto to the top of the damage caberdek and raise the shower tray and enclosure slightly. Then there is no need to cut out the damaged area.
 
Sponsored Links
Warranty won't cover that, as to the morals of that, that's another question.

How bad is the plywood - yes it is black, but is it badly swollen and punky (soft)? Do you think there is any possibility that it could be dealt with by using a wood hardener?
It's difficult for us to tell of course but it doesn't look that bad, Caberdek isn't ply either of course. Once you scrape all the adhesive off, what about sticking a 6mm sheet of aquapanel over the lot, assuming the drain can be extended a little. But then that will surely need modifying at least a bit to suit the new tray anyway.

Otherwise I agree it's all just awkward and you'll need to be a contortionist to get those noggins in there.
 
Yes , I've used Caber P5 chip in the past, the "plywood" was just a slip of the fingers... (since edited to correct)

Like you I don't think it looks too bad - my preference would be to try and stabilise the chipboard with wood hardener if possible - but the OP does say that it is a recessed shower tray so how feasible it would be to overclad the floor there I don't know. I'm surprised that on what I assume is a bespoke built house the floors and walls weren't clad with a water resistant panel such as cement fibre board

As to awkward, yes, very. I have done a retrofit on a space joist floor (very similar) once before where the guys joisting out had missed some noggins and it was an absolute horror of a job. I did say never again afterwards and I kept my word!
 
Thanks for the comments and help diagrams so far guys!

I’m running the dehumidifier for a day or two to see where we are. Certainly I can push a flat head screwdriver into the worst bit but it doesn’t go all the way through. The mould is pretty fury so how would I need to treat this?

I’ve cut a hole in the middle with a 100mm hole saw. I need to get my camera down there and see if I can see noggins under the stud.

I can get to the other side of the stud on the left so could cut a circular hole over the joist to get the z-clip for two noggins. I need to see what clearance I have because potentially I could try to sister the joist to catch the floating boards I’d create.

The en suite which the shower sits in is tiled (did this myself with 6mm Hardie Backer under).

I wonder, if the floor at the top right of the cubicle (by the drain, the worst bit) isn’t totally knackered, I could just cut the board out between the two joists, add noggins or 22mm ply between the joists (with batons to catch it per the Mitek documentation) then another piece of ply on top to bring it back to the existing level. Then hardie backer on top to sort out any level issues.

It’s a shower enclosure which I plan to get a new tray for (£300!!) and reuse. I will be tanking the bare plaster behind before refitting just for piece of mind
 
The mould is pretty fury so how would I need to treat this?
Strong bleach, e.g. Parazone, will kill black mould.

I could try to sister the joist to catch the floating boards I’d create.
AFAIK you aren't supposed to sister these joists in case it applies uneven loading to the joist structure and twists them. or so I've been told. Maybe I've misunderstood what you meant

I could just cut the board out between the two joists, add noggins or 22mm ply between the joists (with batons to catch it per the Mitek documentation) then another piece of ply on top to bring it back to the existing level. Then hardie backer on top to sort out any level issues.
A repair like that is possible providing you support the wall on noggins and the floor edges are fish-plated as far as possible. I'd certainly want to have that floor tanked properly this time were I you
 
So the floor has been drying and I've scraped them mould off today. The chipboard looks a little 'lumpy' and I can get a screwdriver in about 5mm with hand force on the handle. The worst of the mould is on a joint and it appears the joint has puffed slightly. Do people think I need to replace this or can I get away with wood hardener and overboarding with a piece of 18mm ply or 12mm Hardie Backer?
 
If your screwdriver won't go through and it is confined to the immediate area of the joint I'd definitely comsider wood hardener then overboarding. It's a lot of work doing it the other way for limited gains
 

DIYnot Local

Staff member

If you need to find a tradesperson to get your job done, please try our local search below, or if you are doing it yourself you can find suppliers local to you.

Select the supplier or trade you require, enter your location to begin your search.


Are you a trade or supplier? You can create your listing free at DIYnot Local

 
Sponsored Links
Back
Top