Smooth drill operation when drilling downlight holes

Joined
30 Mar 2015
Messages
3,849
Reaction score
58
Country
United Kingdom
I am using a bosch holesaw with my Makita cordless drill.
I find that this is often hit-and-miss for me. On occasions it will work fine and provide a nice clean hole and on other occasions it will jerk aggressively and even mark some of the teeth outside the hole area as it has slipped and inflict force against my wrist.

I think it goes wrong when I am being slow and careful with my drill. Is the idea to do this with maximum revs on the drill?
 
Sponsored Links
The drill should follow the pilot drill. Perhaps you are not drilling at 90 degrees to the surface.

It might be advisable to reduce the torque setting on the drill to minimise the risk to your wrist.
 
I think it goes wrong when I am being slow and careful with my drill. Is the idea to do this with maximum revs on the drill?
I think that it's definitely more likely to 'catch' (and then potentially jump around etc.) if it is rotating slowly. In my experience it's best to get the drill running at high speed before ('gently') allowing any of the teeth to touch the plasterboard/whatever.

The worst thing of all is to have any of the teeth touching the plasterboard when you 'turn the drill on'.

Kind Regards, John
 
Sponsored Links
Does your Makita have a side handle?
Are you high enough up to have a good firm grip on the drill, or teetering atop a small ladder?
 
They're usually ok if you're working at the right height, square on etc.
Top tip- cut a hole in a bit of scrap plasterboard or whatever sheet material you have to hand. Put a flat bit of rag between template and ceiling (gives more friction), hold it there while you get the hole established
 
When I drill plastic with a holesaw I run the drill in reverse after drilling the pilot, might work on plasterboard, just wears itself through gently.
 
Does your Makita have a side handle?
Are you high enough up to have a good firm grip on the drill, or teetering atop a small ladder?
No side handle and I made sure I was high up on this occasion. Worked a treat!
 
UPDATE: following the advice provided above, I was able to drill out the holes without any incident.

Except…
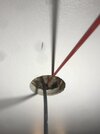
One of my holes is hitting 2mm of the joist. I had done some inspection beforehand and thought I was clear but obviously not!
A95BFC98-855B-4E73-8051-73FC439DAEC4.jpeg

I moved the other holes in this line over by 1.5cm and it’s barely noticeable. I need to resolve this though. Could I leave here and somehow shave some wood of the joist? Alternatively, how will I drill a new hole 1.5cm away?

Thanks again
 
.... Could I leave here and somehow shave some wood of the joist? Alternatively, how will I drill a new hole 1.5cm away?
You could never do that with the (rotating) hole saw - you'd have to use either a padsaw/jigsaw/whatever (maybe even a hacksaw blade, ideally in a 'handle that effectively turned it into a padsaw) or a sharp knife (e.g. 'Stanley') - but you'd probably then have to do some 'making good' at the other side, unless the downlight has a very substantial bezel.

Kind Regards, John
 
Is shaving some wood off the joist an option?

If a new hole is necessary, can I fill the current hole with the plasterboard cutout I removed (and easifill) and then try a new hole?
 
Is shaving some wood off the joist an option?
In a literal sense it clearly is an option and, to be honest, is very probably what I would do - but I would expect some people to moan if I suggested it here :)
If a new hole is necessary, can I fill the current hole with the plasterboard cutout I removed (and easifill) and then try a new hole?
Sure, I almost mentioned that approach, which I would think could work- provided that you got the cutout 'well stuck back in' (otherwise it would probably fall out when you tried to make the new hole. If I were doing that, I think I might well wiggle in a piece of wood above the plasterboard, spanning the hole, and screw the 'cutout'to it (pulling the wood tight against the top of the plasterboard), to make sure it stayed in place when I made the new hole.

Kind Regards, John
 
In a literal sense it clearly is an option and, to be honest, is very probably what I would do - but I would expect some people to moan if I suggested it here :)
Narrow chisel and hammer? Can’t see how I can use any power tool in this situation.

If I were doing that, I think I might well wiggle in a piece of wood above the plasterboard, spanning the hole, and screw the 'cutout'to it (pulling the wood tight against the top of the plasterboard), to make sure it stayed in place when I made the new hole.
Since my new hole is only 1.5cm away from the current hole, I don’t have much space for a wood above the ceiling to screw the cutout to. It will innevitably come in the way of the new cut out. Is that what you are suggesting?
 
The joist is sized to support the weight of the roof and cope with the stresses of the roof construction. You shouldn’t be making them smaller.
But even if you shave some off, will you comply with the maker’s spacing requirements.
More care in measuring needed.

End of criticism. Re guarding your wrist and hole saws. As mentioned above, run the drill in reverse, it takes longer, but it’s smoother.

Also, set the Chuck to one of the medium screwdriver settings, not the drill setting. Then if the saw catches, the drill will just buzz, and not wrench your wrist.
 

DIYnot Local

Staff member

If you need to find a tradesperson to get your job done, please try our local search below, or if you are doing it yourself you can find suppliers local to you.

Select the supplier or trade you require, enter your location to begin your search.


Are you a trade or supplier? You can create your listing free at DIYnot Local

 
Sponsored Links
Back
Top