Hi all, its been a few months without a leak in our fantastically built Redrow property (sarcasm)...
The latest one first got noticed when we had a little damp patch above our grey skirting between the kitchen and dining room around March time this year (an area we opened up when we moved in in 2017, took a wall out etc).
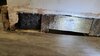
After reluctantly removing the skirting and some lower plaster a lot of damp was seen on the floor substrate and on the lower breeze blocks.
I called a local damp expert who suggested the DPC had probably been clipped when we took the wall out in 2017 and wanted to inject new chemical dpc, coat and re plaster for £750.
Coincidentally our neighbours (same house design and also done similar work to his house) noticed his skirting coming away in the same location.
Fast forward 2 months and he located a pipe in the main stack which had a 1cm hole in it, every time the main bathroom was used water was coming out of it. He uses his main bathroom a lot as they have 2 kids, ours barely gets used except the odd toilet flush every few months as we use the en suite at the front of the house. He had also had the main bathroom recently replaced so you can imagine he was confident this was linked, we had also had the rear Garden extensively landscaped late last year so equally without bouncing off each other we would have gone down various dead end rabbit holes...thankfully we had enough notice to avoid a waste of £750 from the damp expert.
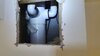
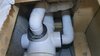
To cut the story short he found the leaking pipe with the hole (no idea how or why the hole is there) and I cut a the same square ours to view the waste stack. As can be seen on the attached photos there is no hole but ours is leaking from the join to the main stack pipe that goes under the house into the ground. Clearly the fantastic Redrow contractors know how to use plastic weld, Not!
So despite both houses having wet in the same area and caused by the same stack pipe from the main bathrooms, and finding the damp within a few weeks of each other they are it seems completely unrelated!!! Very odd.
My question is what is the best way of sorting this on mine?
I've tested with running the bath, separately running the sink both cause dripping from the location in the photos within minutes. Flushing the toilet causes water in the same place but much more prolonged for some reason. In fact before cutting the hole flushing the loo a few times would after a day or so cause significant pooling on the floor at the bottom. I'm not sure why a flush or 2 would cause the water to drop for over a day from stack, surely 99% of water goes down the stack and then the odd bit that doesn't would leak out but stop pretty quickly??? Any ideas?
More importantly any suggestions on sealing the join to stop any water whatsoever coming out? Avoiding completely ripping the bathroom floor up. Fortunately it does appear to be just the area in the photos and not of the more fidddly joints higher up in the space above.
We are expecting our first baby in a week or so so the main bathroom will actually probably get used a more so could do with this rectifying asap.
Many thanks for your advice
Liam
The latest one first got noticed when we had a little damp patch above our grey skirting between the kitchen and dining room around March time this year (an area we opened up when we moved in in 2017, took a wall out etc).
After reluctantly removing the skirting and some lower plaster a lot of damp was seen on the floor substrate and on the lower breeze blocks.
I called a local damp expert who suggested the DPC had probably been clipped when we took the wall out in 2017 and wanted to inject new chemical dpc, coat and re plaster for £750.
Coincidentally our neighbours (same house design and also done similar work to his house) noticed his skirting coming away in the same location.
Fast forward 2 months and he located a pipe in the main stack which had a 1cm hole in it, every time the main bathroom was used water was coming out of it. He uses his main bathroom a lot as they have 2 kids, ours barely gets used except the odd toilet flush every few months as we use the en suite at the front of the house. He had also had the main bathroom recently replaced so you can imagine he was confident this was linked, we had also had the rear Garden extensively landscaped late last year so equally without bouncing off each other we would have gone down various dead end rabbit holes...thankfully we had enough notice to avoid a waste of £750 from the damp expert.
To cut the story short he found the leaking pipe with the hole (no idea how or why the hole is there) and I cut a the same square ours to view the waste stack. As can be seen on the attached photos there is no hole but ours is leaking from the join to the main stack pipe that goes under the house into the ground. Clearly the fantastic Redrow contractors know how to use plastic weld, Not!
So despite both houses having wet in the same area and caused by the same stack pipe from the main bathrooms, and finding the damp within a few weeks of each other they are it seems completely unrelated!!! Very odd.
My question is what is the best way of sorting this on mine?
I've tested with running the bath, separately running the sink both cause dripping from the location in the photos within minutes. Flushing the toilet causes water in the same place but much more prolonged for some reason. In fact before cutting the hole flushing the loo a few times would after a day or so cause significant pooling on the floor at the bottom. I'm not sure why a flush or 2 would cause the water to drop for over a day from stack, surely 99% of water goes down the stack and then the odd bit that doesn't would leak out but stop pretty quickly??? Any ideas?
More importantly any suggestions on sealing the join to stop any water whatsoever coming out? Avoiding completely ripping the bathroom floor up. Fortunately it does appear to be just the area in the photos and not of the more fidddly joints higher up in the space above.
We are expecting our first baby in a week or so so the main bathroom will actually probably get used a more so could do with this rectifying asap.
Many thanks for your advice
Liam