• Looking for a smarter way to manage your heating this winter? We’ve been testing the new Aqara Radiator Thermostat W600 to see how quiet, accurate and easy it is to use around the home. Click here read our review.

Stairs switches

Joined
21 Dec 2006
Messages
150
Reaction score
3
Location
Surrey
Country
United Kingdom
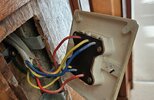
I have old light switches at the top and bottom of my stairs and I want to change them to new ones. I have found this is the wiring set up for them at the moment.

Downstairs switch is labelled like this

Top row connectors

A (COM) - red
B (1 WAY) - yellow
B (2 WAY) - blue

Bottom row connectors

A (1 WAY) - yellow
A (2 WAY) - blue
B (COM) - red


Upstairs switch is labelled like this

Top row connectors

A (COM) - red
B (1 WAY) - blue
B (2 WAY) - yellow

Bottom row connectors

A (1 WAY) - yellow
A (2 WAY) - blue
B (COM) - red

Does this sound right???? Why is the yellow and blue not connected in the same way upstairs and downstairs? (puzzled)
 
The switch is a bit of metal wire permanently connected at COM. That metal wire then moves between the other two connection points, connecting COM to A1 or A2 in your example.

Hence it does not matter which of the pair of wires is in A1 or A2 as both of these connectors look the same to those two wires.

If you did switch the wires around (between A1 and A2) then the only difference you will see is that the switch itself will now seem upside down to the position it was in before.

See here for a diagram. The second diagram with three parallel wires is the most relevant to you. Consider the middle line as your red wire. And the outside lines as your yellow and blue wires.

Sfk
 
Last edited:
Also - do not treat it as top row and bottom row.

The switches are each a triangle - one A and one B.

Thank you. Thinking of them as top and bottom row was very confusing. However, now that you have advised to think of them as triangles make a lot more sense!
 
The switch is a bit of metal wire permanently connected at COM. That metal wire then moves between the other two connection points, connecting COM to A1 or A2 in your example.

Hence it does not matter which of the pair of wires is in A1 or A2 as both of these connectors look the same to those two wires.

If you did switch the wires around (between A1 and A2) then the only difference you will see is that the switch itself will now seem upside down to the position it was in before.

See here for a diagram. The second diagram with three parallel wires is the most relevant to you. Consider the middle line as your red wire. And the outside lines as your yellow and blue wires.

Sfk

Thank you. This is the existing downstairs switch connection. Does it matter which live / red wire go into COM1 and COM2 (as long as the two neutrals on the same cable goes into the L1 and L2 on the same triangle)?

The new switches have COM1 and COM2, whereas the old switches shown just has label, "TOP" and then COM and COM at top and bottom of the switch.
 

Attachments

  • downstairs.jpg
    downstairs.jpg
    316.2 KB · Views: 93
This is the existing downstairs switch connection. Does it matter which live / red wire go into COM1 and COM2 (as long as the two neutrals on the same cable goes into the L1 and L2 on the same triangle)?
It does not matter.
To double clarify, all of the wires in a gray cable have to go into one of the triangles. (Ie one grey cable into one sperate triangle).

You choose which triangle based on which switch you want to use. Typically you have the switch to control the light in the side nearest the light.

Hope that sort of makes sense.

Thank you, that is very clear instructions :giggle:(y)
 
Also...
If you find a switch is upside down (I like all my switches when the light is off to be pushed in at the top of the switch) then swap the A1 and A2 over which each other (blue and yellow wire)


ALSO, you mentioned the two wires being 'Neutral
The blue and yellow wires ARE NOT neutral. The red wire is live and when you switch over the switch you are switching the 'Live' in the red into one of those two yellow and blue wires. They are then 'Switched Live' wires.

The colour of the wires does not always define what it is carrying.

There is actually no Neutral in that switch. In your case The Neutral wire is in the Ceiling Rose.
 
Last edited:
Also...
If you find a switch is upside down (I like all my switches when the light is off to be pushed in at the top of the switch) then swap the A1 and A2 over which each other (blue and yellow wire)


ALSO, you mentioned the two wires being 'Neutral
The blue and yellow wires ARE NOT neutral. The red wire is live and when you switch over the switch you are switching the 'Live' in the red into one of those two yellow and blue wires. They are then 'Switched Live' wires.

The colour of the wires does not always define what it is carrying.

There is actually no Neutral in that switch. In your case The Neutral wire is in the Ceiling Rose.

Thanks for the info!

I called them neutral because the guy in the youtube video called them neutral :LOL: Thank you for the correction in terminology.

I have an existing light switch that is upside down and it is a bit annoying, so I now know how to change that :giggle:
 
I have an existing light switch that is upside down and it is a bit annoying, so I now know how to change that :giggle:
What you have learned is only applicable in the case of a "2-way" switch (i.e. one with three terminals, like those discussed above). If you had a simple "1-way" switch (with just two terminals) the only way you could get it to 'work the other way around' would be to physically rotate the switch by 180 degrees (which you can do).
 
Also:

Also...
If you find a switch is upside down (I like all my switches when the light is off to be pushed in at the top of the switch) then swap the A1 and A2 over which each other (blue and yellow wire)
... bear in mind that with a two way system both switches pushed in at the bottom will also be light off.

Both switches in the same positions - light off
The two switches in opposite positions - light on. :)
 
What you have learned is only applicable in the case of a "2-way" switch (i.e. one with three terminals, like those discussed above). If you had a simple "1-way" switch (with just two terminals) the only way you could get it to 'work the other way around' would be to physically rotate the switch by 180 degrees (which you can do).

I did think that my one way switch only had one COMM and one L1 so there is no way to swap the L1 and L2 but I couldn't rely on my memory. I couldn't turn the switch round because there was no space inside but with the new switch that I have bought, there may be more space. Thanks.
 
Also:


... bear in mind that with a two way system both switches pushed in at the bottom will also be light off.

Both switches in the same positions - light off
The two switches in opposite positions - light on. :)

Oh dear, now this is too confusing :LOL:
 
Oh dear, now this is too confusing :LOL:
It's not really particularly confusing ...

Each switch has two positions - say 'up' and 'down'. Whether one of the switches is in the up or down position determines which position of the other switch (up or down) will result in the light coming on. It therefore follows that, as EFLI has pointed out, there are two possible combinations of switch positions which will result in the light being on,and two combinations which will result in the light being off - and nothing can change that.

Simples :-)
 

If you need to find a tradesperson to get your job done, please try our local search below, or if you are doing it yourself you can find suppliers local to you.

Select the supplier or trade you require, enter your location to begin your search.


Are you a trade or supplier? You can create your listing free at DIYnot Local

 
Back
Top