Stripping paint on Victorian woodwork

Joined
29 Apr 2017
Messages
42
Reaction score
1
Country
United Kingdom
Hi diynot folk,

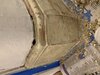
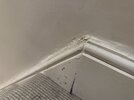
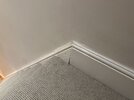
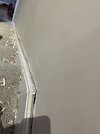
I’m trying to get my Victorian skirting and dados in better shape for painting. I tried the sand and fill method but it still looked clogged and messy. I’m now attempting to strip them down with Nitromors but that last layer of (lead) paint is not budging.

What recommendations do you have? I’ve considered the following:

1. replacing the woodwork (nope - this leads to the stairs and that feels like more work than I can bear)
2. Peelaway - hmm, super expensive
3. Getting a heavy-duty chemical mask and sanding to the wood
4. Getting a heavy-duty chemical mask and lightly sanding the old paint just enough to paint over

Thoughts?
 

Attachments

  • 60E31CFE-5CF0-48CB-A36E-8EC5E73DF82F.jpeg
    60E31CFE-5CF0-48CB-A36E-8EC5E73DF82F.jpeg
    114.7 KB · Views: 242
Sponsored Links
Regis, good evening.

The final base coat you have may ??? be Shellac common in Victorian properties on wood finishes and on flooring around the perimeter of rooms, carpet squares were in common use, not "our" fitted carpets of today.

There are some specialist chemicals used to remove Shellac.

As for the paint being "lead" if it is proceed with caution, lead dust is a dangerous material in that the Lead dust will build up in the body and produce Lead Poisoning, there are lead paint Test kits available on the net, just to be sure about the material.

My [slow] option would be to use a chisel as a scraper, that is not to "cut" the timber but to be drawn over the surface to remove the applied "paint" material.

Ken.
 
Ah, I hadn’t thought of shellac. That’s an interesting turn up.

The house is 120 years old though - isn’t it pretty much a given that the first coat of paint is lead-based? Even if they waited until the 60s to paint the trim?
 
Sponsored Links
Hello. Novice DIYer here and wondering if anyone could give advice how to spruce up this skirting running up my stairs before new carpet is fitted.
It’s a bit of a mess, so instead of trying to strip back, I’m wondering whether a strip of beading run on top, and then a paint job, may be the best answer for a low skill / quick fix. Any thoughts welcome.
Thanks!
 

Attachments

  • IMG_0882.jpeg
    IMG_0882.jpeg
    159.2 KB · Views: 46
  • IMG_0880.jpeg
    IMG_0880.jpeg
    294.2 KB · Views: 43
Hello. Novice DIYer here and wondering if anyone could give advice how to spruce up this skirting running up my stairs before new carpet is fitted.
It’s a bit of a mess, so instead of trying to strip back, I’m wondering whether a strip of beading run on top, and then a paint job, may be the best answer for a low skill / quick fix. Any thoughts welcome.
Thanks!
Use a Stanley knife to cut out all the old caulk and then replace with new. If you can, see if you can hammer that corner piece in level then stick another nail in it. Use some polyfiller and sand back/paint.
 
The bit running up the stairs is the "string". I very much doubt that you will be able to pull it in. You may however be able to force the skiting to push out to meet the string. A way of doing so would be to pilot drill and drive a screw into the the brick work (low down on the skirting), as you tighten the screw, it may force the skirting towards you. You will then need to lock the skirting in place (so that when you remove the said screw, it doesn't pop back. I normally drill a series of hole and squirt expanding foam in- it helps to lock it in place.

Alternatively, try to feather out the area with two pack filler.

Getting back to the mess where the strings meet the walls. I would use a sharp chisel to remove the caulk. On the balance of probability there has been historic cracking where the string meets the plaster. Again, I drill a series of holes and squirt in expanding foam to reduce any bounce. I then fill the gap between the string and plaster with TX110 filler, sand it back, prime and then run new caulk.

Be advised that 2 pack filler requires significant sanding.
 
This is so thorough, thanks for taking the time to reply. I feel like the feathering option and filler may be the best for my skill set. Thanks!
 
Old caulk off - I hope I haven’t gone into the plaster too much!!! But shape coming through nicely…
 

Attachments

  • IMG_0925.jpeg
    IMG_0925.jpeg
    186.9 KB · Views: 29
The bit running up the stairs is the "string". I very much doubt that you will be able to pull it in. You may however be able to force the skiting to push out to meet the string.
Look closely at the joint - the angle of the mitre isn't bisected. That single fact means you can never get a good joint. This is because the two sides of the joint where the moulding is are of different lengths:

20240115_223705.jpg


20240115_223726.jpg


It's purely a matter of geometry, I'm afraid

Edit: OK, so I got the "What you have" the wrong way round. DOH! The point was that if you don't bisect the angle equally, the result is two halves of a joint where the moulding doesn't match up - a bit of a schoolboy error (yet one a lot of joiners and builders still make).
 
Last edited by a moderator:
Look closely at the joint - the angle of the mitre isn't bisected. That single fact means you can never get a good joint. This is because the two sides of the joint where the moulding is are of different lengths:

View attachment 329331

View attachment 329330

It's purely a matter of geometry, I'm afraid

Edit: OK, so I got the "What you have" the wrong way round. DOH! The point was that if you don't bisect the angle equally, the result is two halves of a joint where the moulding doesn't match up - a bit of a schoolboy error (yet one a lot of joiners and builders still make).

I agree with your post. I was referring to the fact that the skirting board kicks in slightly at the bottom.
 
I agree with your post. I was referring to the fact that the skirting board kicks in slightly at the bottom.
Yes , but that kick-out is at the bottom, making planing it out, or even sanding potentially problematic. I think the best way to deal with that is to pull the skirting off the wall, pack it so that it is umb, then refix it IMHO. Filling won't necessarilly work all that well, will require 3-pack to stand any chance of working at all and that in turn will require a power sander of some description.
 
Last edited by a moderator:

DIYnot Local

Staff member

If you need to find a tradesperson to get your job done, please try our local search below, or if you are doing it yourself you can find suppliers local to you.

Select the supplier or trade you require, enter your location to begin your search.


Are you a trade or supplier? You can create your listing free at DIYnot Local

 
Sponsored Links
Back
Top