Swapping out a British Gas UP1L for a NEST 3rd Generation Thermostat

Joined
29 Dec 2016
Messages
4
Reaction score
0
Country
United Kingdom
Hi,
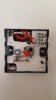
I have just moved into a new house and it has a British Gas UP1L controller and thermostat controlling the heating and hot water. I have a new 3rd Generation NEST controller and thermostat to install and I cannot find a wiring diagram for the UP1L.

3.jpg
111143-50d953aaa0938bdd7a4cbcb9f567f550.jpg

N and L are self explanatory.
I think 1 is for the water and 3 is for the heating but i am unsure what 4 is for (Is this correct)?

Does anyone know where i connect these wires on the NEST controller?

Thanks in advance

Regards

Tom
 

Attachments

  • 1.jpg
    1.jpg
    77.5 KB · Views: 1,246
Last edited:
Sponsored Links
Fairly certain this is a rebadged landis and staefa rwb9.
Live and Neutral are as you would expect.

The wires in the old backplate terminals.....
1 HW OFF will go into Nest terminal 4
3 HW ON goes into Nest terminal 6
4 CH ON goes into Nest terminal 3

You also need two short wire links
One from Nest Live to terminal 2
The second between terminals 2 and 5.
 
As the Nest combines the functions of a programmer and also a room thermostat, if you have an existing wired room thermostat, then you will also need to decommission it.

The best way to do this is by removing the thermostat and the wire going to it, and then linking the terminals that previously contained the thermostat 'Live' and 'Switched Live' wires together. If you require further assistance with this post back and someone will be able to assist.
 
Thanks very much for that Jackthom. I have taken the old connection plate off the wall and it looks like a rats nest of wires behind there. Do you know of anyone in the Wallsend area who can install it for me?

Thanks again

Tom
 
Sponsored Links
As the Nest combines the functions of a programmer and also a room thermostat, if you have an existing wired room thermostat, then you will also need to decommission it.

The best way to do this is by removing the thermostat and the wire going to it, and then linking the terminals that previously contained the thermostat 'Live' and 'Switched Live' wires together. If you require further assistance with this post back and someone will be able to
As the Nest combines the functions of a programmer and also a room thermostat, if you have an existing wired room thermostat, then you will also need to decommission it.

The best way to do this is by removing the thermostat and the wire going to it, and then linking the terminals that previously contained the thermostat 'Live' and 'Switched Live' wires together. If you require further assistance with this post back and someone will be able to assist.
Here are the thermostat connections, I am unable to remove the cable between the old programmer and the thermostat. I presume if i connect both the 'Live' and 'Switched Live' wires together behind the old thermostat using a chock block this will be OK ?
 

Attachments

  • 20161231_111303.jpg
    20161231_111303.jpg
    48.6 KB · Views: 318
As stem says the best way is usually to find where the thermostat wires join into the wiring centre.
If you don't have such a central junction box then safely joining those two thermostat wires in L and 3 together will get things working. If there's enough space in there you can buy chocboxes from screwfix which will keep the wires safely covered.


Predictive text is the work of the devil!
 
In your photo, it looks as if the thermostat might be fitted to a metal pattress / back box. If so, you could remove the thermostat, join the two red wires together with a screw terminal. Stick the earth wire (if it is connected to an earth at the other end) in the back box earth terminal and then cover the whole thing with a single blanking plate.
 
In your photo, it looks as if the thermostat might be fitted to a metal pattress / back box. If so, you could remove the thermostat, join the two red wires together with a screw terminal. Stick the earth wire (if it is connected to an earth at the other end) in the back box earth terminal and then cover the whole thing with a single blanking plate.
I know this is an old post but i have the exact same situation. I have a wired thermostat and am curious where these normally wire back to. would you expect them to go direct to the boiler or to the British Gas UP1L controller?

Is there a good way to trace these wires?

Many Thanks
 
Usually the wiring center, but can depend on your system.
 
Usually the wiring center, but can depend on your system.
Hi Chris, thanks for the reply.

When you say wiring centre, this will be some point where the cabling form the tank (pumps, thermostat and value) and the boiler all congregate?
 
Usually, one of the conductors of the thermostat cable will be connected to the heating control wire of the motorised valve. That can give you a clue as to where to look, then it can be tested to confirm.

For a 'Y Plan' system with a 3-Port motorised valve it is usually a white wire, for an 'S Plan' system with 2-Port motorised valves the brown wire of the central heating motorised valve.
 
  • Like
Reactions: CBW
Honeywell years ago published plans, C, Y, W, and S plan. Job one is to work out what you already have.
C Plan normally no motorised valves, but some times one two port.
Y Plan and W Plan use three port valves, W is rare.
S Plan normally two x two port valves.
The are exceptions my house is C Plan with two x two port valves, but unusual.

The valves have standard colours for cables, so can help work out what you have, most other cables have no colour code.

A junction box is called a wiring centre with central heating, some are marked S or Y.

Most motorised valves are 230 volt, but boilers can be 24, 230 or variable voltage, I normally start by down loading installation manual, and a word search for OpenTherm or ebus.

However most of our systems the TRV is king, and one can improve the system without using any hard wired device.
 

DIYnot Local

Staff member

If you need to find a tradesperson to get your job done, please try our local search below, or if you are doing it yourself you can find suppliers local to you.

Select the supplier or trade you require, enter your location to begin your search.


Are you a trade or supplier? You can create your listing free at DIYnot Local

 
Sponsored Links
Back
Top