Nest 3rd Generation Installation 240v

Joined
19 Dec 2016
Messages
8
Reaction score
0
Country
United Kingdom
Hi All,

I have recently purchased the 3rd Generation Nest Thermostat.

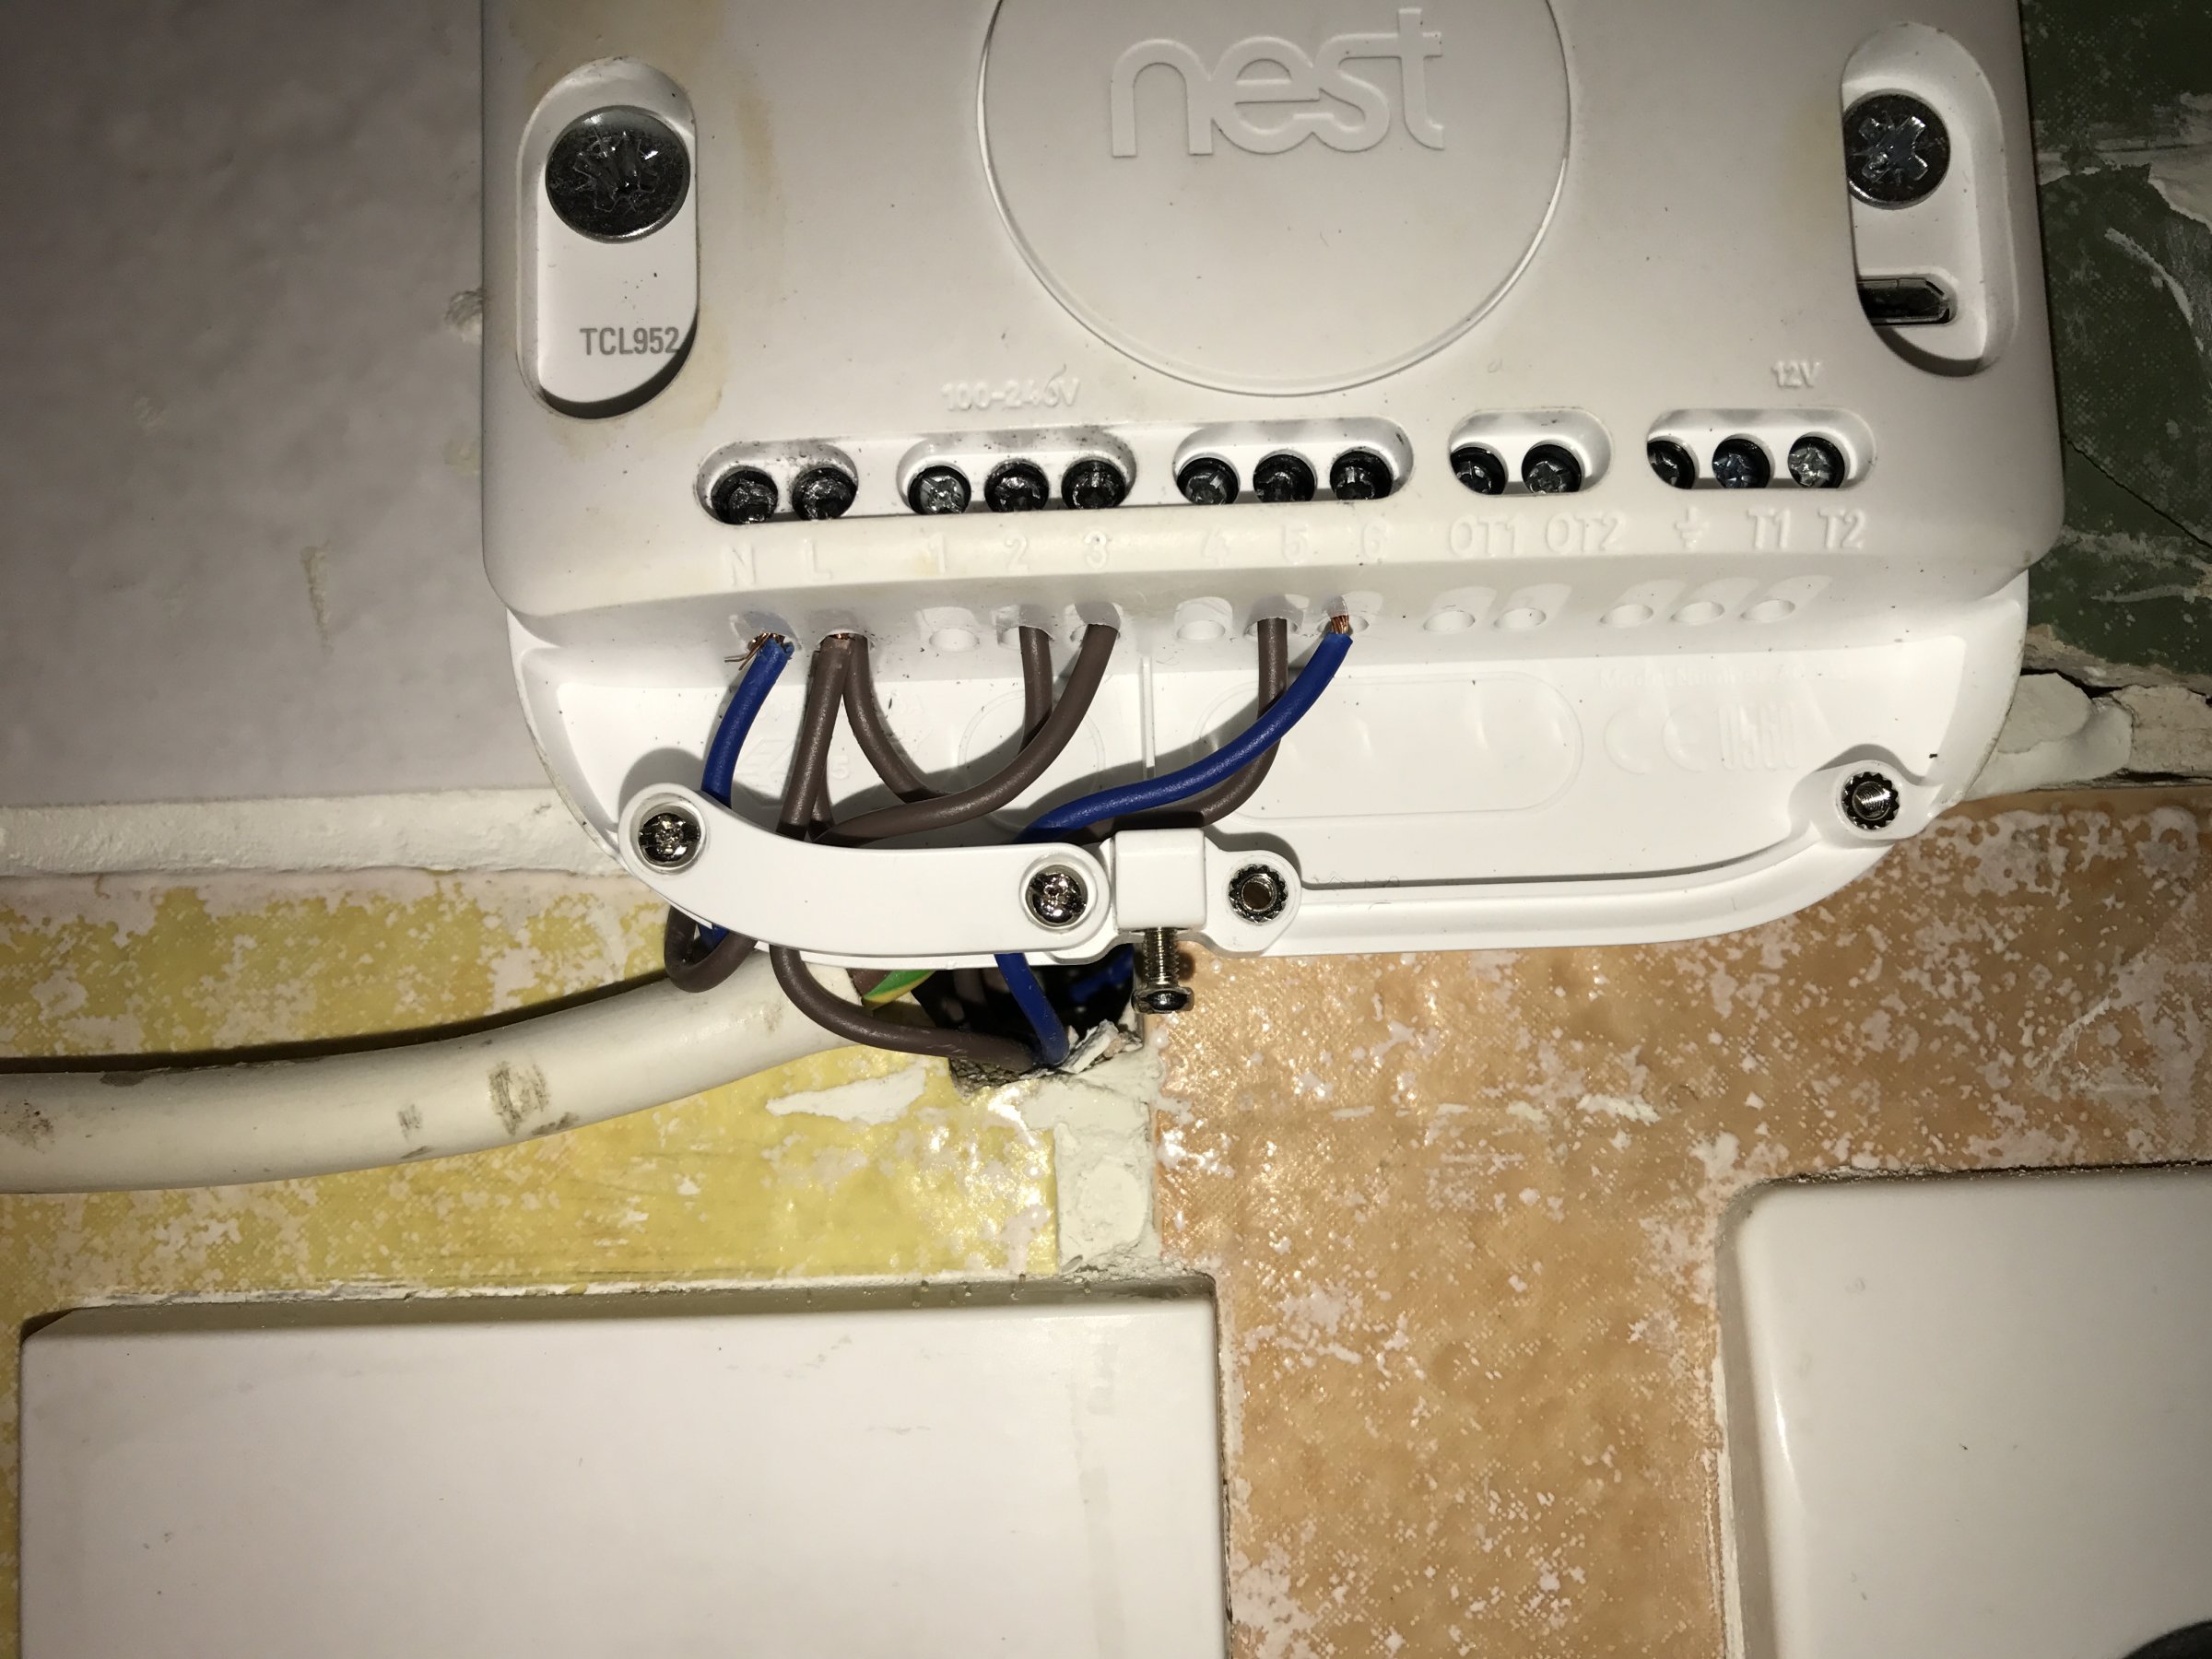
I managed to wire the heatlink up replacing the old controller next to the boiler. The thermostat connects perfectly and this now runs smoothly and I can trigger the heating on and off wirelessly.

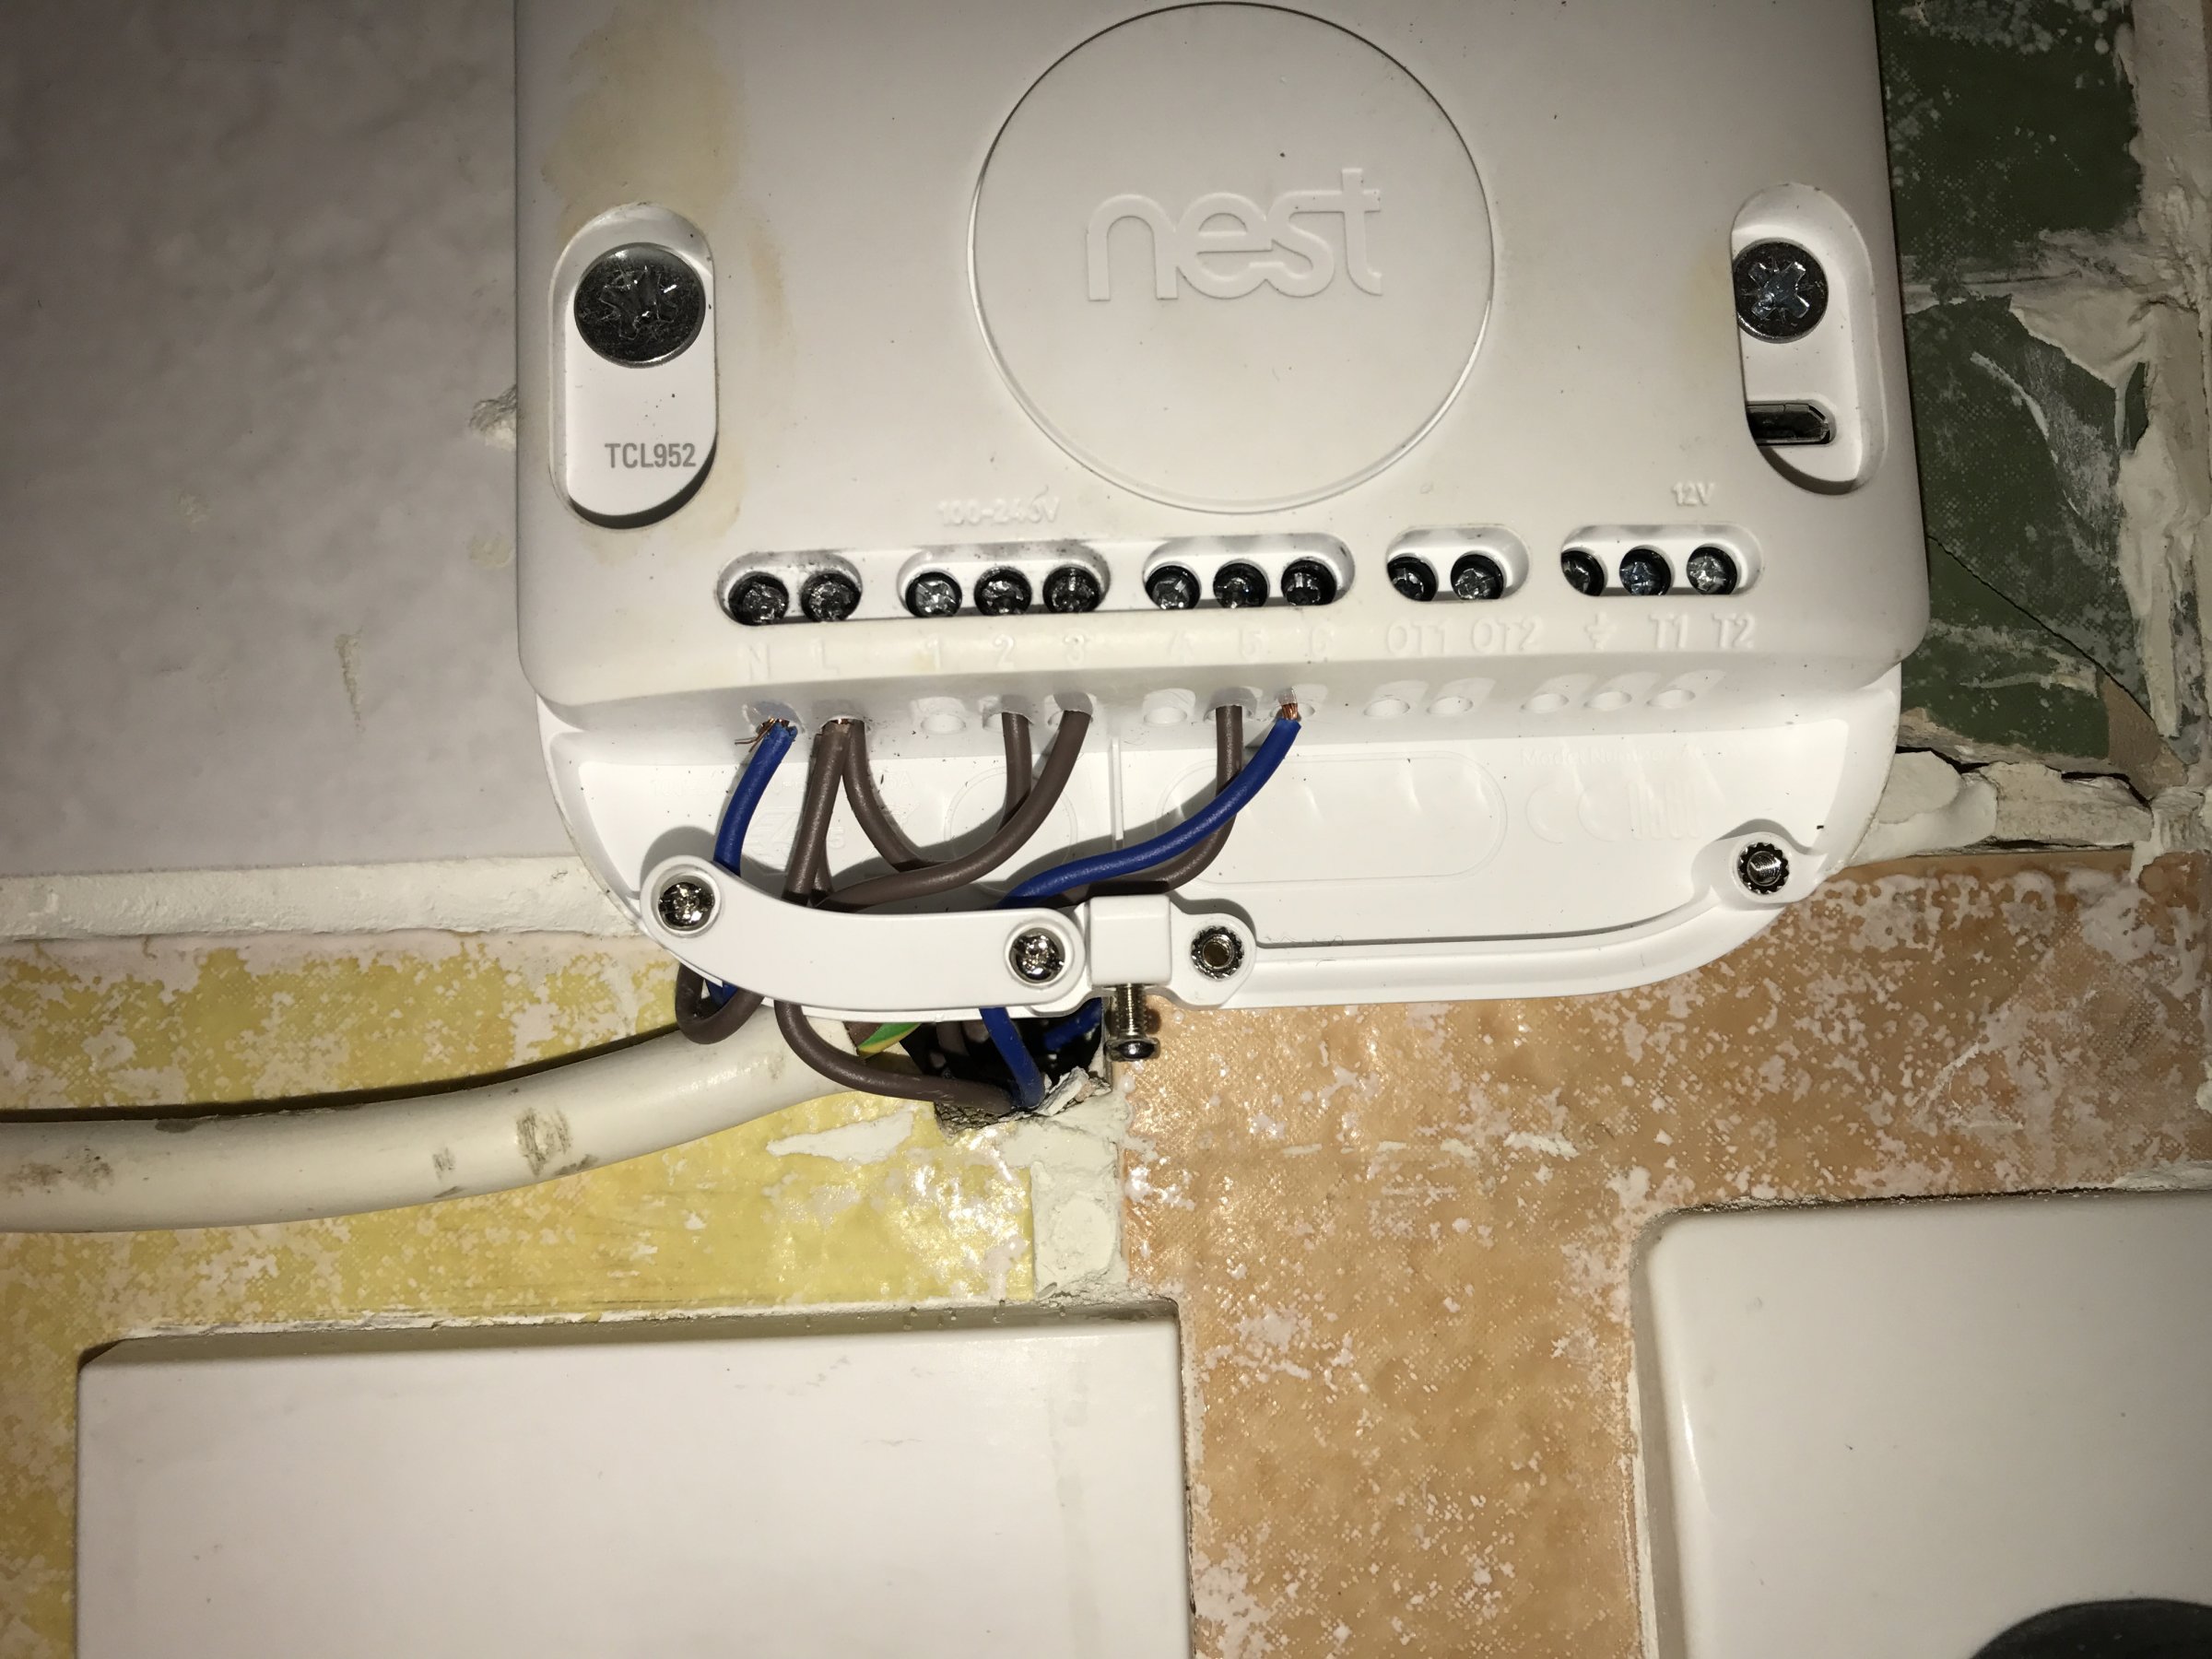
My next task was to replace the old thermostat in my hall with the nest thermostat rather then plugging it in via USB.

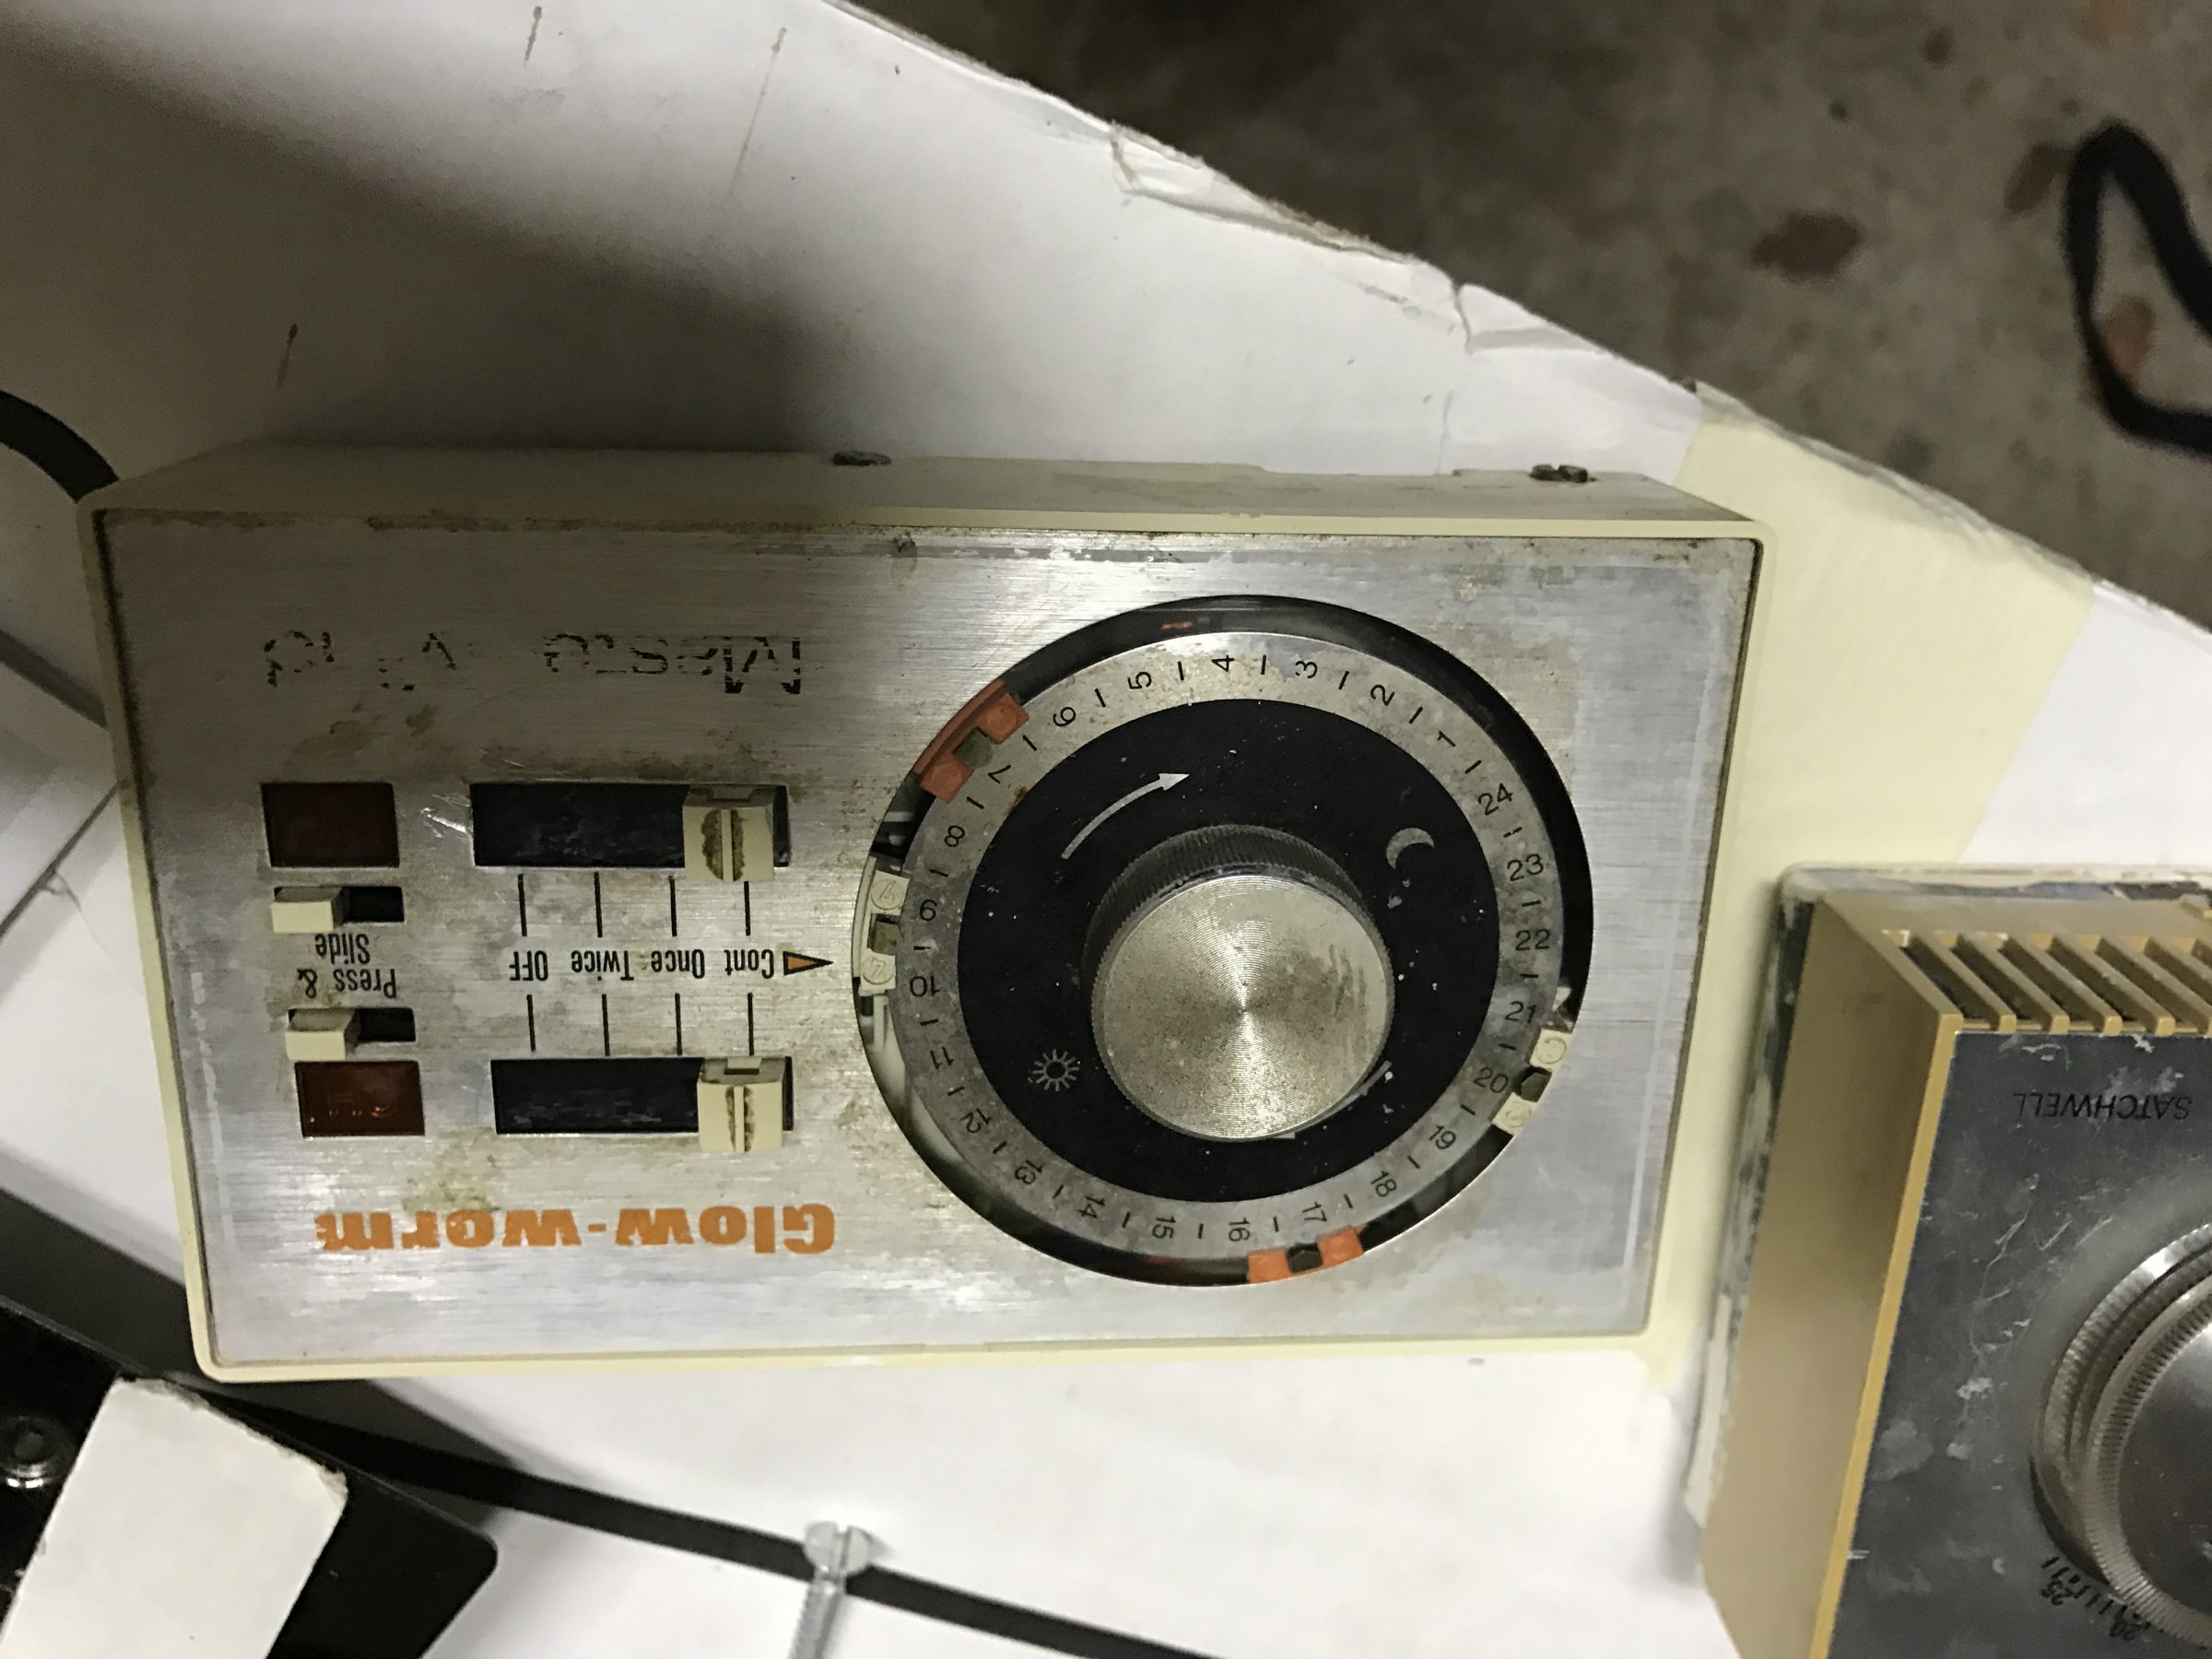
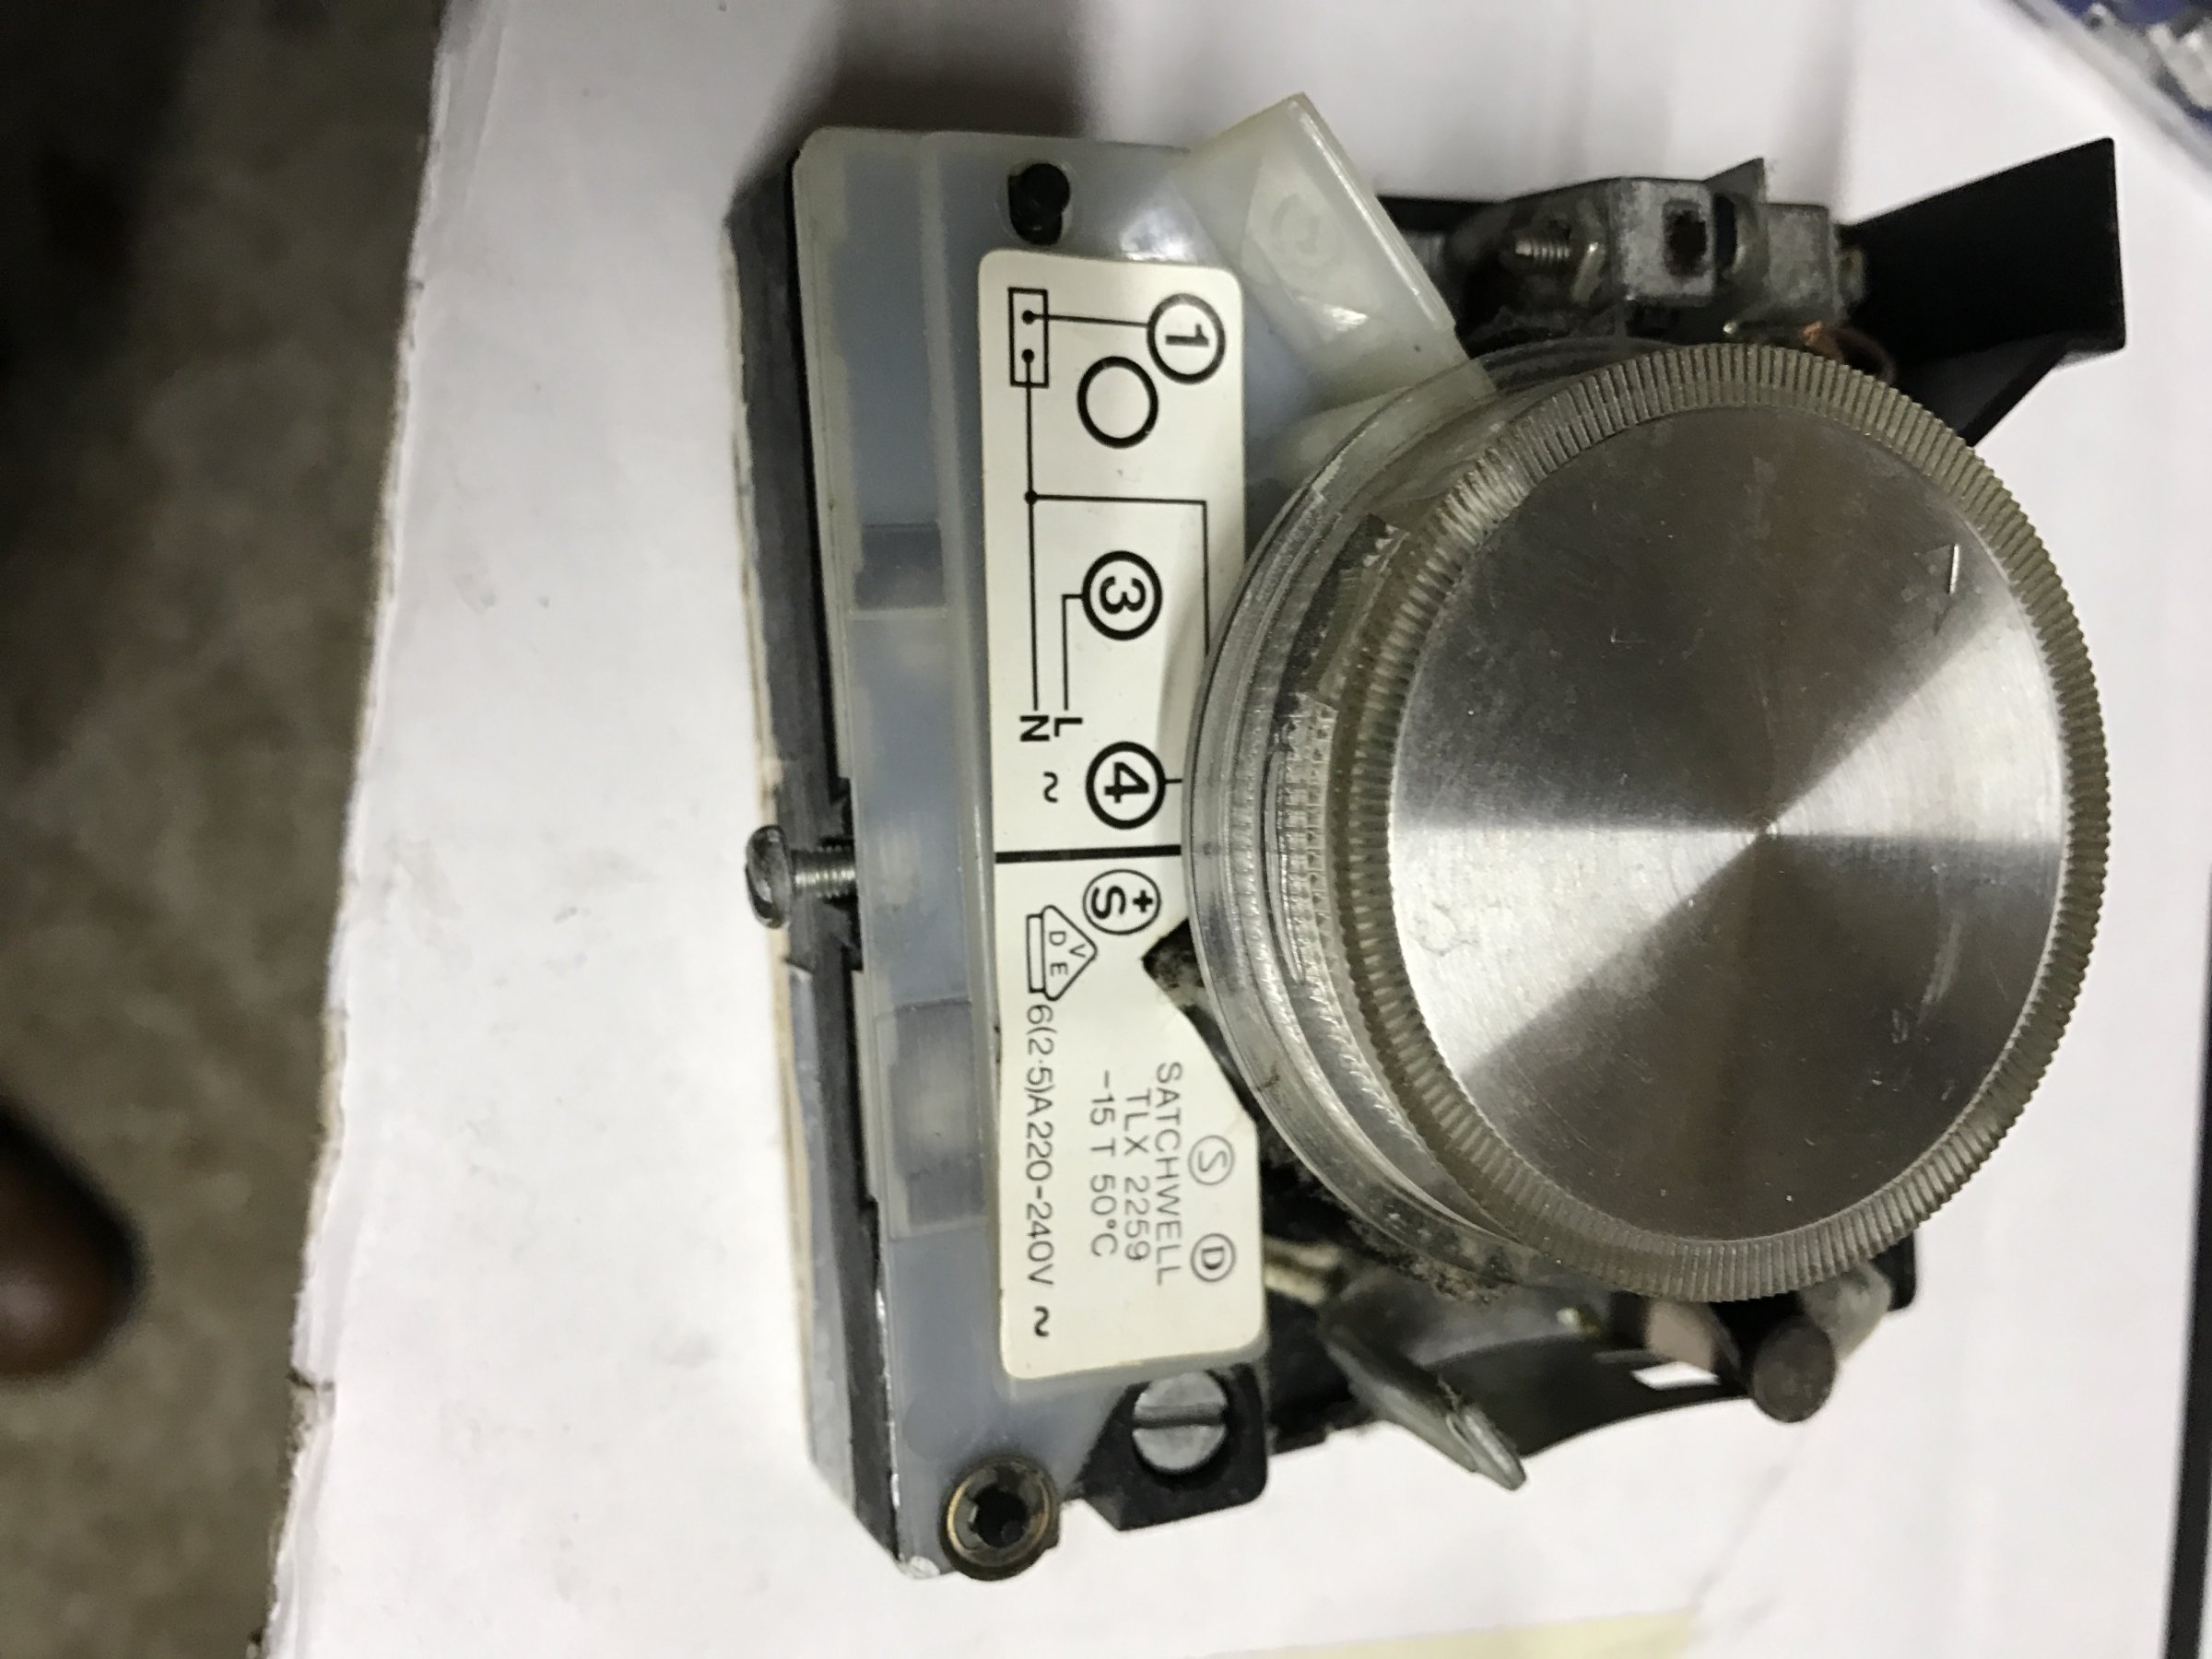
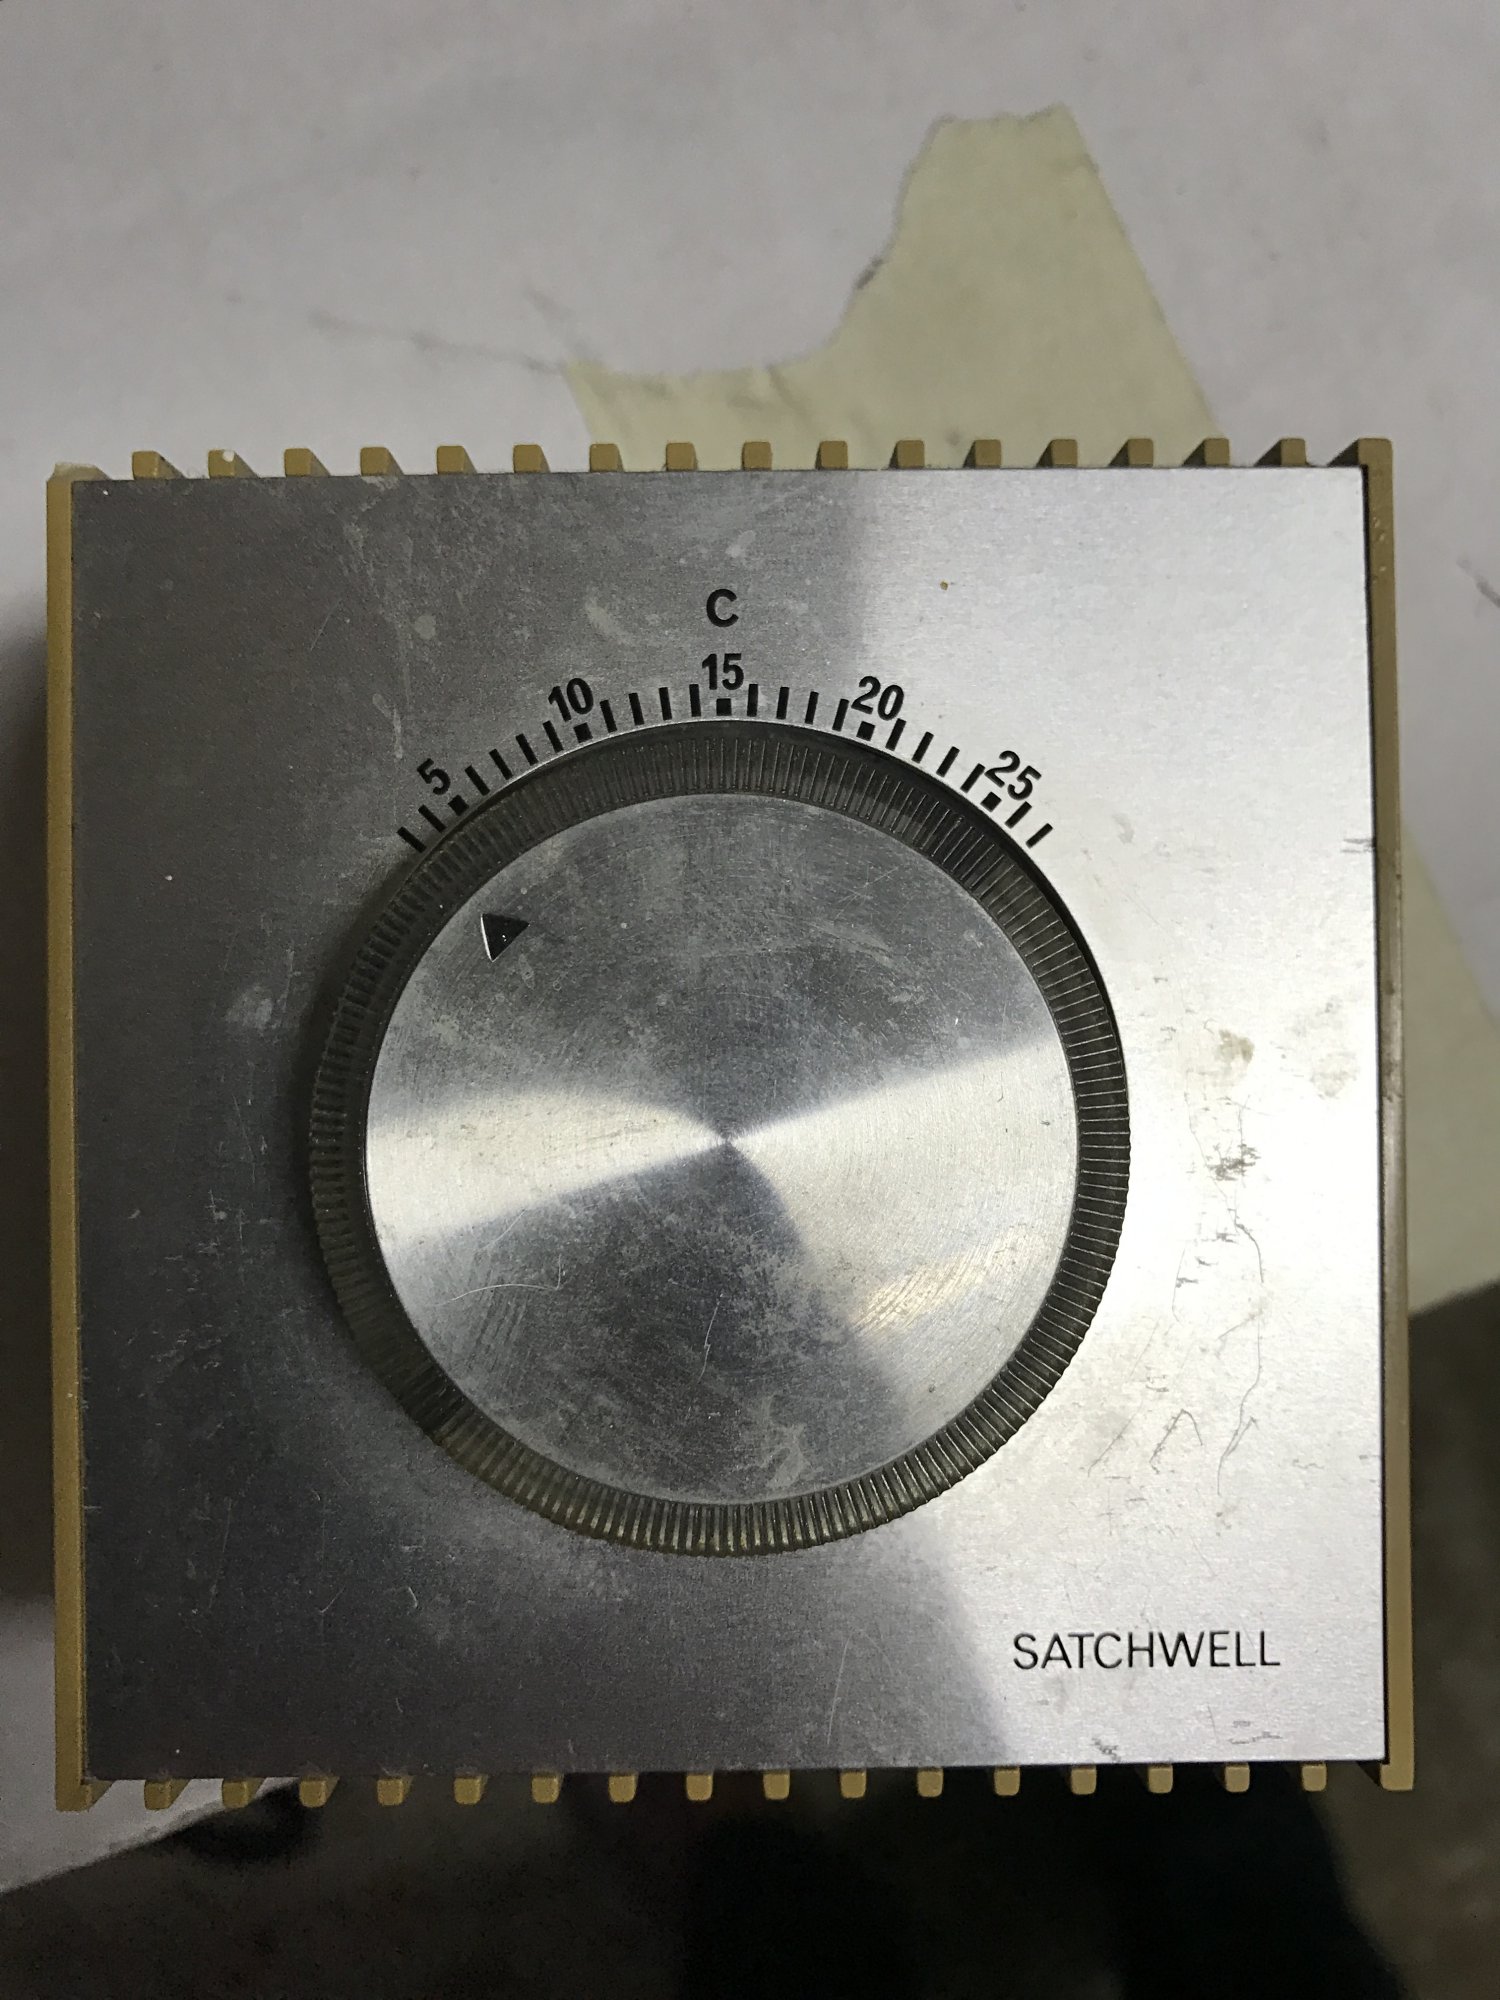
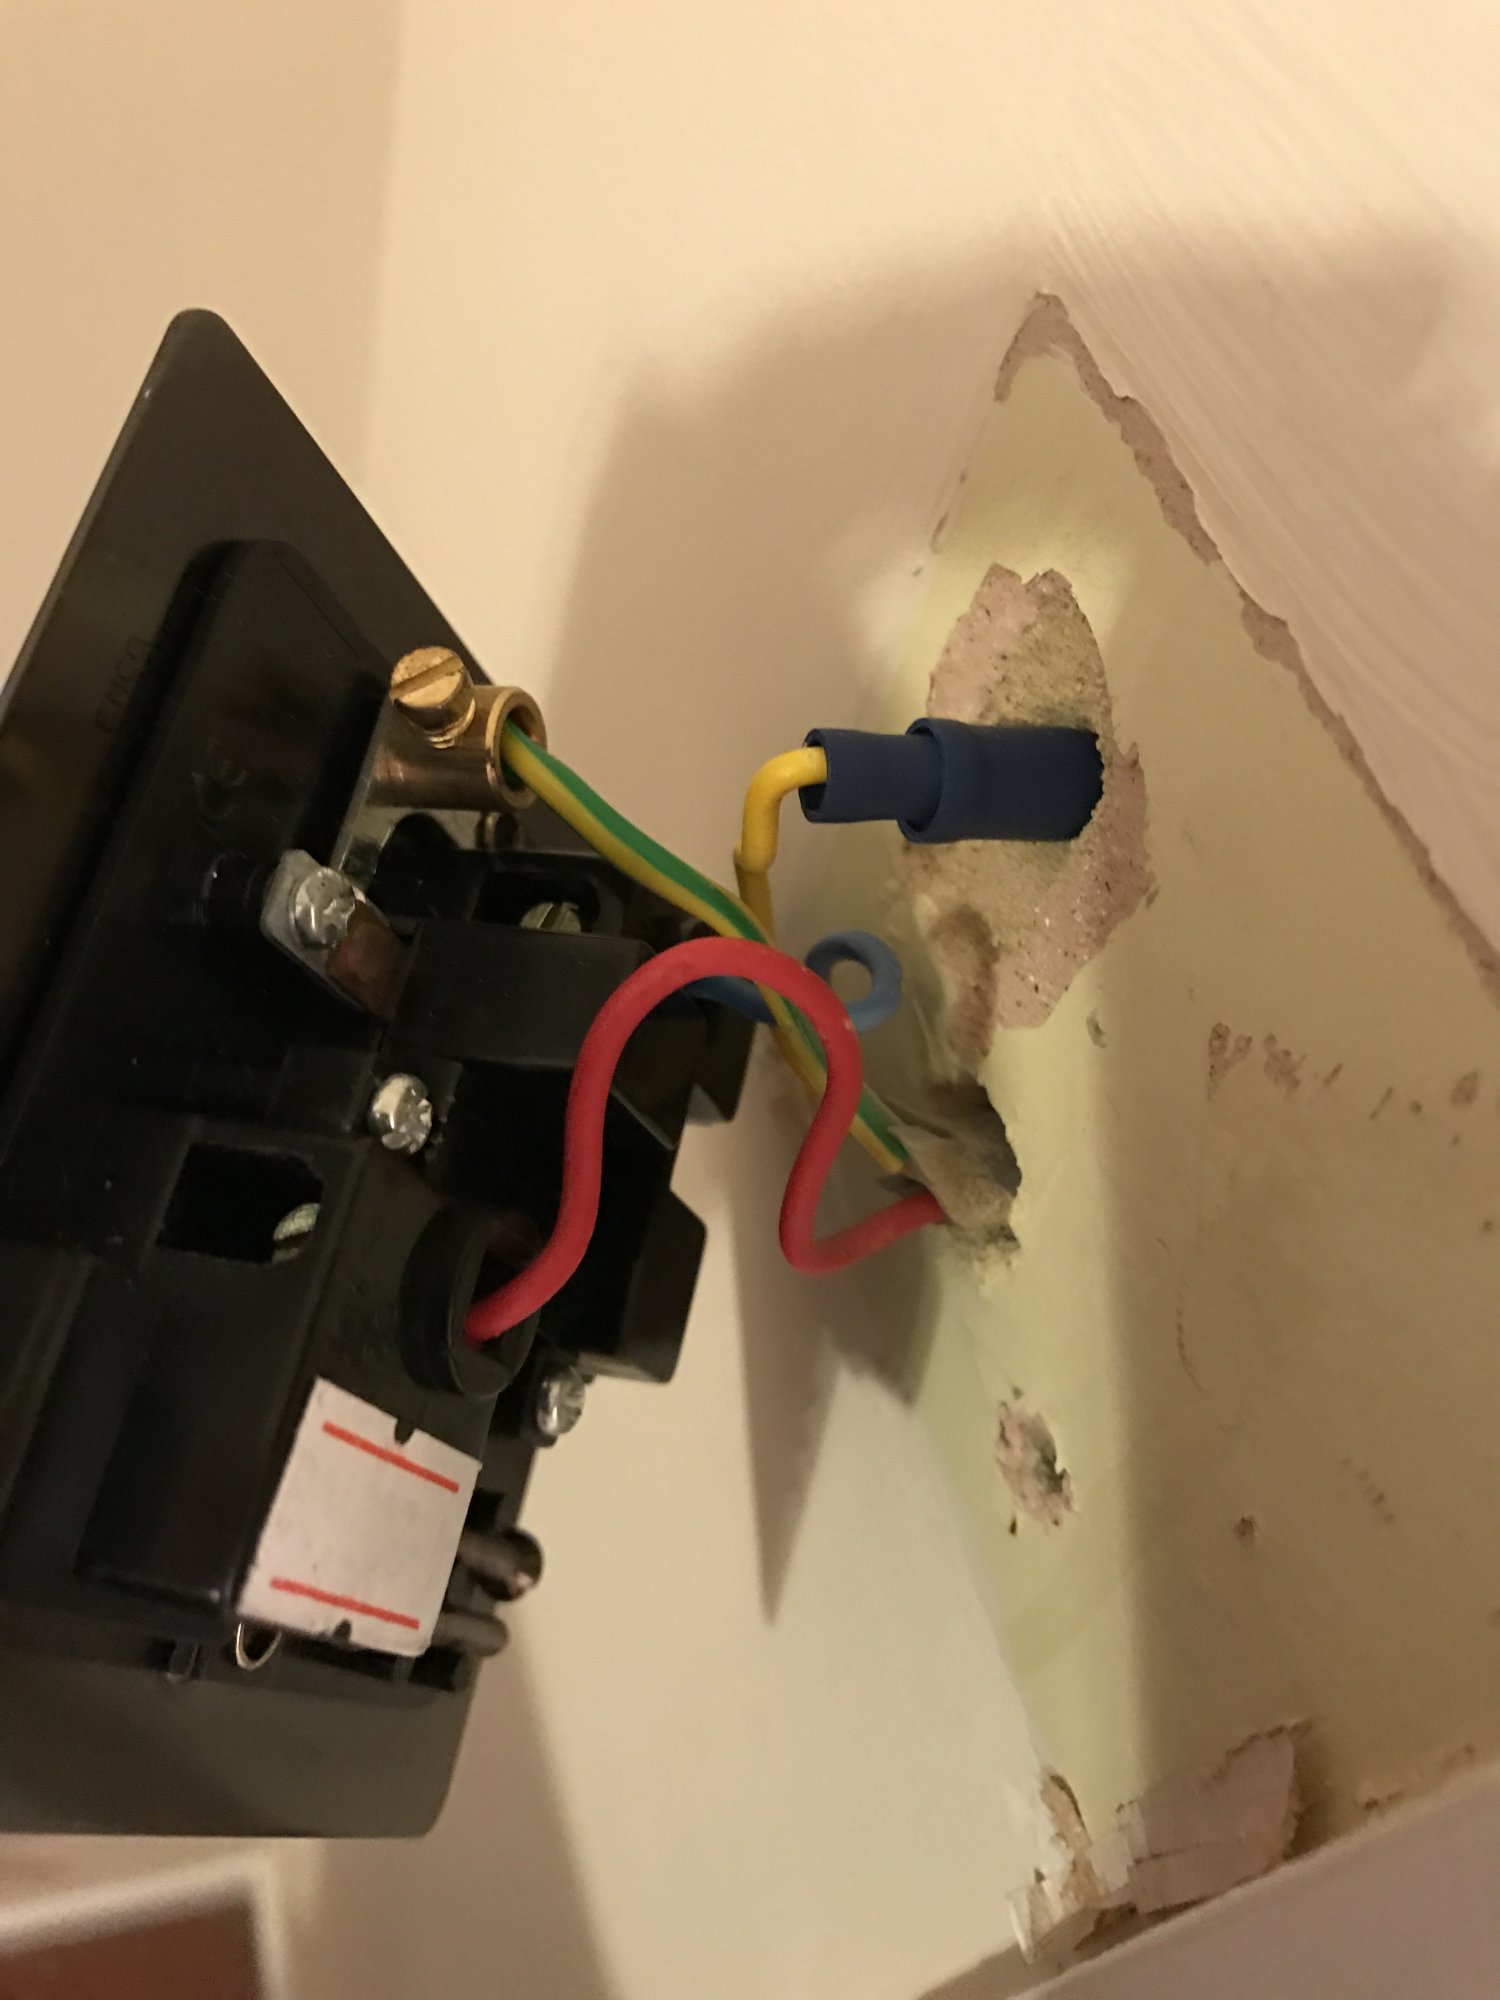
Upon removing the old thermostat (Pictured). I found four wires, L,N, a yellow wire and earth. Using a multimeter I was getting 240v so I can't wire in the thermostat as being 12v it would just fry.

I have attached a picture of my heat link wiring, my old controller and old thermostat. Should I be wiring some of the wires from the old thermostat into T1 and T2 and if I do which ones?

Or is there anything I can do to reduce the voltage on the thermostat cabling?

Please see pictures below.

I have 18 people coming over for christmas next week and I'm getting an earful from the wife.

What can I do to wire in this thermostat and keep my heating!

Thanks in advance.
 
Sponsored Links
I can't see any photo's but it will likely be 230v, so don't connect the Nest thermostat to it.

First of all you should have removed the existing thermostat before using the Nest, as you will now have two thermostats trying to do the same job. You should remove it from the circuit and modify the wiring.

The Nest does only need 12v and there are two possible options:

1. Wire it directly to T1 & T2 at the Heatlink,
2. Use the plug in power supply.

The usual format is for 230v thermostat wiring is:

Red = Live from programmer
Yellow = Switched live to heating
Blue = Neutral

However please verify this with a multimeter, because someone who didn't follow the usual format may have originally installed it. Maybe your photos will help if you can manage to upload them. There is usually a wiring diagram inside the thermostat lid which will also show the connections. If it is correct, you will need to disconnect the cable to the existing thermostat at the other end, firstly making a note where the 'live' & 'switched live' wires went. Then, where they came from needs joining together.

If the original and now completely disconnected cable happens to be installed in the correct location, you can connect it to the Heatlink terminals T1 & T2 to get 12v to the new Nest thermostat. If it doesn't go back to where the Heatlink is installed, you will have to run another cable, or stick with the separate power supply.
 
Hi,

Thanks for the reply. Pictures now attached.

I believe the old thermostat cabling comesback into the heatlink but it is wired to the mains behind the heatlink.
Could it be the case that I remove it from the mains and put in t1? The yellow cable I use in the call for mains in 3 on the heatlink.

Which of the cables would I use for t1 and t2 (R,Blue,Yellow) on both ends heatlink and thermostat.

 
Thanks, the diagram in the thermostat lid shows what you need to know, although with the cover on, I can't see which wires go to which terminals.

3 is connected to the Permanent Live (Red?)
4 is connected to the Neutral (Blue?)
1 is the Switched Live (Yellow?)

Can you confirm that the colours of the cables i have sown in () is correct please.
 
Sponsored Links
Yes thats right, I believe they are coming back to wiring box behind the heatlink.

If so this is how they are currently wired in.

Red to a live terminal connector with the mains live and a cable to L on the heatlink,
Blue to a terminal connector with the mains neutural and a cable to N on the heatlink
Yellow to a terminal connector which I have used a brown cable (wasn't long enough and only had brown) to 3 on the heatlink.

I have another yellow cable from somewhere which I have used for the call for HW.

The old programmer had L,N,CH, HW

I hope that helps give more context.
 
Thanks, so it does follow the usual convention. Now you need to disconnect the existing thermostat cable at the Heatlink end. Note where you remove the Red and Yellow wires from at the Heatlink end and join where they came from together. The Neutral and Earth can simply be disconnected.

Then you should have a four core cable that is not connected to anything, running between the Heatlink, and where you want the Nest thermostat to be. Simply use one of the cores to connect T1 at the Heatlink, to T1 at the Nest Thermostat and another to connect T2 at the Heatlink with T2 at the Nest Thermostat. The other wires can be cut off.
 
The cabling from the thermostat will this be the four core cabling?

So I remove the L (Red), N(Blue) coming from the thermostat from the terminal connectors therefore disconnectin it behind what would I use for call for heat on the heatlink with the yellow cable (brown in 3 on the heatlink?.

Could I disregard the Blue and Earth from the thermostat cable on the heatlink and use Red and Yellow for T1 and T2 and do the same on the thermostat?

Is that right?

Thanks so much for your help with this your really saving my bacon!
 
I have made a drawing for you. hopefully this will make everything clear. I've shown the Red and Yellow wires for T1 & T2 but it's not crucial as long as the two T1's are connected together and the two T2's

The earth is omitted for clarity, just disconnect it and isolate it safely away, the same as the blue.

Drawing1.jpg
 
That is perfect, great explanation.

I will try this tonight and let you know the outcome. Thanks so much for your help with this!
 
As a side point, looking at your photos, I notice that your version of the Heatlink has an earth terminal without an earth connected to it. I don't think earlier versions of the Heatlink have an earth terminal, so an actual earth connection may not be necessary, and the terminal could just be provided for convenience to terminate the earth from a main supply cable.

I would recommend that you to check the instructions that came with your Heatlink it to see if an earth connection is necessary. If it doesn't say that it is, there should be the double insulated symbol on the Heatlink somewhere. If you don't know what it looks like, it's a square box inside a larger square box.

If you do need to add an earth, then connect it to the earth from the Fused Connection Unit (FCU) supplying the heating system.

You should also ascertain that the thermostat cable isn't attached to anything else along it's route. It shouldn't be, but I mention this because once I came across one where there was a wall light tapped into the Neutral halfway along. A previous 'bodger' occupant had wanted to connect a new light to an existing light switch and when he found there wasn't a neutral at the switch, tapped into the thermostat wires neutral which was nearby.

By the way. What is this showing? I'm guessing that it's a socket that you have fitted to where the original thermostat was to test the connections.


IMG_3323.JPG


If so. Just to be clear, please confirm that the wires were connected to the terminals that I assumed that they were before you disconnected them as follows:

3 Was connected to the Red wire
4 Was connected to the Blue wire
1 Was connected to the Yellow wire
 
Last edited:
Yes I wired in a socket to keep the wife happy and the danger out the way. I did think that about the earth but the Instructions don't really mention it for this set up.

No i had 1 as Red and 3 as Yellow on the old thermostat.
 
OK thanks, if just the yellow and red are transposed that's fine you can carry on as we said. My concern was the neutral I didn't want you to insert the link between a live and neutral. It's highly unlikely that any wire other than the blue would be the neutral, but you never know, over the years I have seen some very odd configurations. Fortunately they are rare.

The set up is irrelevant to whether the Heatlink requires an earth or not. It's product related.
 

DIYnot Local

Staff member

If you need to find a tradesperson to get your job done, please try our local search below, or if you are doing it yourself you can find suppliers local to you.

Select the supplier or trade you require, enter your location to begin your search.


Are you a trade or supplier? You can create your listing free at DIYnot Local

 
Sponsored Links
Back
Top