

Hi,
I’m a newbie here and apologies in advance if I’m repeating this topic but I couldn’t find answers on other posts hence posting this.
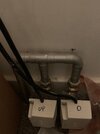
So I’ve Danfoss system with Ideal combi boiler that came with this new built home I purchased few years back. Our boiler is on ground floor in kitchen, a large Danfoss junction box and 2 Danfoss valves on first floor in a cupboard, one TP40704 controller on ground floor and another one on first floor.
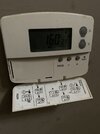
All was going well and I never bothered to look at replacing this with any smart heating things like Hive etc but recently our ground floor thermostat started playing up and it won’t turn on heating, I tried resetting, replacing batteries etc but nothing worked so I took it off to take a look at wiring and now accidentally broke the pin connectors that connects thermo stat to back plate and hence need to replace it to keep our heating going thru winter.
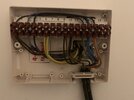
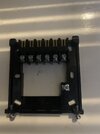
And because getting the same Danfoss thermostat to replace works out as expensive as putting a smart thermostat, I bought this Drayton system that as advertised should be a simple one to one replacement. However when I opened up the Danfoss junction box it has much more wires than shown in Drayton manual. Only wires I can clearly identify are the ones that are going to 2 valves(one up and one down) and 2 each for up and downstairs thermostat.
Can someone please help to decode this wiring and how do I wire the new Drayton control box instead?
I have attached some pictures below for reference -
First one is wiring in the Danfoss junction box, 2nd is 2 valves, 3rd is current thermostat, and 4th is Drayton backplate.
I’m a newbie here and apologies in advance if I’m repeating this topic but I couldn’t find answers on other posts hence posting this.
So I’ve Danfoss system with Ideal combi boiler that came with this new built home I purchased few years back. Our boiler is on ground floor in kitchen, a large Danfoss junction box and 2 Danfoss valves on first floor in a cupboard, one TP40704 controller on ground floor and another one on first floor.
All was going well and I never bothered to look at replacing this with any smart heating things like Hive etc but recently our ground floor thermostat started playing up and it won’t turn on heating, I tried resetting, replacing batteries etc but nothing worked so I took it off to take a look at wiring and now accidentally broke the pin connectors that connects thermo stat to back plate and hence need to replace it to keep our heating going thru winter.
And because getting the same Danfoss thermostat to replace works out as expensive as putting a smart thermostat, I bought this Drayton system that as advertised should be a simple one to one replacement. However when I opened up the Danfoss junction box it has much more wires than shown in Drayton manual. Only wires I can clearly identify are the ones that are going to 2 valves(one up and one down) and 2 each for up and downstairs thermostat.
Can someone please help to decode this wiring and how do I wire the new Drayton control box instead?
I have attached some pictures below for reference -
First one is wiring in the Danfoss junction box, 2nd is 2 valves, 3rd is current thermostat, and 4th is Drayton backplate.
Attachments
Last edited: