Hi,
We have a Baxi Assure 30 combi and have used a hive system with standard TRVs bar 1 rad for ages. We don't have a hot water tank or anything like that, no multi zones. We basically boosted the heating as and when we wanted and hot water is on demand. We've bought a Tado Wireless Smart Thermostat starter kit V3+ to replace the Hive. We have 8 rads and have 7 tado smart radiator thermostats to go on once this is sorted.
The boiler was fitted 2 years ago and the existing Hive was connected to it by the installer.
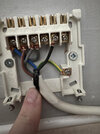
I've followed the Tado instructions up until the wiring part, there's an extra wire on the (1) connection on the Hive wiring which him not sure what to do with.
Am I correct in saying based on the Hive wiring (image) that:
Hive Bridge wire on L & 1 to Tado Bridge wire to (L) and (CH COM)
Hive Blue on N to Tado Blue to (N)
Hive Brown on L to Tado Brown to (L)
Hive Black on 3 to Tado Black to (CH NO)
Im not sure what to do with the Grey wire that is in 1 of the Hive, do I just put that on (CH COM)?
Also noticed the earth on the Hive wiring, when I trace it back in the boiler its just a loose wire, hasn't ever been connected to anywhere as its not even stripped, is that not connected on purpose or just poor workmanship from the installer? Looking at the Hive wiring connections i'm guessing the latter.
Thanks in advance")
We have a Baxi Assure 30 combi and have used a hive system with standard TRVs bar 1 rad for ages. We don't have a hot water tank or anything like that, no multi zones. We basically boosted the heating as and when we wanted and hot water is on demand. We've bought a Tado Wireless Smart Thermostat starter kit V3+ to replace the Hive. We have 8 rads and have 7 tado smart radiator thermostats to go on once this is sorted.
The boiler was fitted 2 years ago and the existing Hive was connected to it by the installer.
I've followed the Tado instructions up until the wiring part, there's an extra wire on the (1) connection on the Hive wiring which him not sure what to do with.
Am I correct in saying based on the Hive wiring (image) that:
Hive Bridge wire on L & 1 to Tado Bridge wire to (L) and (CH COM)
Hive Blue on N to Tado Blue to (N)
Hive Brown on L to Tado Brown to (L)
Hive Black on 3 to Tado Black to (CH NO)
Im not sure what to do with the Grey wire that is in 1 of the Hive, do I just put that on (CH COM)?
Also noticed the earth on the Hive wiring, when I trace it back in the boiler its just a loose wire, hasn't ever been connected to anywhere as its not even stripped, is that not connected on purpose or just poor workmanship from the installer? Looking at the Hive wiring connections i'm guessing the latter.
Thanks in advance