Tap Cartridges - Impossible situation

Joined
1 Oct 2011
Messages
153
Reaction score
3
Location
West Midlands
Country
United Kingdom
Please take a look at the pics first.

Mixer Swivel Taps - Time to change cartridges - They're 15 years old - need help.

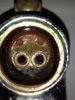
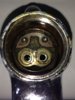
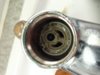
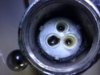
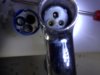
The top casing & main body of each cartridge (two different types) has come off (upstairs bathroom - downstairs bathroom) - but the base is stuck in each of them - I can't shift/pull them out.

It's the base with the seating pins that has been left behind while the main body has pulled away.

If I understand right - the cartridge is just supposed to be loose and lift out?

Soaked them both in descaler overnight - no joy. Is it likely just to be the scale holding the bases in?

Would really appreciate some guidance on what to do. This is for my own home.

My thanks to any - willing to contribute.

SL
 

Attachments

  • DownStairsA.jpg
    DownStairsA.jpg
    248.2 KB · Views: 389
  • UpStairs 3.jpg
    UpStairs 3.jpg
    167.8 KB · Views: 405
  • UpStairs1.jpg
    UpStairs1.jpg
    234.6 KB · Views: 382
  • UpStairs2.jpg
    UpStairs2.jpg
    152 KB · Views: 511
Last edited:
Sponsored Links
It's probable that the rubber gaskets on the base of the cartridges have stuck to the tap body.

Pair of needle nosed pliers and some brute force should do the trick.
 
Consider replacing the 15 year old taps. You may be able to replace the valves and get them functioning without dripping ,and you may not. In my opinion its not worth the effort on taps of that age.
 
Ok - so here is a short guide /tutorial - on what I've done - to successfully remove the base of a stuck cartridge - in a mixer / swivel / flick tap.

1. Eye protection is crucial.
2. Small bottle of room temp water.
3. Thin nose Pilars
4. Descaler - liquid kind used on kettles
5. Tissues - loads - and a plastic bag.
6. Gloves

Step A: Ensure water isolation from outside property is accessible. Also check stop cock inside property is accessible and if that is working. Only to be used if there is a problem with the tap isolation that should be somewhere in the runs to the sink.

Step B: Should have already done this - but isolate the tap only.

Step C: Once tap top is removed - if cartridge does not come out. Carefully pour in descaler - be mindful if your tap has a stop rod on the back for the drain. If the descaler overflows around the tap - it can travel down the pull stop rod - under the sink. Leave for a few hours.

Step D: Use gloves + eye protection - start soaking up the excess descaler, and dispose off.

Step E: Pour boiling water into the tap cavity that holds the cartridge. Again - eye protection and gloves. Plenty of ventilation too.

Step F: This is where you have to be measured and careful. Soon after you have poured the boiling water into the cavity where the cartridge sits - using eye and hand protection - use pliers to pull out the base of the stuck cartridge. Use upward and wiggle motion - with one hand - and place other hand on your wrist - to act as a stop one the cartridge comes away. It will need a large amount of force - and will give all of a sudden.

Step G: Once the base is out - keep pouring the room temp water into the cavity to cool the tap.

Notes: I am not a professional plumber by any means. This is how I did it. I have no idea if the boiling water has damaged the taps - they are 15 years old - so I thought it worth a try. I cannot guarantee this will work - and it can be very hazardous if some of the descaler comes flying out with the base. You take your safety in your own hands - and plan the job well.
 
Sponsored Links
Have you fitted the new valves ,and not got dripping from the tap spouts when taps are off ? If so well done mate.
 
Have you fitted the new valves ,and not got dripping from the tap spouts when taps are off ? If so well done mate.

Will be able to seek out compatible cartridges on Monday.

Could use any pointers people have, in making that job - as easy as possible?
 
pour a kettle of boiling water into the tap body,the metal will expand and the plastic part will be easy to prise out.

Be ready to clean any debris off the sealing areas before inserting new cartridge (y).

If a cartridge is £20 or more,consider a new tap :idea:

edit,you have already sussed it.Welcome to the world of bodge it & scarper.
 
UPDATE

Please look at new pics.

Cartridge bases removed successfully. Asking for help with following:

1. How to prepare the mating surface / base of tap for a new cartridge (How to clean & make good to receive new cartridges).

2. Where to get replacement cartridges - does anybody recognise these units?

My thanks and sincere gratitude to any willing to contribute.

SL

IMG_2668.jpg
IMG_2669.jpg
IMG_2674.jpg
IMG_2675.jpg
IMG_2682.jpg
IMG_2684.jpg
 
Given the severity of the pitting on those mating surfaces, I think you may be extremely lucky if they don't leak when the new cartridges go in. They would need to be rubbed up with fine wet n dry to a polished totally level surface before the new o-rings will seal to them properly. That and the tap body where the large o-ring around the cartridge body sits would need the same treatment.
If anyone will have the cartridges then it'll probably be these guys - http://www.shop.lunns.net/cassette-valves-53-c.asp

Honesty, In my professional opinion though ..... I'd replace them
 
My sincere thanks to all those that have contributed thus far.

I took the long route - as I knew I'd learn a life skill - that will stay with me long term.

I have located the cartridges I need.

Final question:

What can I do to prepare the bases of the taps cavity's - to give the replacements the best chance of success - i.e to get a good seal? How would I go about doing it - what tools would you recommend?

Thanks to any willing to chip in:
 

Attachments

  • IMG_2682.jpg
    IMG_2682.jpg
    519.9 KB · Views: 274
  • IMG_2684.jpg
    IMG_2684.jpg
    561.5 KB · Views: 279
They would need to be rubbed up with fine wet n dry to a polished totally level surface before the new o-rings will seal to them properly

In there with your fingers and some 240 wet'n'dry. Then use a little silicone grease to give the seals every chance before the cartridge goes in. Still no guarantees tho as the surfaces are quite pitted.
 

DIYnot Local

Staff member

If you need to find a tradesperson to get your job done, please try our local search below, or if you are doing it yourself you can find suppliers local to you.

Select the supplier or trade you require, enter your location to begin your search.


Are you a trade or supplier? You can create your listing free at DIYnot Local

 
Sponsored Links
Back
Top