Tiling a shower quadrant enclosure

Joined
5 Nov 2015
Messages
11
Reaction score
0
Country
United Kingdom
Hi all,

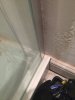
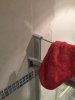
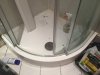
I've been tiling a 800 x 800 quadrant shower enclosure that I just put in with a handyman.

The tiling for the previous enclosure was just done over plasterboard on one wall and plywood on the other, so we did the same again. (I wasn't aware of cement/waterproof boards at the time). However we used waterproof tile adhesive and a decent quality grout (http://www.toppstiles.co.uk/tprod44012/section173/bal-micromax2-white-25kg.html) - although not epoxy grout.

Is this good enough to stop the water or should I get some grout sealer or re-tile over a waterproof board?

I'm also worried that the enclosure was screwed into the wall and then the tiles were done, rather than tiling and then installing the shower enclosure.

Thanks for the advice,

Matt
 
Sponsored Links
The enclosure should be fixed on the tile surface, and the tile run past the jamb. Maybe you can silicone a caulk line and hopefully waterproof the jamb from penetrating damp.

Perhaps use some grout sealer and see how you get on with the tile.

Depending on cash available you might consider ripping out the whole thing and starting again - but give it a go for now, and see what happens.
 
Okay, thanks. I'll see how it goes this weekend.

The next thing I've realised is that I think my handyman didn't realise the shower enclosure adjusted and installed it on its smallest setting, further into the corner than the previous enclosure, leaving ugly filled vertical channels on either side. Maybe we'll try removing the enclosure, adjusting the profiles, tiling further out, and re-installing everything.

At this point, it's almost worth removing everything and waterproofing the backboard but I guess I'll know if I get a leak.

Matt
 
Sponsored Links
Sure. This is how it is currently. Let me know what you think.
 

Attachments

  • IMG_1155.JPG
    IMG_1155.JPG
    78.8 KB · Views: 440
  • IMG_1154.JPG
    IMG_1154.JPG
    76.8 KB · Views: 435
  • IMG_1153.JPG
    IMG_1153.JPG
    75.9 KB · Views: 451
Not a pretty sight. But, providing there are no leaks, it can be smartened up.

Is that a pic of grout covered tile?

You cannot extend the enclosure - or you will run into the rad valve.

You have caulked in the jambs - have you water tested them? Have you water tested anything?

Where are the "ugly vertical channels"?
 
The ugly vertical channels have now been filled up with that grey filler, which you can see on either side of the shower! That's where the old enclosure screwed into. I'm thinking it would be difficult to extend the tiles, since the one that's been cut is on the inside rather than the outside. And I'd only get a couple more centimetres because of the tray and, like you said, the rad valve.

That's right, the sides and the bottom have been caulked. I haven't had a chance to water test them yet, because the silicone was only put on in the week. But it looks pretty good so I'm confident when I do test it. The handyman also caulked the inside at the bottom, which I know isn't usually recommended, but since it's frameless, I think I might get away with it.

I think I have to at least take one or two of the middle tiles out, because the handyman used compression joints behind and I've heard that can be a problem. The bottom also needs to be re-caulked, because the handyman used that bit of propped wood you see in the photos to force the frame out so the door would fit and siliconed it in that position. I removed the wood while the silicone was still wet and managed to adjust the door to fit even in the non-forced position, so I think the bottom just needs re-sealing.

What would you recommend? Thanks for your on-going advice.
 
Here's a photo of the bottom.
 

Attachments

  • IMG_1156.JPG
    IMG_1156.JPG
    126.7 KB · Views: 368
As above - water test and wait and see.

I presume that you've caulked the outside of the vertical frame jambs - and that the frame or door is not under pressure?

If possible, remove any silicone on the inside of the frame jamb - but beware of scratching.

Only seal the bottom at the outside.

If the shower valve was under pressure when it was exposed and it didn't leak, then dont bother opening up the wall again - the comp. fittings might stay good for the life of the valve. Wait and watch.
 
Thanks again for the reply.

The outside of the vertical frame jambs were sealed but that sealant has been temporarily removed. When we're done with the pipes, we'll reseal the outside and I'll make sure not to reseal the inside (at least not the jambs)!

In the end we had to open up the wall as I found out that the handyman had used some random non-compression screw fittings and some plastic pipe on the bit that fed into the valve without the right fittings or any inserts. So I'm re-plumbing all of that now, and he's coming back tomorrow to re-tile.

On the bit that will be re-done, I bought a cement hardibacker board with some tape, and some mix-from-powder adhesive and some new tiles. So at least a small bit of the wall will be done right.

I'm grateful for any more comments if you have any?

Matt
 
More comments? Get a better tradesman next time. Actually it doesn't LOOK too bad but I think stripping it all back and starting again is best policy now you know the extent of his or her cock-ups
 

DIYnot Local

Staff member

If you need to find a tradesperson to get your job done, please try our local search below, or if you are doing it yourself you can find suppliers local to you.

Select the supplier or trade you require, enter your location to begin your search.


Are you a trade or supplier? You can create your listing free at DIYnot Local

 
Sponsored Links
Back
Top