Tiling a wall at a time

Joined
30 Mar 2015
Messages
3,829
Reaction score
58
Country
United Kingdom
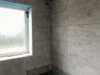
let me start by stating that I have now tiled a few times but I’m on to my most ambitious project yet: full bathroom!

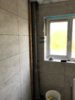
My question: once I’ve planned the tiling and matters such as ensuring there is a reasonably sized tile at top, bottom and edges and also that the tile lines follow through logically to window wall and again, avoid small cuts around window, can I tile out one wall and then move to the next?

I will also set a datum line using a batten above the bath.

Doing the one wall at a time, will help me busy through this I feel :)

I don’t want to come unstuck despite the initial planning.

Appreciate your help with this
 
Sponsored Links
For mine, I used a laser level to keep me right.....I could imagine the fourth wall meeting the first with a bloody step in the tile :eek:
I set battens all the way round before starting off, and check, check again for level.
John :)
 
Thanks John.
Once I’ve done this, can I then tile a wall at a time? Or do I have to go all the way around for each row?
 
With my bathroom, I worked around each wall with a full tile ( one of the walls was falling out big time) and the end result was fine.
I’m no tiler though, just applying engineers logic so maybe a pro will come in here!
I dont intend to do any more bathrooms, and I now use multiPanel boards.....wish I’d found them earlier!
John :)
 
Sponsored Links
I set my datum line and gave consideration to the points mentioned above. I am tempted to attack this a wall at a time. I'm hoping that a pro can yay or nay this...
 
The actual planning side of tiling is simple find your centre points vertically and horizontally you can then draw out your tiles if you really thought you would come across problems of small tiles needed near edges and so on. To which you could push your starting point (centre pont) forward or backwards to whichever direction by enough margin so that you're happy.

I wouldn't be so worried about the top of a wall as here is what mine ended up looking like, when I started my first big tiling project, which was my bathroom. I had full tiles above the bath to begin with and ended up with short tiles I had to file to a fine mm at the end. I'm not a tiler either.

IMG_20191009_031012840.jpg
 
I’ve made some progress since then. Current pics
 

Attachments

  • 7A3DD83B-F435-4A66-9577-00F0865FA06E.jpeg
    7A3DD83B-F435-4A66-9577-00F0865FA06E.jpeg
    216.3 KB · Views: 156
  • C32B4873-2C52-42AC-BFBD-C8B0BB571B88.jpeg
    C32B4873-2C52-42AC-BFBD-C8B0BB571B88.jpeg
    218.8 KB · Views: 162
  • EC1D100B-BFCE-4BE6-B463-9EBCD20306D4.jpeg
    EC1D100B-BFCE-4BE6-B463-9EBCD20306D4.jpeg
    217.5 KB · Views: 185
The actual planning side of tiling is simple find your centre points vertically and horizontally you can then draw out your tiles if you really thought you would come across problems of small tiles needed near edges and so on. To which you could push your starting point (centre pont) forward or backwards to whichever direction by enough margin so that you're happy.

I wouldn't be so worried about the top of a wall as here is what mine ended up looking like, when I started my first big tiling project, which was my bathroom. I had full tiles above the bath to begin with and ended up with short tiles I had to file to a fine mm at the end. I'm not a tiler either.

View attachment 172911
Coving works wonder in these cases if the little strip bothers you.
 

DIYnot Local

Staff member

If you need to find a tradesperson to get your job done, please try our local search below, or if you are doing it yourself you can find suppliers local to you.

Select the supplier or trade you require, enter your location to begin your search.


Are you a trade or supplier? You can create your listing free at DIYnot Local

 
Sponsored Links
Back
Top