tiling around door

Joined
21 Feb 2008
Messages
436
Reaction score
44
Location
Cardiff
Country
United Kingdom
Hi,

How do you tile a wall floor to ceiling if there is a door? I can think of 2 options

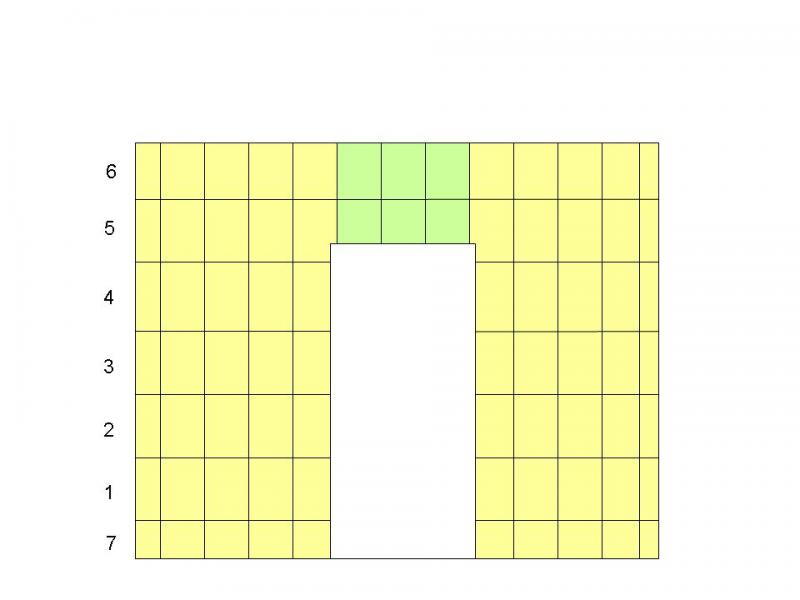
1) Tile the wall on one side of the door, the top rows would go above the door to the other end of the wall. Then tile the wall on the other side of the door upside down, i.e. starting from the upermost row and going down, securing each tile with gaffer tape. Perhaps will have to wait the adhesive of the top row to set off before securing to it.

2) Nailing a horizontal baton across the whole wall, including door opening. Sticking the first row of tiles on one side of the door, then measure as precisely as possible the width of the tiles and spacers that can be accommodated in the door opening, marking this on the baton and tiling the other side starting from the mark. Then nail vertical batons on both sides to give me datum lines, tile to the top. Tile above the door.

I personally like the second option but maybe you guys have some know-how. It is the first bathroom I am tiling.
 
Sponsored Links
i tend to try(soz attempt)your 1st option,but i tend to cut all tiles i need and work rapidily,remember you do have a bit of time before the adhesive starts to go off.if you find you cant get all the tiles on then go down as far as practical and bang a couple of pins in the wall to hold the tiles up,then carryon when gone off.hth a bit.
 
maybe you should just tile the bottom rows of each at the same height then it will fall into place........

a laser guide from all good larger dept stores are not expensive
 
Thank you guys!

gregers, I am a complete beginner, have put 21 tiles on the wall yesterday. Maybe my speed will improve in time but at the moment I can't imagine myself working rapidly :) Hence my preference of the second option.

jefoss, I have a laser guide, it is not a problem to ensure the same height on both sides of the door. But I have to be precise about the horizontal positioning of the tiles. Your post reminded me though to check that each new row of tiles is the same height on both sides, not to relay on the wooden baton and the spacers only.

Maybe one day I'll post a successful story on the forum :)
 
Sponsored Links
sorry im a little lost here, if your using a laser guide and doing both walls at the same time, (not reccommended btw) how can you go wrong?


im assuming that your using the same spacers on the tiles also?
 
Sorry, probably I didn't explain well. The door is approximately in the middle of the wall. If you imagine a continuous row of tiles near to the ceiling, there will be 11 whole tiles + 2 cut tiles at the both ends.


My idea is to do the yellow marked areas first starting with row 1 and finishing with row 7. I will nail a wooden baton horizontally on the line under row 1 from corner to corner. There is only a door frame there, no door, no architrave, so there is nothing on the way. Let say I tile left to right. After sticking the tiles left from the door, I have to start on the other side but can't just start from the door frame. I have to leave exact distance to accommodate later the tiles above the door opening.

If I don't get it right, when tiling the green area, I will have to cut the middle tiles or to have big vertical gaps between the tiles. That is where the things can go wrong. Of course, I'll do my best to avoid this.
 
i understand now, i thought you had a door at the edge of the wall.

you seem to want to do it the awkward way, as you seem to realise, one bit out and you are either cutting tiles that should be whole or spacing out tiles with 50mm spacers instead of 2mm
 
Well, I might go with the other option at the end, there is still time to think. As I said I am a complete beginner and this is an ambitious project for a beginner. I am going to tile the whole bathroom floor to ceiling. There are several things to take into account when deciding about the layout of the tiles - a bath (with tiled panel), vanity unit and concealed cistern toilet pan (they have a shared worktop), a window, a door.

I measured and checked very carefully several times, marked where the rows of tiles will be on the walls, made sure the datum lines are horizontal. Hopefully one or another way everything will be done properly.

The bathroom was a complete wreck, the floor was rotten, there were holes in the floorboards. With my partner we changed the rotten joists, put a new floor (2 layers of 18mm WBP exterior grade ply), changed all the plumbing, chased the walls for cables, the sparky did the first fix (I would do it myself but it is illegal), had the bathroom skimmed, tanked the bath/shower area, painted the ceiling, and now are tiling. Except of the electrician coming again to do the second fix, we are going to do everything ourselves. The house is not occupied, so the time is important but not such a huge problem.

This forum has been a great help so far, thank you very much!
 
sounds like your enthusiastic enough!


and on behalf of most of the forum, your welcome!
 
Yeah, resurrecting a 10 year old thread, but I can't find any others that deal with the same topic and my question is exactly the same.

Perhaps OP will get an email and let us know what he did in the end (10 years ago) or perhaps some others can give some guidance on how best to do this?
 

DIYnot Local

Staff member

If you need to find a tradesperson to get your job done, please try our local search below, or if you are doing it yourself you can find suppliers local to you.

Select the supplier or trade you require, enter your location to begin your search.


Are you a trade or supplier? You can create your listing free at DIYnot Local

 
Sponsored Links
Back
Top