
Yes, but the OP is basically embarking on a site assembly of disparate parts. IIRC there’s a regulation governing what you must do before firing it up!Not that all that much different, to a modern metal faced switch.

You are using an out of date browser. It may not display this or other websites correctly.
You should upgrade or use an alternative browser.
You should upgrade or use an alternative browser.
Using old crabtree (dolly light) switches (Ed.)
- Thread starter RedQueenie
- Start date
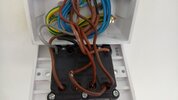
Hiya, could I use this 'dummy' switch to earth? I'm guessing not and it would be far safer to attach a brass screw into the casing. I was just curious.Come on guys sort y'selves out View attachment 341778")
Hiya it's been a while but I'm hoping today is the day I final install this light switch. I would be grateful if someone could just look over what I'm planning to do before I go ahead. I've attached a photo. I have a brass screw that I will drill into the main box for the earth.
Attachments
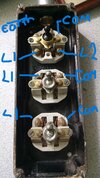
I think it's far more likely to be this arrangement

With a brass or copper link on the right terminals see red markings.
If you look you will see the top right screw is just that whereas all the others are a brass post with a hole.
It looks like the bottom switches are in the on position, in which case you may wish to turn them round so they are down for on. (Assuming the cable entry is at the top)
Thank you. I wasn't looking properly when I was marking out the photo. The red line which you have said to use a brass/copper link can you please explain why, just curious ")
Just had another look at the wiring of the switch already in place and wondered if there should be a wire between the 2 bottom switches rather than then top 2. Just for clarity the top switch will turn the kitchen light on/off in the utility and kitchen and the other 2 are for the utility and outside light
Thank you. I wasn't looking properly when I was marking out the photo. The red line which you have said to use a brass/copper link can you please explain why, just curious
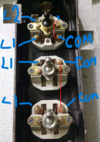
You will need to link the two terminals marked on the right of that top switch, with a short bit of wire. The one marked 'COM'. That will convert the switch into a replacement for a 2-way switch.
Basically, in the switch, is a U shaped bit of brass, which when you operate the switch, flicks up, or down, to link the upper two terminals, or the lower two.
My apologies, I edited my post and deleted more than I meant to.Thank you. I wasn't looking properly when I was marking out the photo. The red line which you have said to use a brass/copper link can you please explain why, just curious
DO NOT UNDO THE TOP RIGHT SCREW
If you look at that switch you will see there is already a brass or copper link in there, usually visible from the front in the channel where the movement is or sometimes in a channel at the back. you should not need to add any link wire on the right side

Brilliant! Thank you so much
You will need to link the two terminals marked on the right of that top switch, with a short bit of wire. The one marked 'COM'. That will convert the switch into a replacement for a 2-way switch.
Basically, in the switch, is a U shaped bit of brass, which when you operate the switch, flicks up, or down, to link the upper two terminals, or the lower two.
Ignore that! I've just had another look, and what I thought was a terminal, at the top right, is not..
Thank you
I have seen that type of switch before, and would be reluctant to re-use.
I think it is around 80 years old.
I have seen them with a bell-like cover that can be unscrewed by hand without using tools. Some of the bells, and the switch lever that you touch, are metal and not earthed.
Are the wires equally old? Rubber or PVC insulation?
I think it is around 80 years old.
I have seen them with a bell-like cover that can be unscrewed by hand without using tools. Some of the bells, and the switch lever that you touch, are metal and not earthed.
Are the wires equally old? Rubber or PVC insulation?
DIYnot Local
Staff member
If you need to find a tradesperson to get your job done, please try our local search below, or if you are doing it yourself you can find suppliers local to you.
Select the supplier or trade you require, enter your location to begin your search.
Please select a service and enter a location to continue...
Are you a trade or supplier? You can create your listing free at DIYnot Local
Similar threads
- Replies
- 22
- Views
- 719
- Replies
- 14
- Views
- 5K