• Looking for a smarter way to manage your heating this winter? We’ve been testing the new Aqara Radiator Thermostat W600 to see how quiet, accurate and easy it is to use around the home. Click here read our review.

Wall units around pillar

Joined
7 Oct 2025
Messages
4
Reaction score
0
Country
United Kingdom
Hi all,

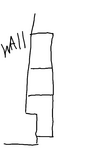
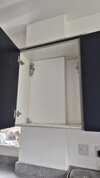
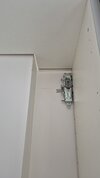
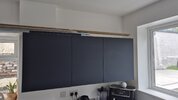
Looking for some advice on the best method to cut around a pillar to fit a kitchen wall unit, I've already fitting the one pictured but I'm not happy with the results

I've got a run of 3 wall units in total, the wall isn't straight by any means, currently I've fixed them straight to the wall but I'm debating whether to batten the wall to try and combat the wall not being straight

Any advice appreciated
 

Attachments

  • 20251007_145246.jpg
    20251007_145246.jpg
    114.6 KB · Views: 58
  • 20251007_150643.jpg
    20251007_150643.jpg
    97.9 KB · Views: 175
  • 20251007_144725.jpg
    20251007_144725.jpg
    136.7 KB · Views: 176
Last edited:
I'd just fill it; honestly you'll never look at it again when you've got a cupboard full of food and life's thrown its next curve ball

However, if you really want to cut another piece of wood with a better profile, get 3 pieces of card, A4 maybe, with at least one clean edge (if you've cut up a cereal box for example)
Cut a shallow triangle off two of the pieces to form a slight point; this is the corner that goes into an angle less than 90
Place your cards on top of the cupboard following the wall edge and tape them together.

This is now the profile you need to cut; measure some distance to a known point, eg from the internal corner of the wall/pillar to the next cabinet along, to know where to place the profile on the cabinet you'll cut. Bear in mind if the angle is too savage you won't be able to get the cabinet in place without taking down the adjacent cabinet, if it's already up

1759903578321.png


There are ways of doing this directly onto eg the cabinet but it's a lot more messing than using a lightweight material to profile

If you have any spray contact glue you can sticky the card with, that can make it easier if you have nothing to rest on, as the pieces will stick together as soon as you overlap them or if you have a scrap of wood you can hold against the wall with your body(on an angle eg touching the wall and the corner of the pillar) it creates a "table" for you to work on
 
Last edited:
The unit depth is now defunct because of the pier you have had to cut it around. I would cut a white panel the size of internal measurements of the unit "height & width" and use that to create a false back. You can then cut the shelves down and use the cupboard for spices, bag of sugar and such like.
 
I'd just fill it; honestly you'll never look at it again when you've got a cupboard full of food and life's thrown its next curve ball

However, if you really want to cut another piece of wood with a better profile, get 3 pieces of card, A4 maybe, with at least one clean edge (if you've cut up a cereal box for example)
Cut a shallow triangle off two of the pieces to form a slight point; this is the corner that goes into an angle less than 90
Place your cards on top of the cupboard following the wall edge and tape them together.

This is now the profile you need to cut; measure some distance to a known point, eg from the internal corner of the wall/pillar to the next cabinet along, to know where to place the profile on the cabinet you'll cut. Bear in mind if the angle is too savage you won't be able to get the cabinet in place without taking down the adjacent cabinet, if it's already up

View attachment 394919

There are ways of doing this directly onto eg the cabinet but it's a lot more messing than using a lightweight material to profile

If you have any spray contact glue you can sticky the card with, that can make it easier if you have nothing to rest on, as the pieces will stick together as soon as you overlap them or if you have a scrap of wood you can hold against the wall with your body(on an angle eg touching the wall and the corner of the pillar) it creates a "table" for you to work on
Yes that's a good idea I did this when fitting a sill board in an out of shape window recess, thanks for the advice
The unit depth is now defunct because of the pier you have had to cut it around. I would cut a white panel the size of internal measurements of the unit "height & width" and use that to create a false back. You can then cut the shelves down and use the cupboard for spices, bag of sugar and such like.
I did think about doing this also, but as I mentioned about whether or not to batten the wall first I'd also be gaining a little bit more depth I know the extra would only be the depth of the batten
 
I did think about doing this also, but as I mentioned about whether or not to batten the wall first I'd also be gaining a little bit more depth I know the extra would only be the depth of the batten
Battening the wall may not solve the problem, you will also end up with a large gap at the bottom rear of the wall units which is hard to disguise.

The type of hangers in your wall units allow for quite a bit of inward outward adjustment.

When I hang a wall unit I wind it back fully to the wall and then get the top front level, I then check the face of the unit sides for plumb, often ill have to put a packer in at either the top or bottom to get the unit plumb, once plumb re level the top, I then work across in the same fashion.

What can happen if the wall dips inwardly on the unit line and as you progress you may find the back of the unit to the adjacent unit isnt closing, its a case of winding the units out to close this gap and pack behind accordingly.

If you achieve plumb and level wall units lining the doors up will be a walk on the park.
 
You'll have to bear with me this is the first kitchen I've fitted, I've drawn a rough sketch of what I'm dealing with on the wall side of things, I've obviously got the pillar to contend with but also the wall that the run of units are fitted, it's not square by any means and I'm not happy with the way the units are sitting
 

Attachments

  • Sketch_20251008_221934.png
    Sketch_20251008_221934.png
    32.4 KB · Views: 143
Is it really as bad as the sketch makes out? Is it curved? Or is it just that the corner isn't 90? How much would you have to build the wall out at the pillar end to make it 90?
 
If the sketch is anything to go by, it's not the wall that's on an angle, but that pillar.
In any case, what you've done with the unit on the pillar is not that bad.
You could use a trim to fill those gaps and as suggested you will never look at them again.
The other units need to go flat on the wall and if the one on the pillar doesn't line up because of the angle, you'd need to cut a little bit more from the left side to make it go back a bit.
Once you fit the wall units, use a long spirit level on the bottom edge to see how much you need to take off from the back left of the pillar cabinet.
I hope it's clear.
 
You'll have to bear with me this is the first kitchen I've fitted, I've drawn a rough sketch of what I'm dealing with on the wall side of things, I've obviously got the pillar to contend with but also the wall that the run of units are fitted, it's not square by any means and I'm not happy with the way the units are sitting
I think you are over thinking it, but say you do want to pull the wall units square to the pier then you would have to cut firrings to correct the out of square.

Is that wall square to the return wall it runs into?

Are there base units below? Have these been fitted to lose the out of square? If you do this you will end up with a worktop that is wider one end than the other.

Not to preach, but...at a guess ive fitted probably 2000 kitchens and never batonned off or cut firrings for wall units.
From the wall to the pillar it runs out by about 15mm and yes there are base units with worktop fitted which I had to scribe both to the wall

So going forward forget the batten I'll trust your 2000 kitchens over my 1, the best approach would be what? I've got a spare 600mm unit ready to be fitted, currently the the run is two 600mm with a 500mm unit in the middle but I'm debating moving the 500mm unit to the end where the pillar is my thinking is there's obviously more space in the 600mm so why waste it cutting the back out off another one when I could use the smaller 500mm

Thanks again
I would leave it as you have done it. Putting the 500 on left will only accentuate the pier and you'll lose the symmetry of 600/500/600, but that only matters if you like symmetry.

If you really need to lose the out of square, I would fix the bracket of the right hanger on the left hand wall unit to packing of 15mm, then fix the right hand bracket of the right hand wall unit directly to the wall. You can then use a string line between the two to measure how much you need to pack the other brackets out by, these packing measurement will need to be mirrored at the bottom of the wall units.
I would use glazing packers, Broadfix from Screwfix have packers ranging from Red 6mm, Blue 5mm, Grey 4mm White 3mm Black 2mm and Green 1mm.
Push the packers up so they cant be seen.

The gables on the wall units I instal have a 16mm service void, if I were to fit these by the packing method suggested above, on the left I would have 15mm packing gap plus 16mm manufactures service gap equals 31mm gap and the far right I would have the 16mm manufactures gap, which imo would look pants considering I could of just gone with the out of square and kept a consistent 16mm or so gap.

As clear as mud? Good Luck.
 

If you need to find a tradesperson to get your job done, please try our local search below, or if you are doing it yourself you can find suppliers local to you.

Select the supplier or trade you require, enter your location to begin your search.


Are you a trade or supplier? You can create your listing free at DIYnot Local

 
Back
Top