• Looking for a smarter way to manage your heating this winter? We’ve been testing the new Aqara Radiator Thermostat W600 to see how quiet, accurate and easy it is to use around the home. Click here read our review.

Warped oak

Joined
20 Nov 2025
Messages
1
Reaction score
0
Country
United Kingdom
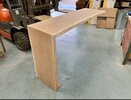
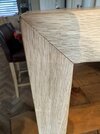
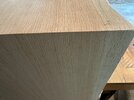
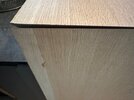
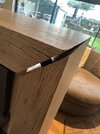
Hi, looking for help/advice on how to deal with some oak that has warped and is now impossible to get a good join, as shown in the photos. The first photo is how it looked in the workshop and the rest are how it looks now it's in my warm house.

Is there a way to get a nice join on this, now it has warped? Obviously want to avoid using screws if at all possible but have had no luck in finding a resolution, after having contacted a number of local joiners.
 

Attachments

  • thumbnail_image0.jpg
    thumbnail_image0.jpg
    78.3 KB · Views: 39
  • thumbnail_image1.jpg
    thumbnail_image1.jpg
    68.6 KB · Views: 39
  • thumbnail_image2.jpg
    thumbnail_image2.jpg
    81 KB · Views: 39
  • thumbnail_image3.jpg
    thumbnail_image3.jpg
    98.2 KB · Views: 37
  • thumbnail_image4.jpg
    thumbnail_image4.jpg
    66.9 KB · Views: 40
Attach G-clamps to the wood then take it in sauna.
I'm sure they won't mind.
 
Ive not tried this but could you sash clamp the joint back together then instal hardwood bows at the 45 degree where it has pulled apart.

Maybe use Iroko or Maple for the bows, make it a feature, you could also reinforce the joint from underneath.
 
too ambitious a join for natural wood of such width - make a join where that movement won't be so noticeable.
 
It can be done but is not easy. Copied and pasted from my favourite furniture making book:

Method: Thermal Rebind with Compression Dowels

Step 1: Controlled Humidity Rebalance

  • Place the warped oak piece in a sealed chamber (or a large plastic bag) with a humidity stabilizer (e.g., damp towels and silica packs).
  • Alternate between 60% and 30% humidity cycles over 24 hours to relax internal stresses in the wood fibers.

Step 2: Thermal Rebind

  • Warm the joint area gently using a low-temperature heat pad (around 45°C) for 2–3 hours.
  • This softens lignin bonds slightly, making the wood more pliable without scorching.

Step 3: Compression Dowels

  • Drill shallow pilot holes across the joint line.
  • Insert compression dowels coated with a flexible resin adhesive.
  • As the dowels absorb moisture, they expand slightly, pulling the joint tight and compensating for minor warp.

Step 4: Resin Lock

  • Apply a thin bead of elastic resin adhesive along the seam before clamping.
  • Clamp for 48 hours under moderate pressure to allow the resin to cure and the dowels to stabilize.
 

If you need to find a tradesperson to get your job done, please try our local search below, or if you are doing it yourself you can find suppliers local to you.

Select the supplier or trade you require, enter your location to begin your search.


Are you a trade or supplier? You can create your listing free at DIYnot Local

 
Back
Top