What floor?

Joined
13 Jun 2015
Messages
94
Reaction score
7
Location
Yorkshire
Country
United Kingdom
Hi guys,

Looking for a bit of help.....

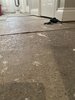
recently had a water leak which has wrecked the laminate flooring that was in my hallway. Taken it up and it’s drying out. I remember laying this and the floor wasn’t very level then. Only now the water is lifting the chipboard flooring at the edges. Obviously as it’s lifted it’s now springy

Anyway when my builder did my extension, he pointed out I had a “floating floor”. Basically concrete or something with a layer of insulation and then chipboard just basically laid across the top and not fastened down i.e, a floating floor.

no idea if what he told me is true but there certainly isn’t any screws or nails anywhere holding it down, obviously being a new build it goes under all the internal walls as well

what are my options to rectify? Picture attached.
 

Attachments

  • 7EC41C7E-8990-42D6-9687-0B1D008C4F7B.jpeg
    7EC41C7E-8990-42D6-9687-0B1D008C4F7B.jpeg
    356.7 KB · Views: 64
Sponsored Links
Providing the pieces are still glued together and not all loose a quick and dirty option might be to belt sand the raised edges flat, treat them with wood hardener, then lay underlay and laminate on top.

Other than that i think it's a case of cut out all the chipboard back to the skirting (circular saw and multitool) and refloor, again floating with the joints glued with a D4 adhesive. I think you will get a better job if you take the skirtings off before doing this, and replace them afterwards, but that does mean a complete redecorating job, I'm afraid

I think it’s the glue that’s failed with the water (assuming it was glued in the first place. Wouldn’t surprise me if it wasn’t) and the edges are lifting across 2 of the joints.

how does it work with cutting it out? The wall to the right is stud and fastened to the floor. So can it just be cut out then relaid? Even though there is t&g to join it to?
 
If this was a suspended floor, you'd put a noggin under the cut edges of the old and new boards where they butt together to support them adequately. But it's not, and the concrete subfloor will support the cut edges just fine.
 
Sponsored Links
how does it work with cutting it out? The wall to the right is stud and fastened to the floor. So can it just be cut out then relaid? Even though there is t&g to join it to?
Cut the floor out tight to the wall. Insert "noggins" (4 x 2in or 3 x 2in) between joists to carry joints as required, and add battens (2 x 2in or 3 x 2in) to sides of joists as required to make them, in effect wider, again as required. Don't worry about the T&G joints into existing, but leave a couple of millimetres gap. Glue grooves on new stuff, also glue to tops of joists (use D4 flooring glue or D4 PVA) and screw down (with something like 4.0 x 50mm chipboard screws) at 150mm centres. Also make sure that all end joints are supported by installing additional "noggins" between joists. Ideally use P5 (moisture resistant) chipboard if possible
 
Last edited by a moderator:
Cut the floor out tight to the wall. Insert "noggins" (4 x 2in or 3 x 2in) between joists to carry joints as required, and add battens (2 x 2in or 3 x 2in) to sides of joists as required to make them, in effect wider, again as required. Don't worry about the T&G joints into existing, but leave a couple of millimetres gap. Glue grooves on new stuff, also glue to tops of joists (use D4 flooring glue or D4 PVA) and screw down (with something like 4.0 x 50mm chipboard screws) at 150mm centres. Also make sure that all end joints are supported by installing additional "noggins" between joists. Ideally use P5 (moisture resistant) chipboard if possible
There are no joists!!
 
Sorry, the result of trying to field three problems at the same time.

As it is just a floating chipboard floor, then just refit the boards, but pull them up with flooring straps or the like and glue the joints to create a single floating floor. You still don't worry about trying to connect to the old floor. You will, however, need to get the concrete sub-floor beneath the chipboard thoroughly dried out before you do the chipboard install unless you want them curling at the edges again. This normally means cutting the old floor out, leaving it uncovered to dry for a while, then replacing it (technically you should use something like a Tramex flooring moisture meter to test moisture levels before reinstalling)
 

DIYnot Local

Staff member

If you need to find a tradesperson to get your job done, please try our local search below, or if you are doing it yourself you can find suppliers local to you.

Select the supplier or trade you require, enter your location to begin your search.


Are you a trade or supplier? You can create your listing free at DIYnot Local

 
Back
Top