Reparing Broken Underfloor DPM

Joined
14 Dec 2015
Messages
25
Reaction score
3
Country
United Kingdom
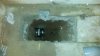
Moving WC/waste in bathroom.

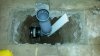
We’ve unearthed and cut back the soil pipe as required. In doing so we’ve removed the DPM back to the edge of our trench (about 30 x 60cm). I’m concerned we should make good the DPM. I've considered removing more floor to expose good DPM so we can patch it somehow. But don't think we can without damaging the DPM we're trying to expose.

Is there any other way I can make good the DPM? Does it really matter? :cautious:

I imagine this is a common scenario. Maybe I’m googling the wrong words but I can’t find an answer anywhere.

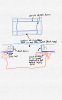
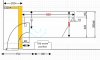
The bathroom’s about 1.6 x 3.3m in a 1970-built extension. When finished, about half the width we've excavated will be tiled over - other half (to wall at top of photo) will be under boxed pipe work etc.

Grateful for any advice.
 

Attachments

  • dpm.jpg
    dpm.jpg
    124.1 KB · Views: 563
Sponsored Links
Why have you excavated? Was there a leak or are you repositioning the WC?
Does the soil pipe go on from the fitting thru the right hand side of the hole, or will it rise up on a ninety bend?

When i understand what you are doing i'll attempt to advise you.

FWIW: the bottom 50mm of the wll plaster should be cut back from solid floor contact.
 
Thanks for the prompt attention ree. We're moving the WC.

We've already cut out a section of the original soil pipe - the remainder to the right is now redundant, the pipe to the left in the photo (with the rubber connector attached in the photo) will be connected to rise 90 to the floor as you suggest, though we're using three separate connectors to stagger the rise so it comes up closer to the back the wall. The 'notch' in the trench is where the waste will come up to the floor. We need to do this to accommodate the new WC btw and this approach (i.e. staggered connectors) was best advice from the plumbing shop.

Noted what you've said about the plaster. This is what we found when we removed the original box work for water supply pipes.
 
As it stands, I dont think your proposition will work, you will come up to the right of the notch: You really need the complete WC pan and cistern on site with a copy of the installation dimensions at hand.

There are various types of S-trap pans with different centres for spigots.

You will also need to know the FFL for the pan connection, and the finished wall line surface eg. tile, for the cistern fixing.

Be aware of the fill valve being RH or LH?

The membrane repair can be taken care of later.
 
Sponsored Links
As I see it the big problem will be that your new pan will be sitting one half on the original concrete and a hallf on your repaired (made up) concrete. Sealing a patch of DPM around its edge to the old is easy, just use silicone goo. The difficulty is getting the underneath concrete to have a flat surface at exactly the right level. If the concrete in-fill is low, after patching the DPM, putting the screed on it will cause the centre of the DPM to drop and pull away at your new seal around its edge.
Frank
 
ree - I have scale plans, including WC dimensions, so hope I won't be too far out, but agree re. having WC on-site and won't complete the waste job until I have. If I need to, I can widen the notch. Is using a corrugated pan connector recommended or otherwise? It isn't an S-trap pan btw.

woody, Frank - I have no DPM protruding in some places so guess I'll just have to carefully break away more concrete and be careful not to damage it (DPM) further. Good point re. weight of screed of that. Maybe I can weigh the patch down with bricks to emulate screed load best I can before sealing(?)
 
The question was about how to repair the floor!
put the pipe in to correct position - concrete to level with existing concrete- 2 coats of synthaprufe, including up the cut screed - leave to dry - make good the screed.
 
I like your weight idea. I think it could be improved if the whole surface of the DPM was covered in sand first, then loaded with as much weight as you can find. the sand will help to spread the weight over the whole surface. After a day the weight and sand can then be removed and the seal inspected. use a vacuum cleaner if required to remove last traces of sand if required.
Because of your rubber joiner, the earth and the concrete can not be thumped down or the rubber bit will collapse. so just fill the hole with sand over the depth of the pipe and tamp it gently down. I think I would try and bond the new concrete to the sides of the old concrete. One very good way, but difficult, would be to drill pairs of holes opposite each other on both "walls" of the old concrete, say 6mm diameter, 20mm deep. Get some 6mm rebar and cut it the width of the big hole plus two times 20mm. Bend it into a slight curve and try and get both ends into opposite holes. Then place a piece of wood under it get the top of the curve on top and clamp it down to the wood. With some luck this will drive the end of the rebar further into the holes. Repeat every 2" (!!). It would be good to have some cross wire too. The whole procedure is to discourage your new concrete plug from sliding down the hole. An alternative approach could be to cut a series of horizontal groove in their walls about 1/4" apart and 1/2" deep, use a chisel to knock the saw cuts into 1/2" wide grooves and use these to support the ends of the rebar.
Frank
 
simon2009,


If you use a flexi connector in the ground there are various risks - personally, i dont like to use flexi's anywhere. I would use solid pipe.

An S-trap pan is the obvious pan to use because willy-nilly you will turn a P-trap into an "S-trap".
An S-trap pan will keep things simpler.
Whats the name of the WC that you have scale plans for?


The in-place rubber "Fernco" connector SS band screws will need re-tightening after 24 to 48 hrs -
AAMOI: you can gently tamp down on a Fernco, it wont dislodge it.
3/4 back fill the hole with tamped earth then concrete the last 1/4 - dont totally fill the hole with concrete.

Temporarily block off the soil pipe in the ground to prevent vermin entering the b/room.
 
Last edited:
Here we go. Nice and simple.

Cut 200mm polythene skirts and lap them under the slab and over the existing DPM. Then fold them down after infilling the hole, and lay another piece of polythene over the skirts and tape the lap.
 

Attachments

  • DPM repair_1.jpg
    DPM repair_1.jpg
    80.2 KB · Views: 620
Thanks everyone for your interest/advice.

Nige F - Like the sound of that synthaprufe stuff.

Frank - I get all that. I'd planned to install a wall-hung WC - the feet of the s-frame would be right on repaired floor. Using a back to wall WC instead would result in part of the load being borne by untouched floor (at bottom of photo). Or I could reinforce as you describe.

Woody - Picture = thousand words, thanks. Only snag is there's no seal between DPM and folded skirt right? Though some silicone would see to that…

Whichever approach I choose, I still have the niggling job of exposing DPM without breaking it.

ree - I'm attaching another photo to show (roughly) how we come up and move back. Please note I've just cobbled together quickly to demo - final version will come up where we need. But the flexi connector was for pan to floor. Have one plumber friend who says flexi connectors are nasty for WCs in general (stuff gets stuck) and another mate who says that's not a problem! Tips re tightening the jubilee clips and blocking old pipe useful/noted.
WC: http://tinyurl.com/hvaa4k9

General point - I'd planned to back-fill with pea gravel (rather than sand or soil), topping with concrete and screed. Not sure if pea gravel's easier or not to tamp(?)

In the photos you can just about see some concrete in the trench bottom (top left). This seems to be the wall foundation. If this extends under the connector I could maybe whack some mortar under the waste/connector to provide support (once in place and tightened obviously). Can't inspect atm.

Another photo and WC plan attached.
 

Attachments

  • 20151216_125209.jpg
    20151216_125209.jpg
    150.6 KB · Views: 559
  • temp.jpg
    temp.jpg
    62.6 KB · Views: 486

DIYnot Local

Staff member

If you need to find a tradesperson to get your job done, please try our local search below, or if you are doing it yourself you can find suppliers local to you.

Select the supplier or trade you require, enter your location to begin your search.


Are you a trade or supplier? You can create your listing free at DIYnot Local

 
Sponsored Links
Back
Top