HIVE THERMOSTAT WIRING - CAN ANYONE HELP?

Joined
16 Oct 2009
Messages
24
Reaction score
0
Location
Hampshire
Country
United Kingdom
Good Afternoon

I have ordered my partner a HIVE thermostat to replace her old tired one. I have tried to get someone in to install it for her, but they have come back with rather high quotes, which I'm assuming is because of Covid.

Thanks to the kind people here at the beginning of the year, I was able to fit my Central heating HIVE with ease. Therefore I was hoping someone could offer the same assistance.

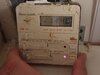
The old thermostat is

a>


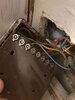
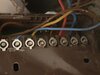
The wires on the back of the old thermostat are:

a>


I would really like to be able to do this for my partner as she has, been through a lot this year and it will really help her out.

If anyone can offer assistance I would be most grateful.

Lastly, I am a methodical person who takes DIY seriously and in no means am I someone to do things at half measure. I take safety of myself and others very seriously. I am always keen to learn new things and I was exceptionally happy and satisfied after I managed to wire in my HIVE thermostat, thanks to the support I received.

Thank you in advance.
 

Attachments

  • 20201120_121021.jpg
    20201120_121021.jpg
    228.8 KB · Views: 213
  • 20201120_120928.jpg
    20201120_120928.jpg
    230.1 KB · Views: 215
  • 20201120_120955.jpg
    20201120_120955.jpg
    269.4 KB · Views: 241
Last edited:
Sponsored Links
The Honeywell ST699 or ST799 shown in your photo is a programmer and not a thermostat.

You will need a dual channel version of the Hive to replace it and all of the existing wires are transferred from the terminals of the Honeywell as below....

Capture.JPG


...to the terminals of the dual channel Hive that have exactly the same functions. So N goes N, L to L, Hot water on, to Hot water on etc...

hive-jpg.141674


If there is an existing room thermostat somewhere, that should either be left in situ and set to its maximum setting so that it doesn't interfere with the operation of the Hive, or decommissioned by removing it and making a small modification to the wiring to bridge the switching circuit. If you need any assistance with that, post back details of the existing room thermostat and a photo of its wiring connections.

You don't give any details of the type of heating system this is connected to. So, if your existing system is fully pumped (eg S-Plan or Y-Plan) then you are good to go. If it's an older system with pumped heating and gravity circulation of hot water, then the Hive should be set to gravity mode. The Hive instructions explain how to do this.
 
Thank you so much for your reply stem. I believe that you were the kind person that helped me install mine beginning of the year. You really are kind providing the diagram and information Thank you.

I have studied the diagrams that you have provided. Looking at the existing wiring, I can see neutral (blue R2/N) and CH on (Red R3) but the yellow, light blue and long brown wires seem to be in the wrong places? I'm assuming this is why the timer has never worked?

I am also assuming the long brown wire is the permanent live, therefore, that leaves the light blue and yellow wires? It looks like one wire is missing?
 
Sponsored Links
Don't get hung up on the wiring colours, they would have been selected by the original installer according to their preferences. It's what the wires are connected to at each end that determines what they do, not the colour of their insulation.

Why it doesn't work now maybe because the programmer itself is faulty or there is a fault elsewhere, but there are wires at the programmer exactly where I would expect to see them (The wiring indicates that it is a Y-Plan system with a 3-Port motorised valve, so you can ignore my earlier comment about gravity circulation of hot water)

You will only need the wires that are already there, and like I said before, they simply transfer from the Honeywell terminals to the Hive terminals that have exactly the same function. So after you have discarded the brown links between L, 5 & 8 as per @ianmcd

  • Honeywell L = Hive L (Brown wire)
  • Honeywell N = Hive N (Blue wire)
  • Honeywell 3 CH ON = Hive Heating on 4 (Yellow wire)
  • Honeywell 6 HW ON = Hive hot water on 3 (Red wire)
  • Honeywell 7 HW OFF = Hive hot water off 1 (Blue wire being used as a live wire and should have a brown sleeve over it to show this)
Is there a room thermostat somewhere?
 

DIYnot Local

Staff member

If you need to find a tradesperson to get your job done, please try our local search below, or if you are doing it yourself you can find suppliers local to you.

Select the supplier or trade you require, enter your location to begin your search.


Are you a trade or supplier? You can create your listing free at DIYnot Local

 
Back
Top