How to replace a rotted timber door sill?

Joined
25 Dec 2013
Messages
186
Reaction score
1
Location
Manchester
Country
United Kingdom
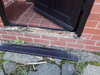
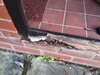
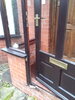
I have a hardwood timber door sill that has rotted away. Not sure how it's rotted so bad.

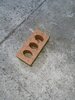
How do I fit a new door sill?

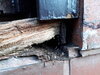
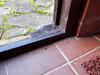
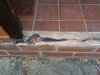
If I slide it in beneath the door jams, how do I secure it in place? The old one appears to have been nailed to the door jambs - the rusty nails can still be seen protruding out from the bottom of the jambs but the jambs themselves seem to be fine i.e. not rot.

Don't really want to start screwing it into the brickwork or cutting the Jambs. Is their some sealant I could use. The only problem is as I push it in the sealant will be pushed out if its a tight fit.

Any tips advice on best way to tackle this would be much appreciated.
 

Attachments

  • 20200925_093219.jpg
    20200925_093219.jpg
    436.8 KB · Views: 309
  • 20201001_101913.jpg
    20201001_101913.jpg
    358.9 KB · Views: 309
  • 20201001_102020.jpg
    20201001_102020.jpg
    279 KB · Views: 332
  • 20201001_101220.jpg
    20201001_101220.jpg
    416.9 KB · Views: 318
Sponsored Links
For the work involved it’s as easy to just replace the frame , looks to be in exposed position which hastens rot .
A canopy or porch of some type would help protect .
 
I agree with foxhole , easier to replace the entire frame

To get a new cill in you would have to cut the jambs , slide it in place and glue it to the jamb and screw it to the floor ,no other way
 
For the work involved it’s as easy to just replace the frame , looks to be in exposed position which hastens rot .
A canopy or porch of some type would help protect .

Not that easy to replace entire frame becuase frame has windows attached. see pic. Looks like more work replacing entire frame.
 

Attachments

  • 20201004_082100.jpg
    20201004_082100.jpg
    343.7 KB · Views: 274
Sponsored Links
I agree with foxhole , easier to replace the entire frame

To get a new cill in you would have to cut the jambs , slide it in place and glue it to the jamb and screw it to the floor ,no other way

why would i need to cut the jambs? The jambs are not rotted. The only thing that would need to be cut are the nails protruding from beneath the jambs which can be hacked off.

Then im doing the same thing as I originally suggested which you've also alluded too, that is sliding in place and screwing to the floor.

I wanted to know if i can bond the sill rather thsn screwing it down into the floor which are bricks. Is there some strong exterior adhesive i can use instead that can bond wood to masonry.
 
Do you step on your cill to step down and up?

Reason I ask if you do and the cill cracked that could be the cause of the rot.

Might be an idea to put a step in.

The reason I said you would need to cut the jambs is because normally there is a tenon there which you would need to remove , if not happy days !

The other reason why I said screw it down is because if it rots again gluing it down will make it a bugger to replace

However any exterior no more nails and the like will do

Hi, the sill originally had a plastic water bar and was rotting near the edge of the water bar. I removed the water bar and used a 2 part filler to patch it up including the gap where the water bar used to sit as it would no longer remain seated. It then did appear to crack along that centre line where the water bar used to sit and eventually we have the result above.

Putting in a step might be a good idea.

The jambs don't appear to have any tenons - theres just some nails protruding out.


If I screw it down into the brick work how many screws would you normally use and how far spaced apart on a sill that is just under a metre in length?

What kind of screws will I need and what length for a sill that is 45mm thick? Do I also need to use plastic plugs and if so how do I knock them through the wood into the bricks without removing the sill first after drilling the holes through both the sill and bricks?
 
Tap the new cill into position, without any adhesive or filler. Drill through the cill so you make a mark into the brickwork. Remove cill and drill holes into bricks. Fit appropriate rawplugs to suit the size of screw you are using. Apply sealant along edges of cill and brickwork before tapping cill back into the same position as first time. Screw through holes in cill into rawplugs in brickwork. Seal all exposed surfaces to help prevent water ingress.
To be honest though, as suggested, I think you also need a step or small single skin wall underneath to help support the cill when people stand on it. (which they will do)

Thanks for the tips. What size screws would I need and how many would you screw into a meter length cill. Also what type of sealant would you recommend...a brand name will make it easier to purchase.
 
You will need three fixings, 3 1/2 x 10's or x 12 stainless steel or brass so they don't rust, countersunk and into brown plugs. One fixing in the centre, the other two 4" in from the frame. Suggest you use an hardwood for the sill, if you can get it, so no more rotting. I would doubt the sill is a metre wide?
 
The length of the screw will need to be the thickness of the cill plus an amount at least the same length of the rawplug you are using in the brickwork.
Have a look at Unibond sealants. You want sealant, not mastic. You can get different colours including clear so the choice is yours. You will also need a gun, often referred to as a mastic gun or sealant gun to apply it.
 
You will need three fixings, 3 1/2 x 10's or x 12 stainless steel or brass so they don't rust, countersunk and into brown plugs. One fixing in the centre, the other two 4" in from the frame. Suggest you use an hardwood for the sill, if you can get it, so no more rotting. I would doubt the sill is a metre wide?
No the sill is meter in length and 6" wide and 2" thick
 
The length of the screw will need to be the thickness of the cill plus an amount at least the same length of the rawplug you are using in the brickwork.
Have a look at Unibond sealants. You want sealant, not mastic. You can get different colours including clear so the choice is yours. You will also need a gun, often referred to as a mastic gun or sealant gun to apply it.

Hi,

Looks like there is a Damp Proof Membrane on the brick work I need to drill into and the bricks I think are engineering type with holes in the middle (e.g. see pic, please note I'm not entirely sure if its the same type of brick with out ripping up the mortar and DPM layer) so finding the right place to drill has become another challenge.

Any ideas or suggestions?

Also if I drill into the DPM is that going to have any adverse impact - mind you some of it is already damaged as you can see in the pic?
 

Attachments

  • 20210223_132145_resized.jpg
    20210223_132145_resized.jpg
    334.9 KB · Views: 190
  • 20210223_142745_resized.jpg
    20210223_142745_resized.jpg
    581.7 KB · Views: 160
I'm not a brickie but I'm sure thats just a standard facing brick, not an engineered brick. In my limited experience the engineering bricks I have encountered always seemed to be a dark, gun-metal, type of colour and heavier than a standard brick. They also didn't have holes in the centre but a sort of 'V' on one side known as a 'frog'. The frog was always placed face down to prevent moisture/water pooling in it. To drill into the brick I would come in from either end about 1/3 of the brick length so you drill into one of the cross ribs. You could measure the distance if you want to be more accurate.
 
I'm not a brickie but I'm sure thats just a standard facing brick, not an engineered brick. In my limited experience the engineering bricks I have encountered always seemed to be a dark, gun-metal, type of colour and heavier than a standard brick. They also didn't have holes in the centre but a sort of 'V' on one side known as a 'frog'. The frog was always placed face down to prevent moisture/water pooling in it. To drill into the brick I would come in from either end about 1/3 of the brick length so you drill into one of the cross ribs. You could measure the distance if you want to be more accurate.

All, so far as I am aware, correct!

I would also advise the OP, not to drill down through the DPM, but to find some other way to fix. Drilling it will allow damp through..
 

DIYnot Local

Staff member

If you need to find a tradesperson to get your job done, please try our local search below, or if you are doing it yourself you can find suppliers local to you.

Select the supplier or trade you require, enter your location to begin your search.


Are you a trade or supplier? You can create your listing free at DIYnot Local

 
Sponsored Links
Back
Top