• Looking for a smarter way to manage your heating this winter? We’ve been testing the new Aqara Radiator Thermostat W600 to see how quiet, accurate and easy it is to use around the home. Click here read our review.

Advice on 600x300 wall tile

Joined
18 Aug 2025
Messages
59
Reaction score
1
Country
United Kingdom
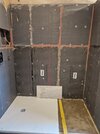
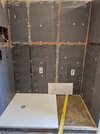
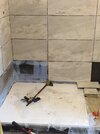
Hi guys so im doing my bathroom wall tiles and wanted to ask some advice about setting out

Maybe a little late as i have already done 2 walls but how i have set them out is i have found the centre of the wall put a laser line up it and then i have gone left and right with my tile and the grout line being the centre point

However after watching somw youtube videos i see almost everyone else finding the centre of the wall and then finding the centre of the tile and setting the centre of the tile as the centre wall point

So can i ask if what i have done is totally wrong and if so with the 2 remaining walls would i be better to carry on with the method i started with switch to the method most use or is it totally up to me and what works as on some parts having the grout line centre works better for bigger cuts and on other parts having the tile centre works better

Image attached from what ive already done and holding up a tile to show the option

Many thanks
20250823_092709.jpg
 
There is no ' correct way' between going full tile off centre, or centre tile off centre. It's usually decided by what cuts are left at the ends.
Perhaps if you showed us a photo of the ends of the runs, we would comment if we thought you made the right starting decision.
And No, the 4 walls don't have to have the answer applied.

Oh, and what you've done so far looks good !!
 
Thanks for the reply

So here is a couple more pictures one of the wall done and one of the shower

As you can see there is the 2 options centre ground line wity a tile each side and a cut each end or centre tile with a bigger 500 cut each side of it
 

Attachments

  • 20250823_102422.jpg
    20250823_102422.jpg
    329 KB · Views: 44
  • 20250823_102831.jpg
    20250823_102831.jpg
    305.3 KB · Views: 47
  • 20250823_102902.jpg
    20250823_102902.jpg
    301.8 KB · Views: 47
Tbh it's personal preference. I prefer as big a tile as poss in the corner of a shower ( therefore keeping the grout away from the corner) so I would go for the 500 cut each side.

But that was the easy part of the laying out - i know your heights are now set in stone as you have to tie the walls together; so what did you set the heights at for that recessed box shelf ? Top of a tile in the centre of the box, or top of a tile being the bottom edge of the box ?
 
thanks guys yeah so i will go with mix of the 2 then what ever give the biggest cut on the edges , ahh thats a good point you have made when i made recessed box i didnt set it to any tile i just though i would work with what was there when the time came and lucky enough its not a silly little cut!!
but it will be neither bottom of the box or top of the box it will be split and full tile will be cut to fill back of the box
 
Too late for you, but I like staggered joints with bigger tiles in smaller spaces as I 5think it takes the eye away from the small cuts which you sometimes wind up with. Try them out dry before you commit and most important of all be sure that SWMBO approves!!
 
Yip, couldn’t agree with you more.
I’ve posted before about the old trick of marking your tile heights on your 1800 level in whiteboard marker pen, then putting that level on the wall and moving it up and down to find the best compromise of the heights .
 
Hi again guys sooo ive just about done the shower but kicking myself as ive ended up with a small cut at the bottom.. which i kind of new but didnt really think there was a way to get over it..now im thinking why didnt i jusy bed the shower tray down on a bigger bed and loose the couple of inch cut this is my first time tiling anything like this btw...

no im thinking is there anything that i could but on rather then that final cut
20250902_204734.jpg
 
For a first attempt at tiling, it looks good and you should be pleased with yourself.
You’ll have learned from the experience - the ‘Setting Out’ on heights is just as important as the ‘ left and rights’ you were focussing on earlier……
To think of solving your bottom tile another way:- it doesn’t look like it’s too late to LOWER that tray ??

( and are you sure your shower valves cover plate covers that big oval clearance you’ve cut ? )
 
Thanks for saying that , yeah had i been going right to the ceiling i think i would of looked more into the top and bottom as much as the left to right..

i set it all from over the other side which i will add a picture to show , which was to get a full tile onto of this boxing behind the bath that ive done which around the room gave me 3 full tiles and a decent cut at the bottom... by setting it here that has set the last grout line in stone as you would say and i wanted to follow that all the way around... but i have not taken into account the shower steps up which in turn reduces the rest of the rooms bottom cut to something like inch and half slither... which is gonna look ****ty..

The shower tray is stuck down now on cement adesive... and thats onto of a preset concrete base ive put in...


Had the tray not been set down i could of raised it the inch and a half loosing the slither cut....

Good pount about the cut i did think i had gone abit big on that fingers crossed i will double check!
 
As you can see here the gap i ment
 

Attachments

  • 20250903_120625.jpg
    20250903_120625.jpg
    288.9 KB · Views: 16

If you need to find a tradesperson to get your job done, please try our local search below, or if you are doing it yourself you can find suppliers local to you.

Select the supplier or trade you require, enter your location to begin your search.


Are you a trade or supplier? You can create your listing free at DIYnot Local

 
Back
Top