Beginner DIY man, on here to learn, shelf advice please...

awm

Joined
28 Jul 2010
Messages
109
Reaction score
4
Location
London
Country
United Kingdom
Hi guys, I moved into this house back in January and last week my shelf suddenly fell down in my room, it's a 'lack shelf' from Ikea, see below...

http://www.youtube.com/watch?v=SHx1s-oTgow

The person in the house before me must've fitted it and it seems the wall couldn't hold the fixings, I don't know if it's a bad job or if it's just because it's a cheap shelf?

Anyway, so I kept the shelf and using the same fixings, I put it slightly higher than where it was before, following the video above.

This was pretty stupid of me considering it had just fell down and I had a few problems with the fixings not going all the way into the wall and they didn't seem to fit tight to me, they seem loose. I wonder if this is the same problem the person before me had, I guess it's the type of wall?

So, now I want to put some brackets underneath, just to make sure it doesn't fall down again, so I've ordered 2 of the following brackets...

http://www.wickes.co.uk/London-Bracket/invt/533802

Now I just need the screws but I don't know which ones to get from here

http://www.wickes.co.uk/Nails-Screws+Fixings/General-Purpose-Screws/icat/swoodscrews

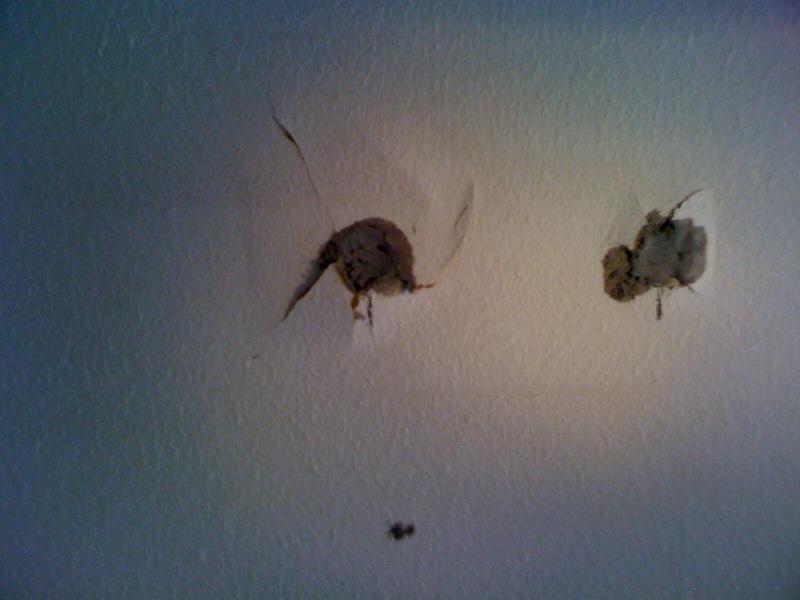
and I'm worried I'm going to damage the wall when I screw them in, or they wont completely do in! I wonder if anyone can shed some light on this? What type of wall is it and what's the best solution?

I've attached a photo to this post if that helps? //media.diynot.com/146000_145980_24808_79102350_thumb.jpg


I'm sure this is very basic but I'd rather check beforehand!

Thanks,


Alex
 
Sponsored Links
The fixing they are using, if they don't grip right first time are no good,
I much prefer to use hollow wall anchors in plasterboards, providing there is space in the cavity to fit them.
If the shelve is a heavy one and holding heavy items, it is worth consider, cutting to your wall and fitting a wood nogin or two, the wall will then need to be repaired by either plastering or tape jointing, but it will offer a sound, solid fixing area.
So go with hollow wall anchor also know as cavity fixings or nogins.
http://www.wickes.co.uk/Cavity-Fixings/invt/510006
 
First of all, what is the wall construction, Timber Fame; Dry Lined; Hard Plastered onto brick.
 
Prentice, thanks for the advice, I'll bare it in mind in future but for now I'm looking for a way to make it work as it is, because it's too late now! :oops:

BI, being the novice I am, I've got no idea, how do I tell? I guess it's hard plastered onto brick, in fact I'm 90% Sure it is.

Thanks,


Alex
 
Sponsored Links
If the fixings you are using are as the youtube vid, those fixing are designed for hallow walls or dot n dab, that would be a plasterboard skin, which could be either finished in plaster skim or tape jointed.
If the wall is a rendered and plastered wall, straight on to a brick/block surface.
You need to use the normal plastic/nylon raw plug masonry fixings.
 
If you have a solid wall then these shelves need a long 70mm screw to secure as there is enormous leverage on the bracket, they are not intended for anything other than display.On a plasterboard wall they are highly likely to rip off if overloaded.Use all fixing holes .
 
Ahh thanks guys, went with 40mm screws in the end, I'm a bit worried about the depth of the wall with 70mm, think this will be fine, especially with the fixings.

Another issue though, if you look at my latest image
You'll see Ive filled the holes from the last shelf with filler, I'll paint over this when it's dried...but I don't know what to do about the cracks around it? Looks to me like wallpaper, so shall I fill over this and then paint?

I know this is simple stuff but have to start somewhere!

Thanks a lot,


Alex
 
40mm far too short, brickwork will take 70mmm easily and blockwork even longer. You need to cut out 60mm around damaged area, chip out you poor filling and refill after removing all loose material.
 
Okay, how do I cut out 60mm around the area? With what exactly?

Thanks again!
 
Okay, how do I cut out 60mm around the area? With what exactly?
It looks like plaster,
A small chisel will do, just remove the damaged and loose plaster.
You can buy batches of ready mixed plaster to fill in the holes, you could also consider using a joint cement compound such as easyfill, there are other types and some are ready mixed too. This will do for small damaged areas.
This product is useful to the novice as it can be sanded down to smooth, it will take two/three application of the compound, sanding after each, to get a good finish.
Follow the instructions which ever product you buy, the damaged area may also need a couple of coats of PVA.
 
Ahh great, thanks...these small jobs aren't so small when you do them properly!

Only thing I'm worried about is that the filled area will stand out from the rest of the wall...I guess it's just a case of doing my best and accepting that will be the case?


Alex
 
Hey guys, got the hammer and chisel ready but just before I go for it, how would you recommend I approach these holes in particular? I assume the idea is to make the hole more gradual, so I was going to go in at an angle to the bottom of the hole.

Then plan is to fill it with quick dry polyfilla.


Alex
 
Before you start to chisel remove the loose stuff, so you now where to start.
Then just a gentle tap to tidy up the area to be repaired.
go in at slight angle, so the good plaster left on the wall, is tapered so the hole is larger at the back than it is at the surface close to you.
This will help hold the repair in place.
 
Okay, so you mean go into the hole and go outwards diagonally?

He he, it's so hard on a forum but I really appreciate your co-operation!
 

DIYnot Local

Staff member

If you need to find a tradesperson to get your job done, please try our local search below, or if you are doing it yourself you can find suppliers local to you.

Select the supplier or trade you require, enter your location to begin your search.


Are you a trade or supplier? You can create your listing free at DIYnot Local

 
Sponsored Links
Back
Top