Cooker Timer Wiring

Joined
21 Jun 2018
Messages
43
Reaction score
1
Country
United Kingdom
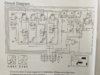
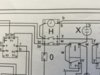
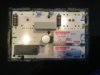
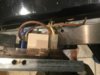
Hi - I’ve just fitted a new timer to my rangemaster professional 90 and although it lights up etc, the clock will not set. It starts at 00.00 and counts up, ie the clock works, but it’s not settable. The ‘cooking pan’ symbol is on permanently. The timer works, as in I can set it for say 2 mins and then the buzzer goes off. I just can’t set the clock or control anything. The oven works. I think the product is probably OK , just literally cross wires somewhere. I’ve obvioulsy wired up the 4 paddle connectors in the wrong order, despite trying to do it as they were. Ofcourse the new timer is different from the old one which doesn’t help. I was so pleased with myself and now can’t believe it’s not working. The order I have put them in is, from the outside of the timer, yellow; double brown, white, brown. Anyone any ideas? I have the wiring diagram from the original manual, but it doesn’t mean a lot to me. This is a pic of the old timer. It’s those 4 connectors bottom right, that I’ve connected the new ones to ( ones a bit bent). And there’s a photo of the old unit before taking out - as you can see, the ‘yellow’ wire is to the outside of the unit, so I put the yellow one to the outside when I put it back. This is the new unit I bought. https://www.espares.co.uk/product/e...eNumber=1&PartTypeId=1605&ManufacturerId=2322
Thanks everyone. Feeling a bit down as I thought I’d done so well.
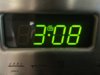
The photo of the clock shows that’s it’s 3.08 hours since I fitted it. This morning it is showing 17.10, presumably because it thinks it is 10 past 5 in the afternoon. So near, yet so far. Shame I didn’t think to take a photo of the new timer before I fitted it.
I’ve now discovered that it’s will switch the oven off at the designated time - it’s just that the time won’t set- too difficulty to explain, but it’s an indication that everything is functioning, just not able to set the clock therefore no use whatsoever. Fingers crossed for JJ’s suggestion below.
Read more: https://www.diynot.com/diy/threads/rangemaster-professional-timer-wiring.504643/#ixzz5J8aGD6NL
 

Attachments

  • image.jpg
    image.jpg
    265.8 KB · Views: 887
  • image.jpg
    image.jpg
    198.9 KB · Views: 1,822
  • image.jpg
    image.jpg
    204.3 KB · Views: 1,095
  • 3804EBC0-2DB4-46CC-A2CE-8352DF7C7BA4.jpeg
    3804EBC0-2DB4-46CC-A2CE-8352DF7C7BA4.jpeg
    206.8 KB · Views: 1,026
  • 0C2A4FD9-89C0-4DF5-A18B-81C5954536B2.jpeg
    0C2A4FD9-89C0-4DF5-A18B-81C5954536B2.jpeg
    215.9 KB · Views: 1,157
Last edited:
Sponsored Links
I presume your are pressing down and holding down the two relevant buttons then using the plus and minus buttons to set the clock.
 
Hi Assuhors - you can never presume anything with people can you, but yes, I should have said, I definitely am trying to set it correctly. Thank you for trying to help. It’s SO annoying as I know I must be so close to getting it right.
 
Something about this is ringing a bell of when we changed ours but my memory is sketchy. IIRC the manual for ours says to press and hold a certain button, but this didn't work. The OH sussed it out eventually but she can't remember either - try pressing and releasing that same button instead (or other combinations and button presses.
 
Sponsored Links
Believe me Alan, I’ve tried every single possible combination. The fact that the ‘cooking pan’ symbol is showing all the time makes me a bit suspicious.
 
Looking at the e-spares pic & the manual wiring diagram ( the one in the latest user guide, not the one you posted ), I would suggest that it should be connected as follows: double brown to ST1.,blue to ST2., second double brown to 4th connection down looking from rear.,yellow to third connection down., single brown to second connection down., then white to top connection ( where you currently have yellow )
 
JJ, you are a total star - someone that can interpret a wiring diagram - thank you so much. I have actually just discovered that the oven will switch off when asked to - it’s just that it’s a random way of doing it - can’t explain, but it’s like it’s working back to front. I KNOW I must be so near but so far as it’s just rubbish at the moment. I won’t try it again until tomorrow at least, just to recover from the last attempt, but I will definitely let you know how I get on a- and buy you a virtual glass of champagne if it works.
 
Hi JJ - . It hasn’t worked unfortunately - actually, it is slightly worse in that it doesn’t turn the oven off now, but counts up. I’m learning fast and might be able to work out a wiring diagram ( actually, I probably couldn’t). I wonder if you could advise again - perhaps I could reverse everything but keep it in the same order? How combinations are there! Interim, I shall try and find the info you were looking at - ie, the new wiring diagram in the new owners manual. ( you can tell i’m not watching the footie). Thanks
 
image.jpg
image.jpg
image.jpg
Hi JJ - I’ve found the new wiring diagram - but I’ve decided I can’t work it out after all - shouldn’t have given up physics at school. I see only 2 wires on their diagram - brown and yellow- and brown is a switch is it? So where is the double brown and white gone?
 

Attachments

  • image.jpg
    image.jpg
    282.2 KB · Views: 577
Try swopping the yellow & white. The pic. of your timer does not look the same as the one in the e-spares link you posted. Are the input connectors still denominated ST1 & ST2?
 
Will do, thanks. I swapped the whole order around as well, but that didn’t work either. I’ll put it back to how you suggested initially, and then swap the white and yellow as you say. I’m not quite sure what you mean by denominated, but I haven’t altered st1 and st2 but it is written on the unit, L and N, so I put the double brown into L and blue into N. I’d assumed if I got those the wrong way around it would have blown. Thanks JJ.
 
Hi JJ - well it doesn’t like that - when I try and set it, it beeps. BUT the wretched ‘cooking pan’ symbol has gone, so somethings changed. A random number of 1869 (I think) came up - but it wasn’t the time, as no ‘:’ in between the digits. That’s gone off now and it’s flashing the minutes, which increases with time. Just fiddling with it and random things set or unset. Now the cooking pan symbol is back again. Basically back as it was - strange that it was different when first switched on.
 
Believe me Alan, I’ve tried every single possible combination. The fact that the ‘cooking pan’ symbol is showing all the time makes me a bit suspicious.
The cooking pan symbol is always lit up on ours too (but was also lit on the old one). Ours is a bit different to yours (ours is 5 buttons rather than 6) but I've sought out my notes on how we now set the clock. The instructions say press the cook time and ready time buttons (buttons 2 and 3 on ours) simultaneously and keep them pressed, then use the plus and minus buttons to set the time of day. The difference is now that we press and release the same cook time and ready time buttons then use the plus and minus buttons to set the time.
Hope this helps :)
 
Alan - my word, I’ve done it. I’ve only tested it briefly but everything seems to be working. Amazing result! Thank you so much. How incredible that you would keep a note of what you did. I would never in a million years press both and then RELEASE to set. My only concern now is that I swapped the yellow and white - I wonder if I should put them back where JJ suggested first? I suppose I could just try it .....
 
This is so frustrating and I’m sure everyone is losing the will to live, but on this link https://www.rangecookers.co.uk/rangecookers_blog/files/putting_your_cooker_clock_back.html it quite clearly shows how setting the clock SHOULD be done - the traditional method of pressing and holding the bell and the cooking pan whilst at the same time pressing the + button. If one does what Alan says, ie hold the cooking pan and stop cooking, then release and then set - why doesn’t Rangemaster say that - after all, they are directing you to buy this spare part, so shouldn’t they have some responsibility for informing us of the change of operation. Grrrr. An email to Rangemaster next I think.
 

DIYnot Local

Staff member

If you need to find a tradesperson to get your job done, please try our local search below, or if you are doing it yourself you can find suppliers local to you.

Select the supplier or trade you require, enter your location to begin your search.


Are you a trade or supplier? You can create your listing free at DIYnot Local

 
Sponsored Links
Back
Top