Damp in corner of kitchen floor (Victorian terrace)

Joined
3 Apr 2022
Messages
18
Reaction score
2
Country
United Kingdom
Hi all, looking for some advice regarding a damp spot in the kitchen before I call on a damp specialist.

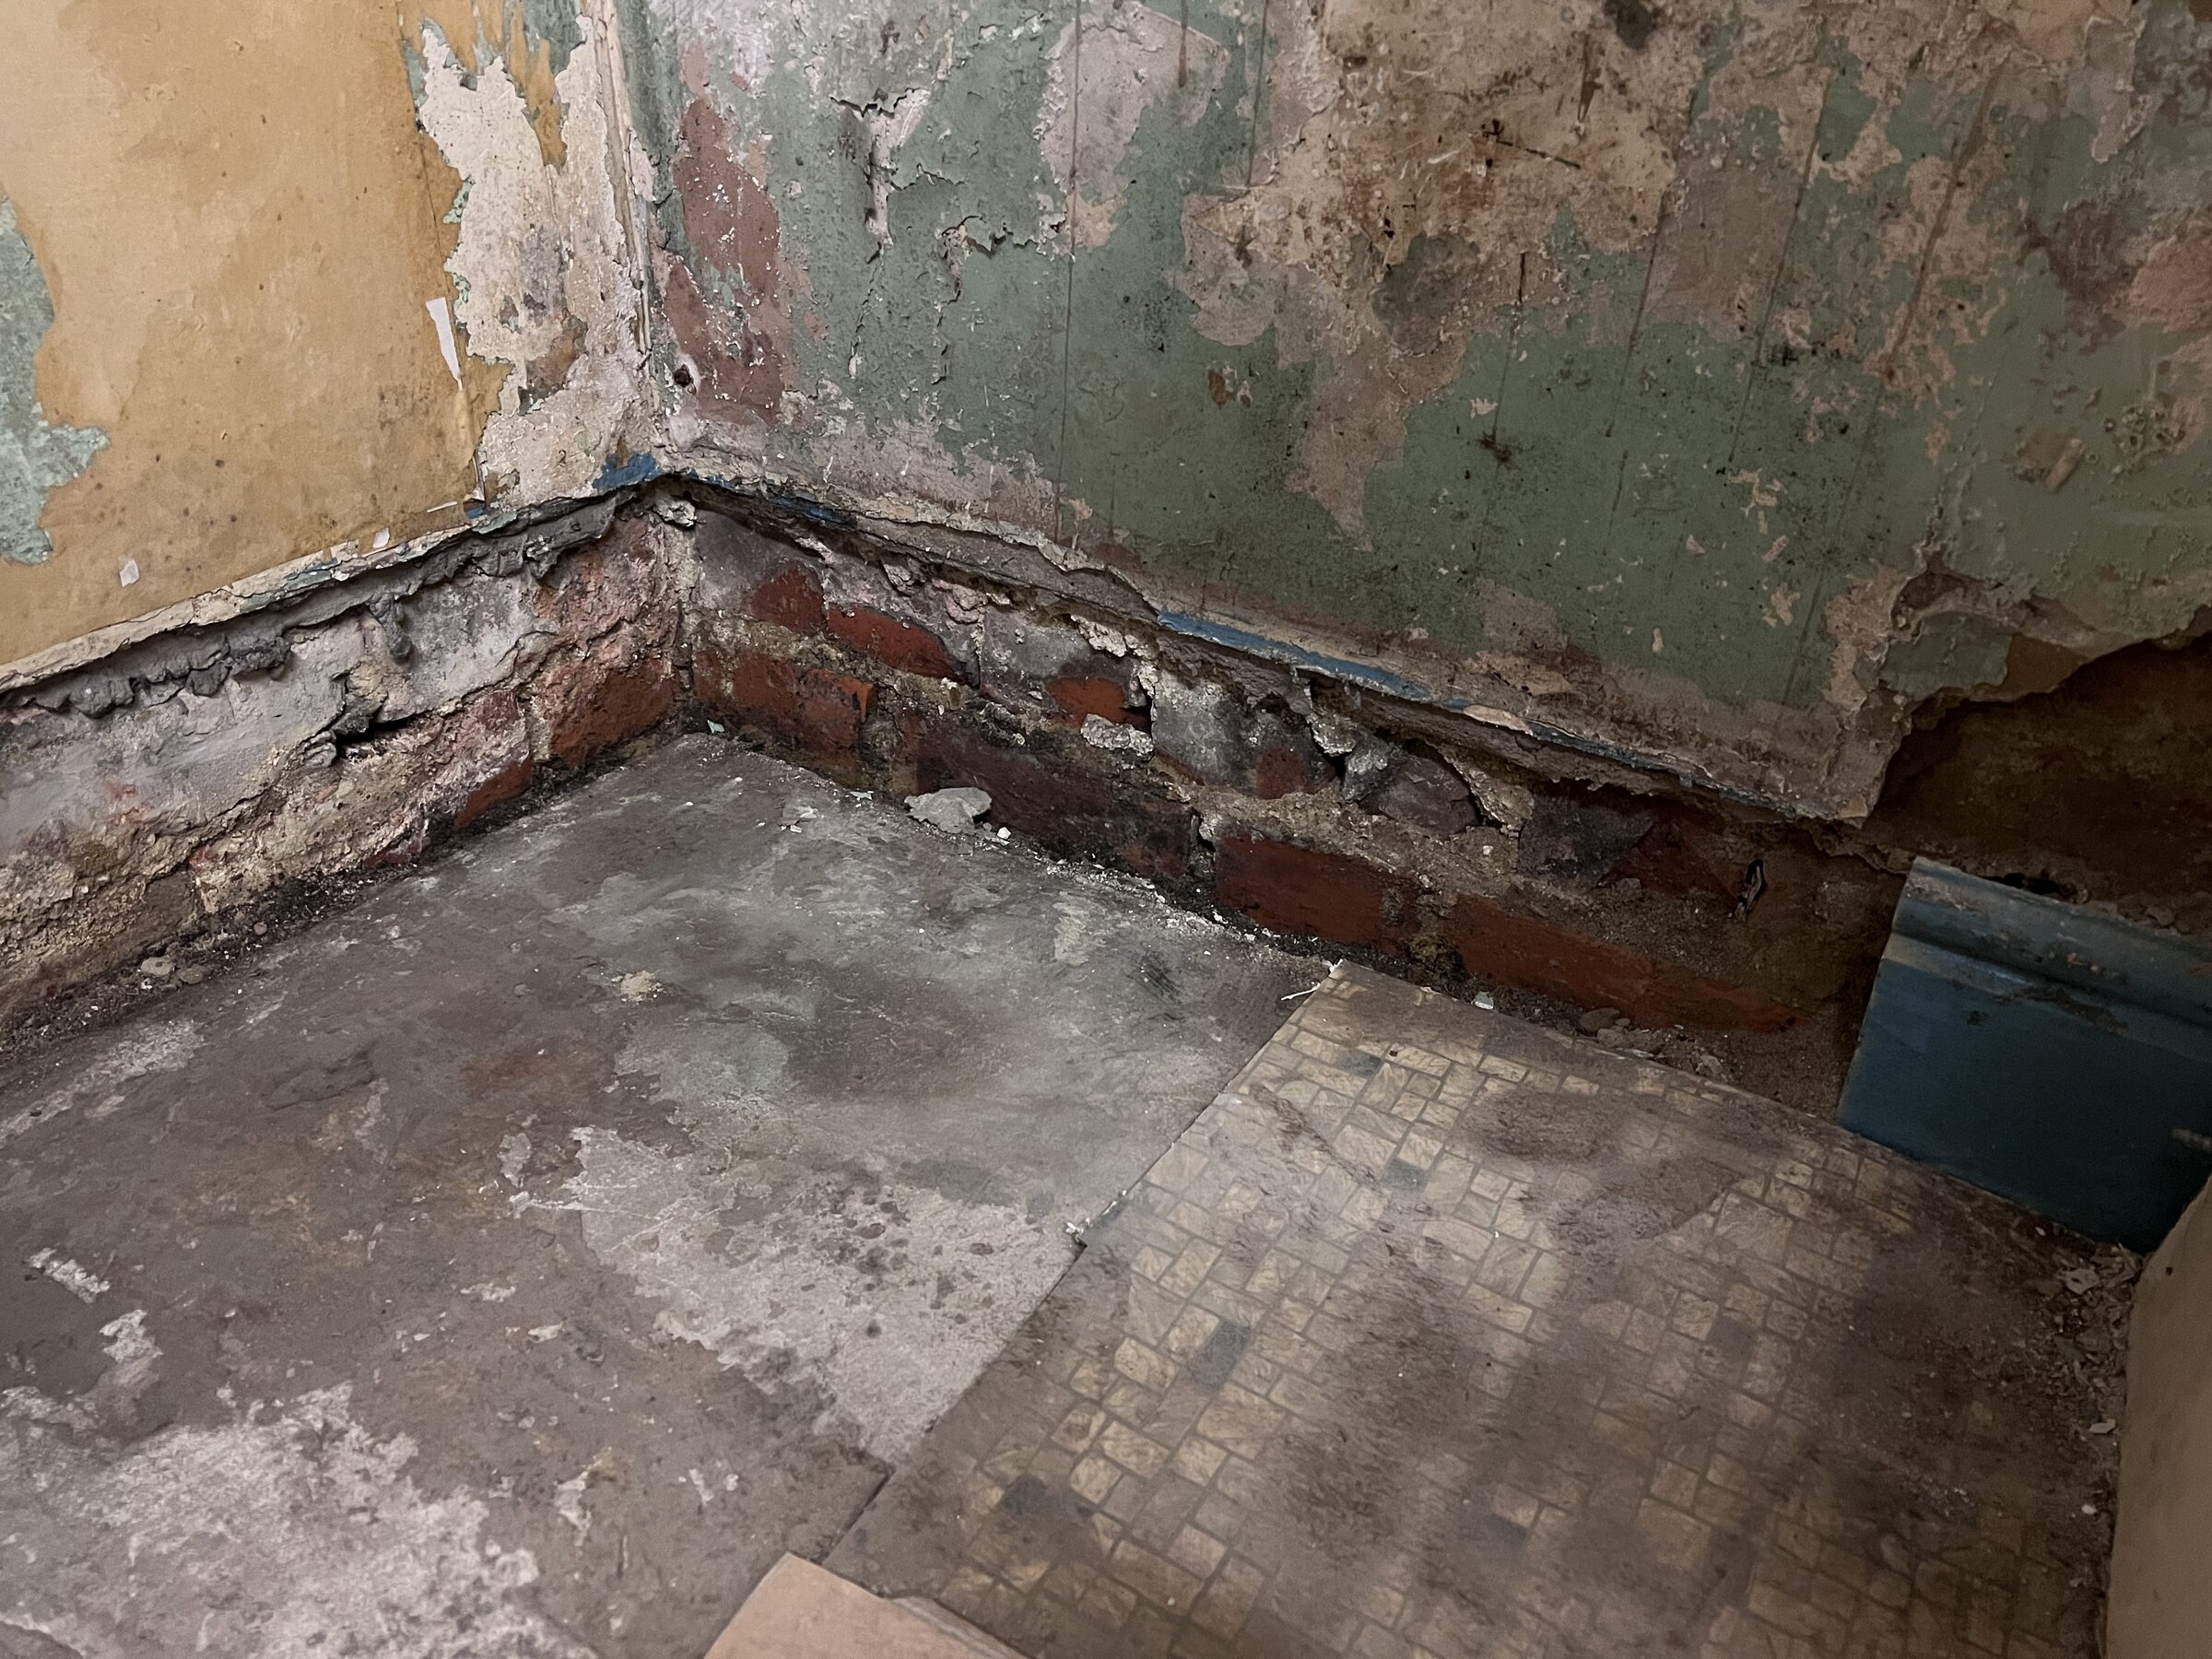
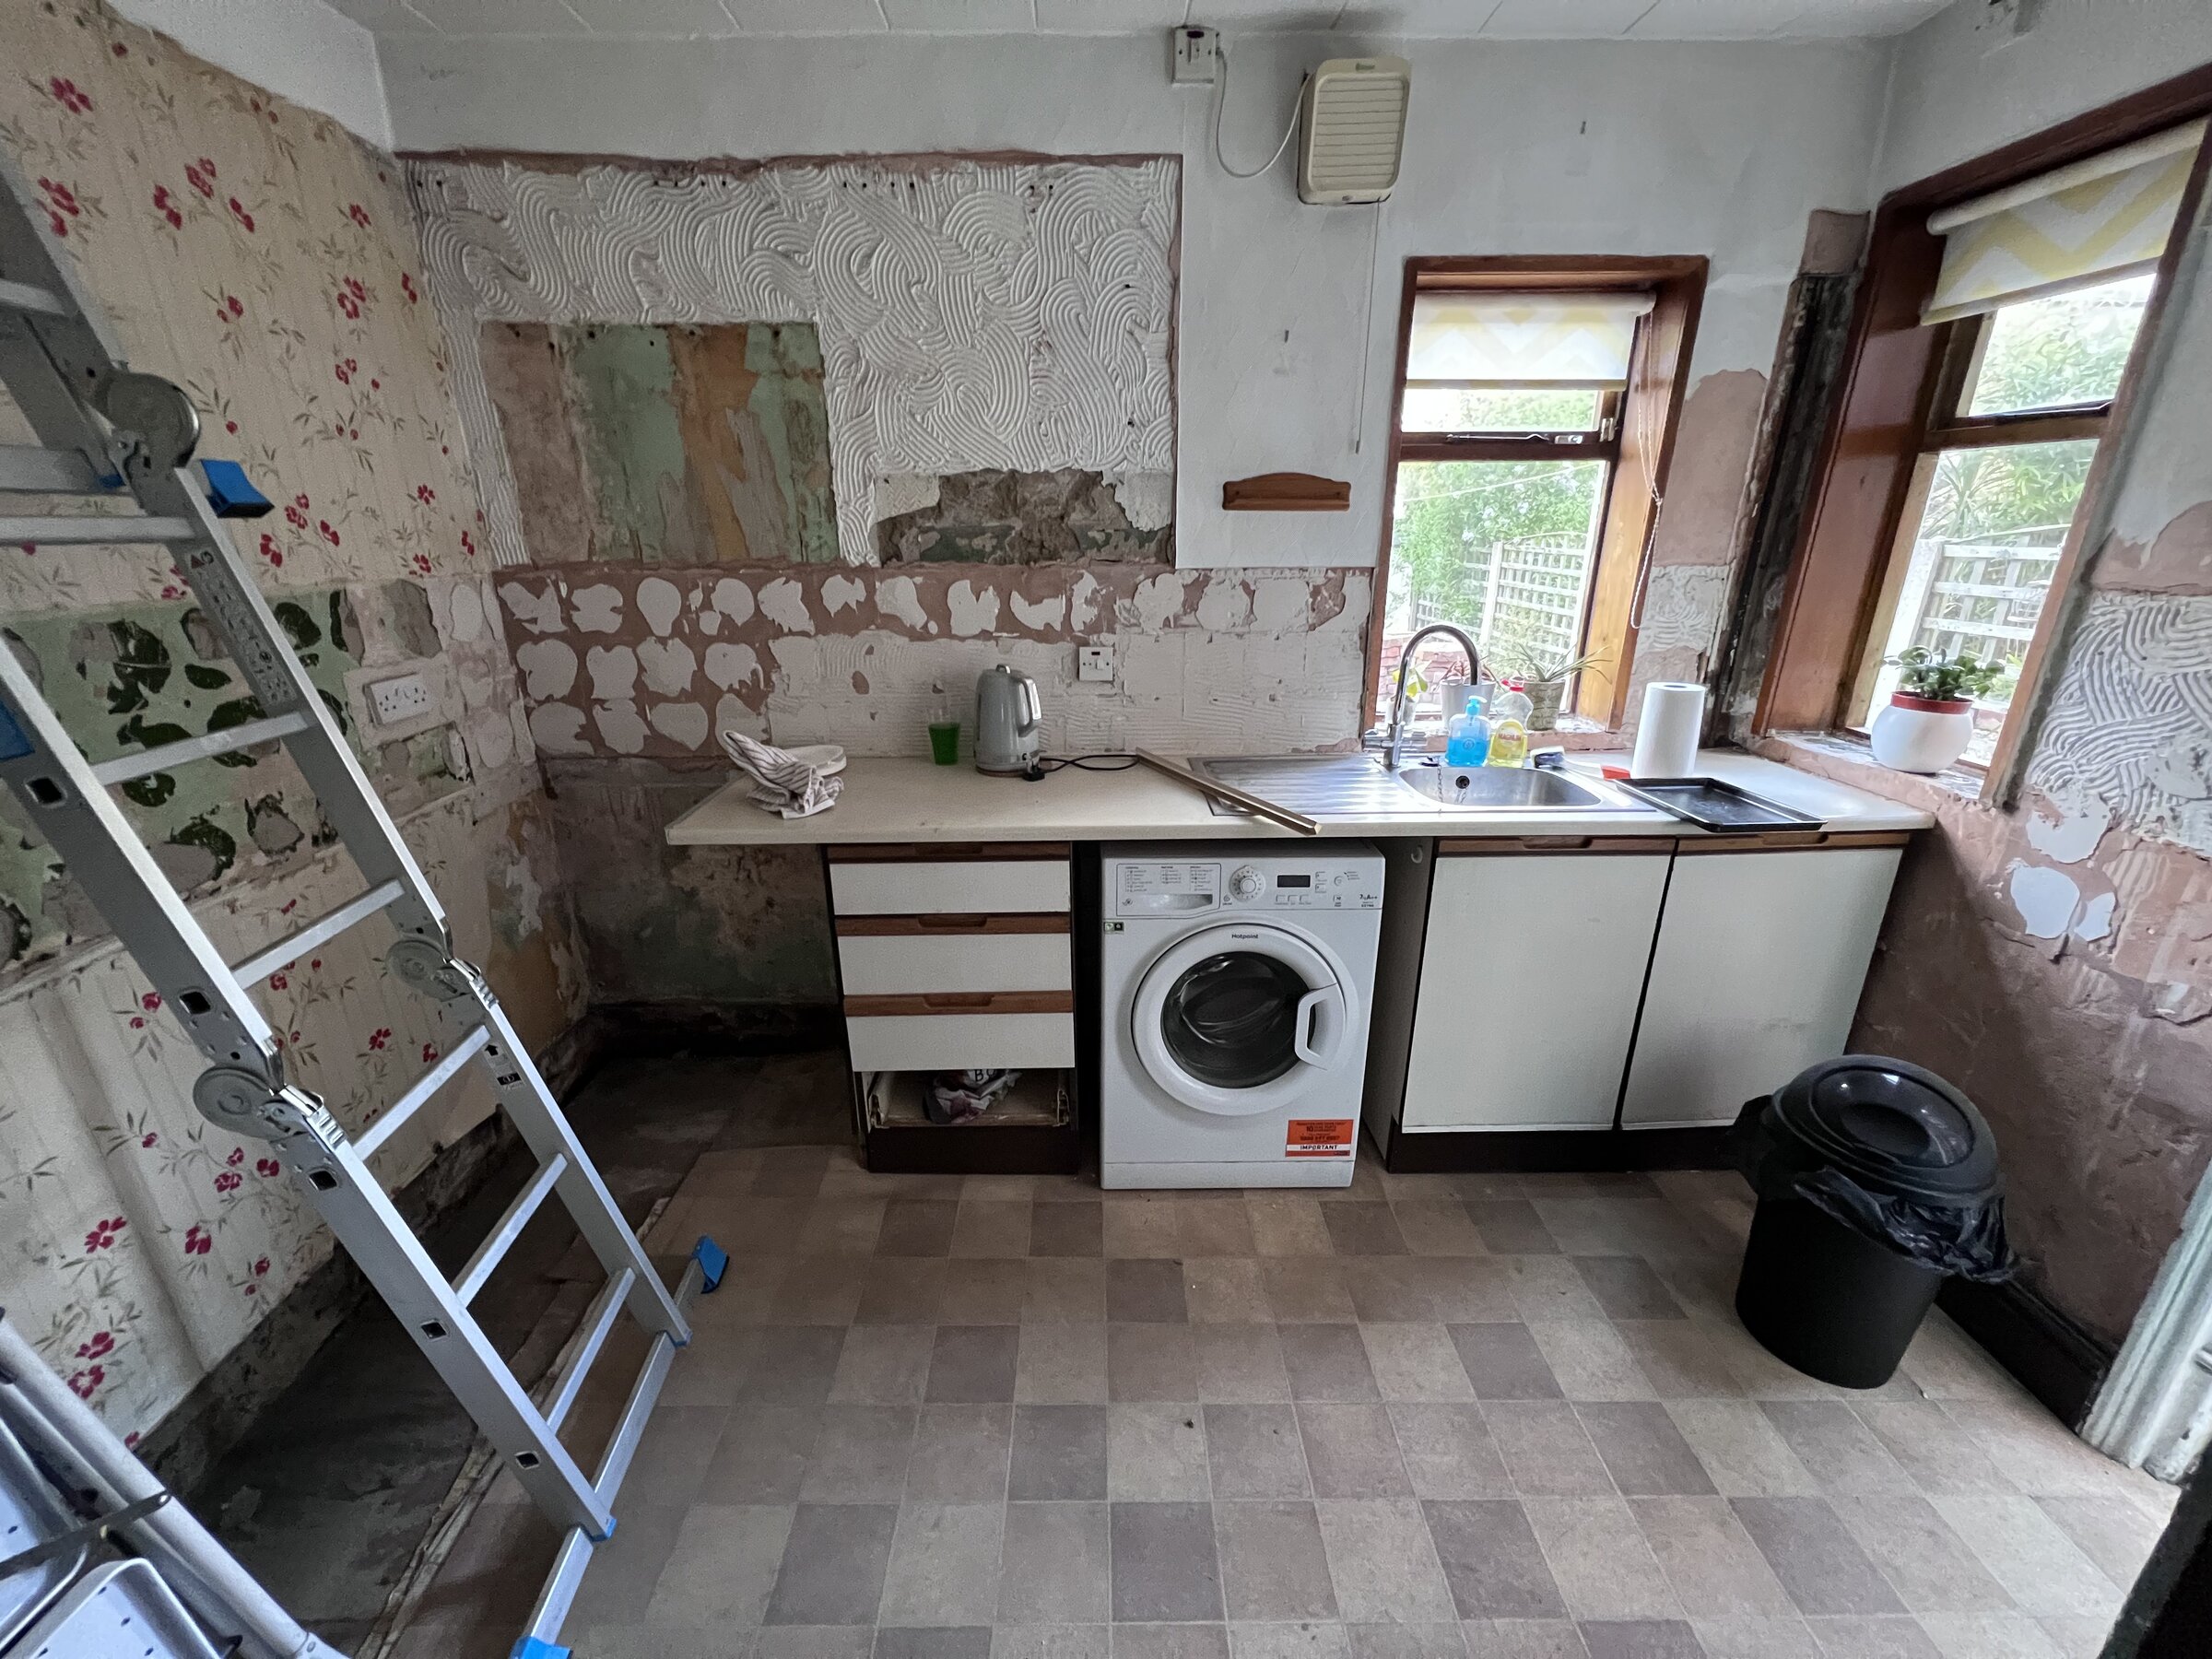
Whilst ripping out the old kitchen in my Victorian terrace I noticed what looked like rising damp in the corner of the exterior wall and the party wall, behind a corner unit (pictures 1 and 2).

The kitchen floor is entirely wooden, with the exception of a concrete slab in the exact location of the damp spot. The slab is what I assume the old wood burning stove in the kitchen was sat on before the previous owner removed it and the chimney. The floorboards and concrete slab were covered by FIVE (!!!!) different layers of lino - it’s like looking back in time via the medium of terrible kitchen flooring.

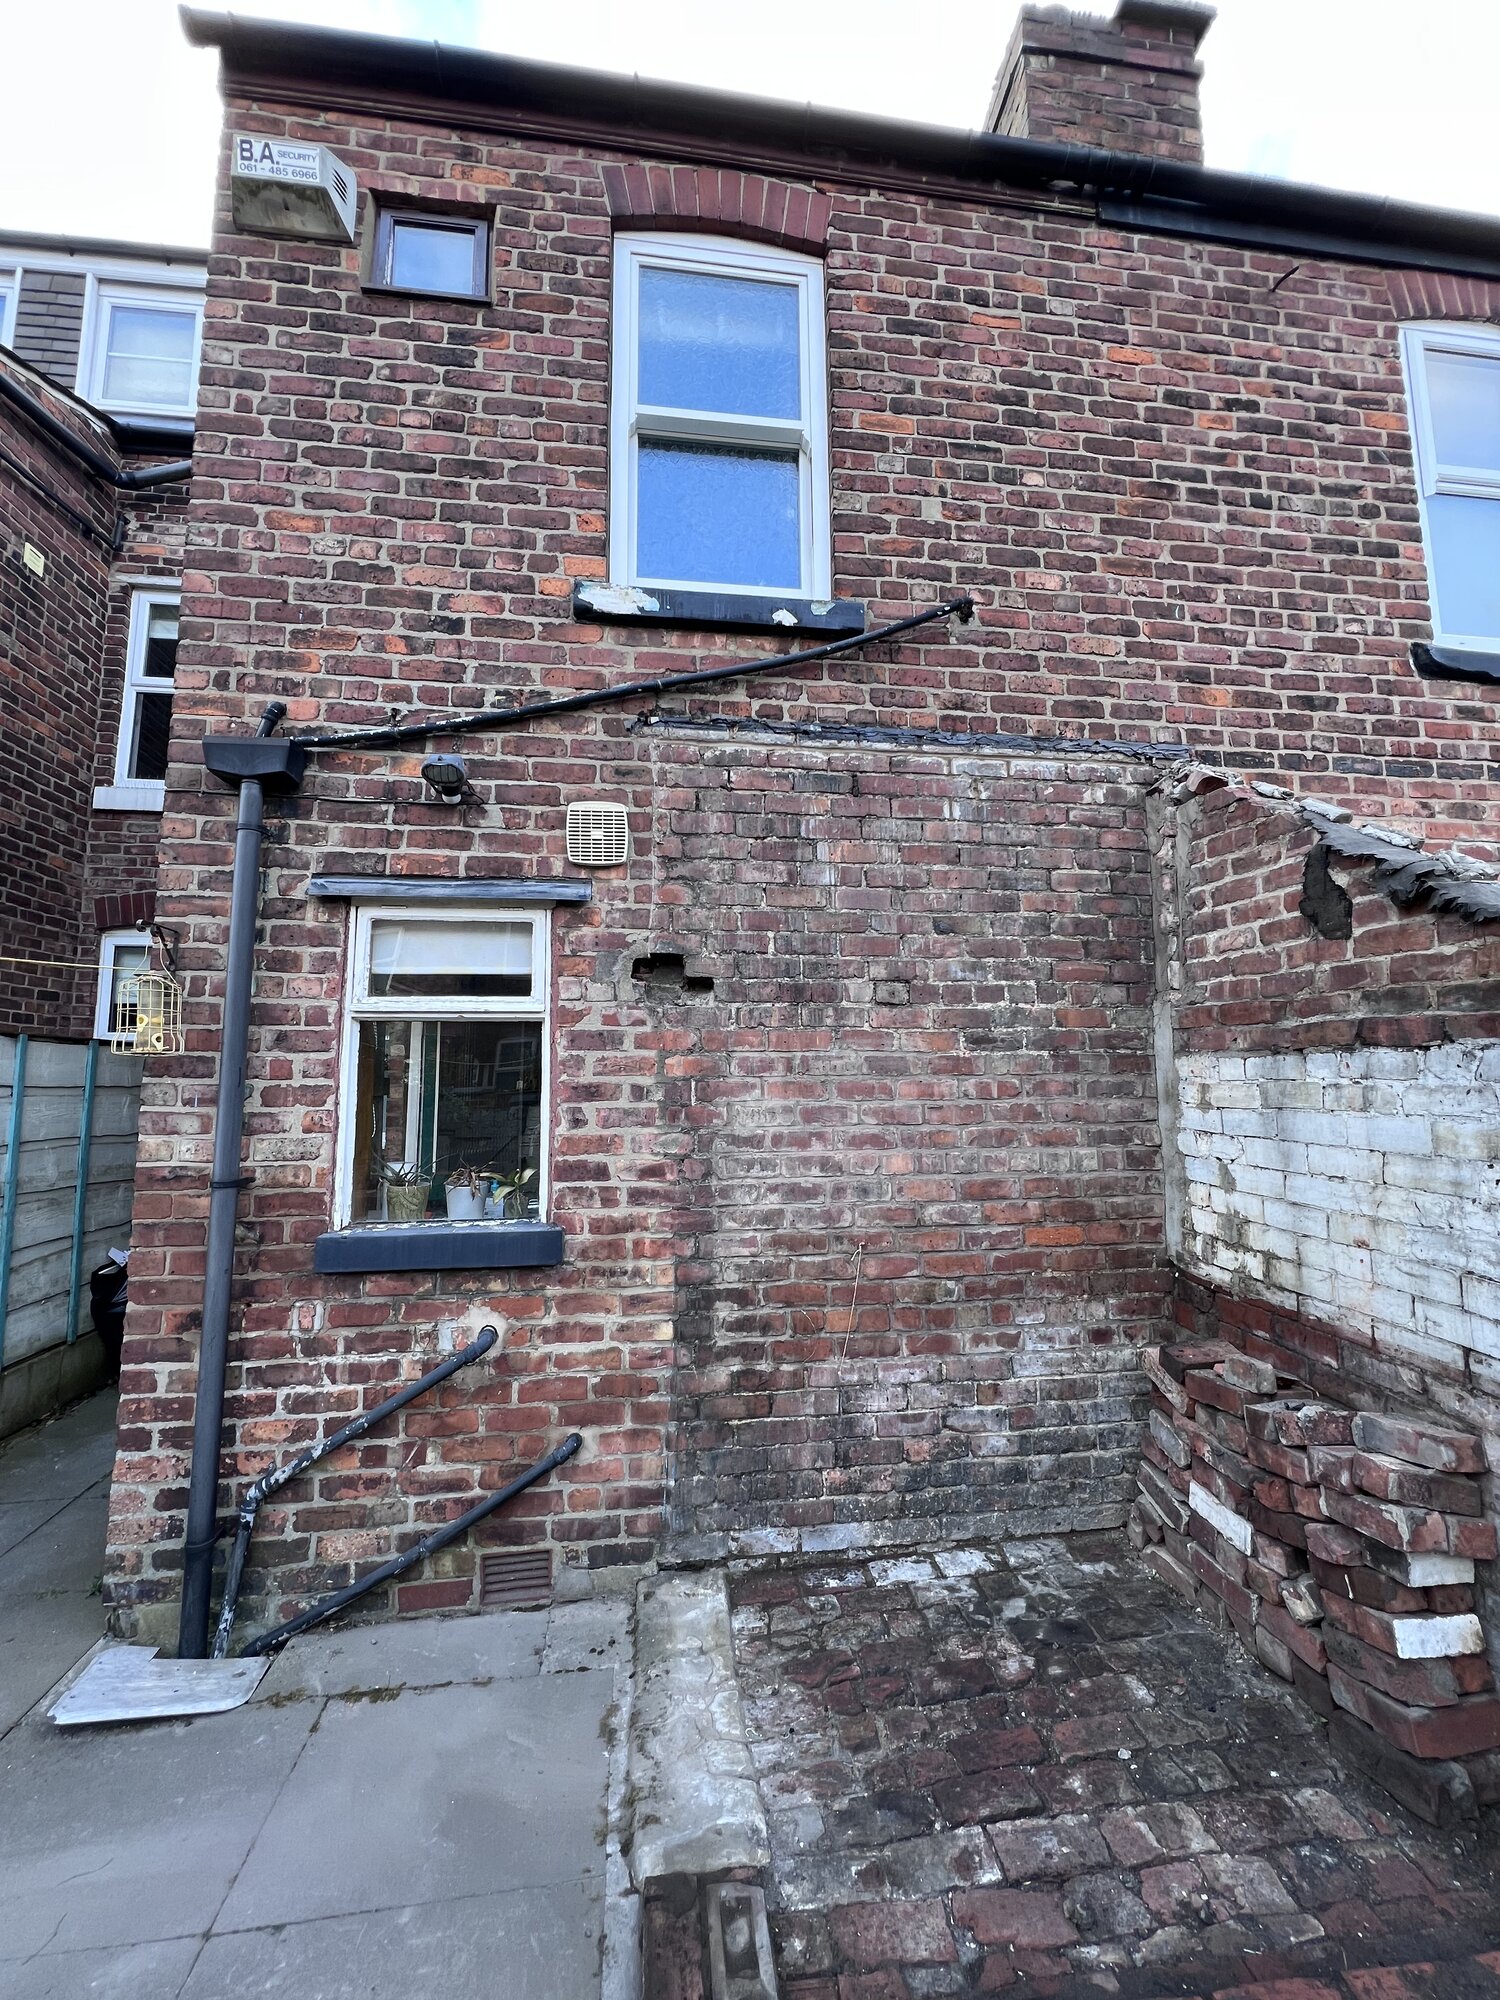
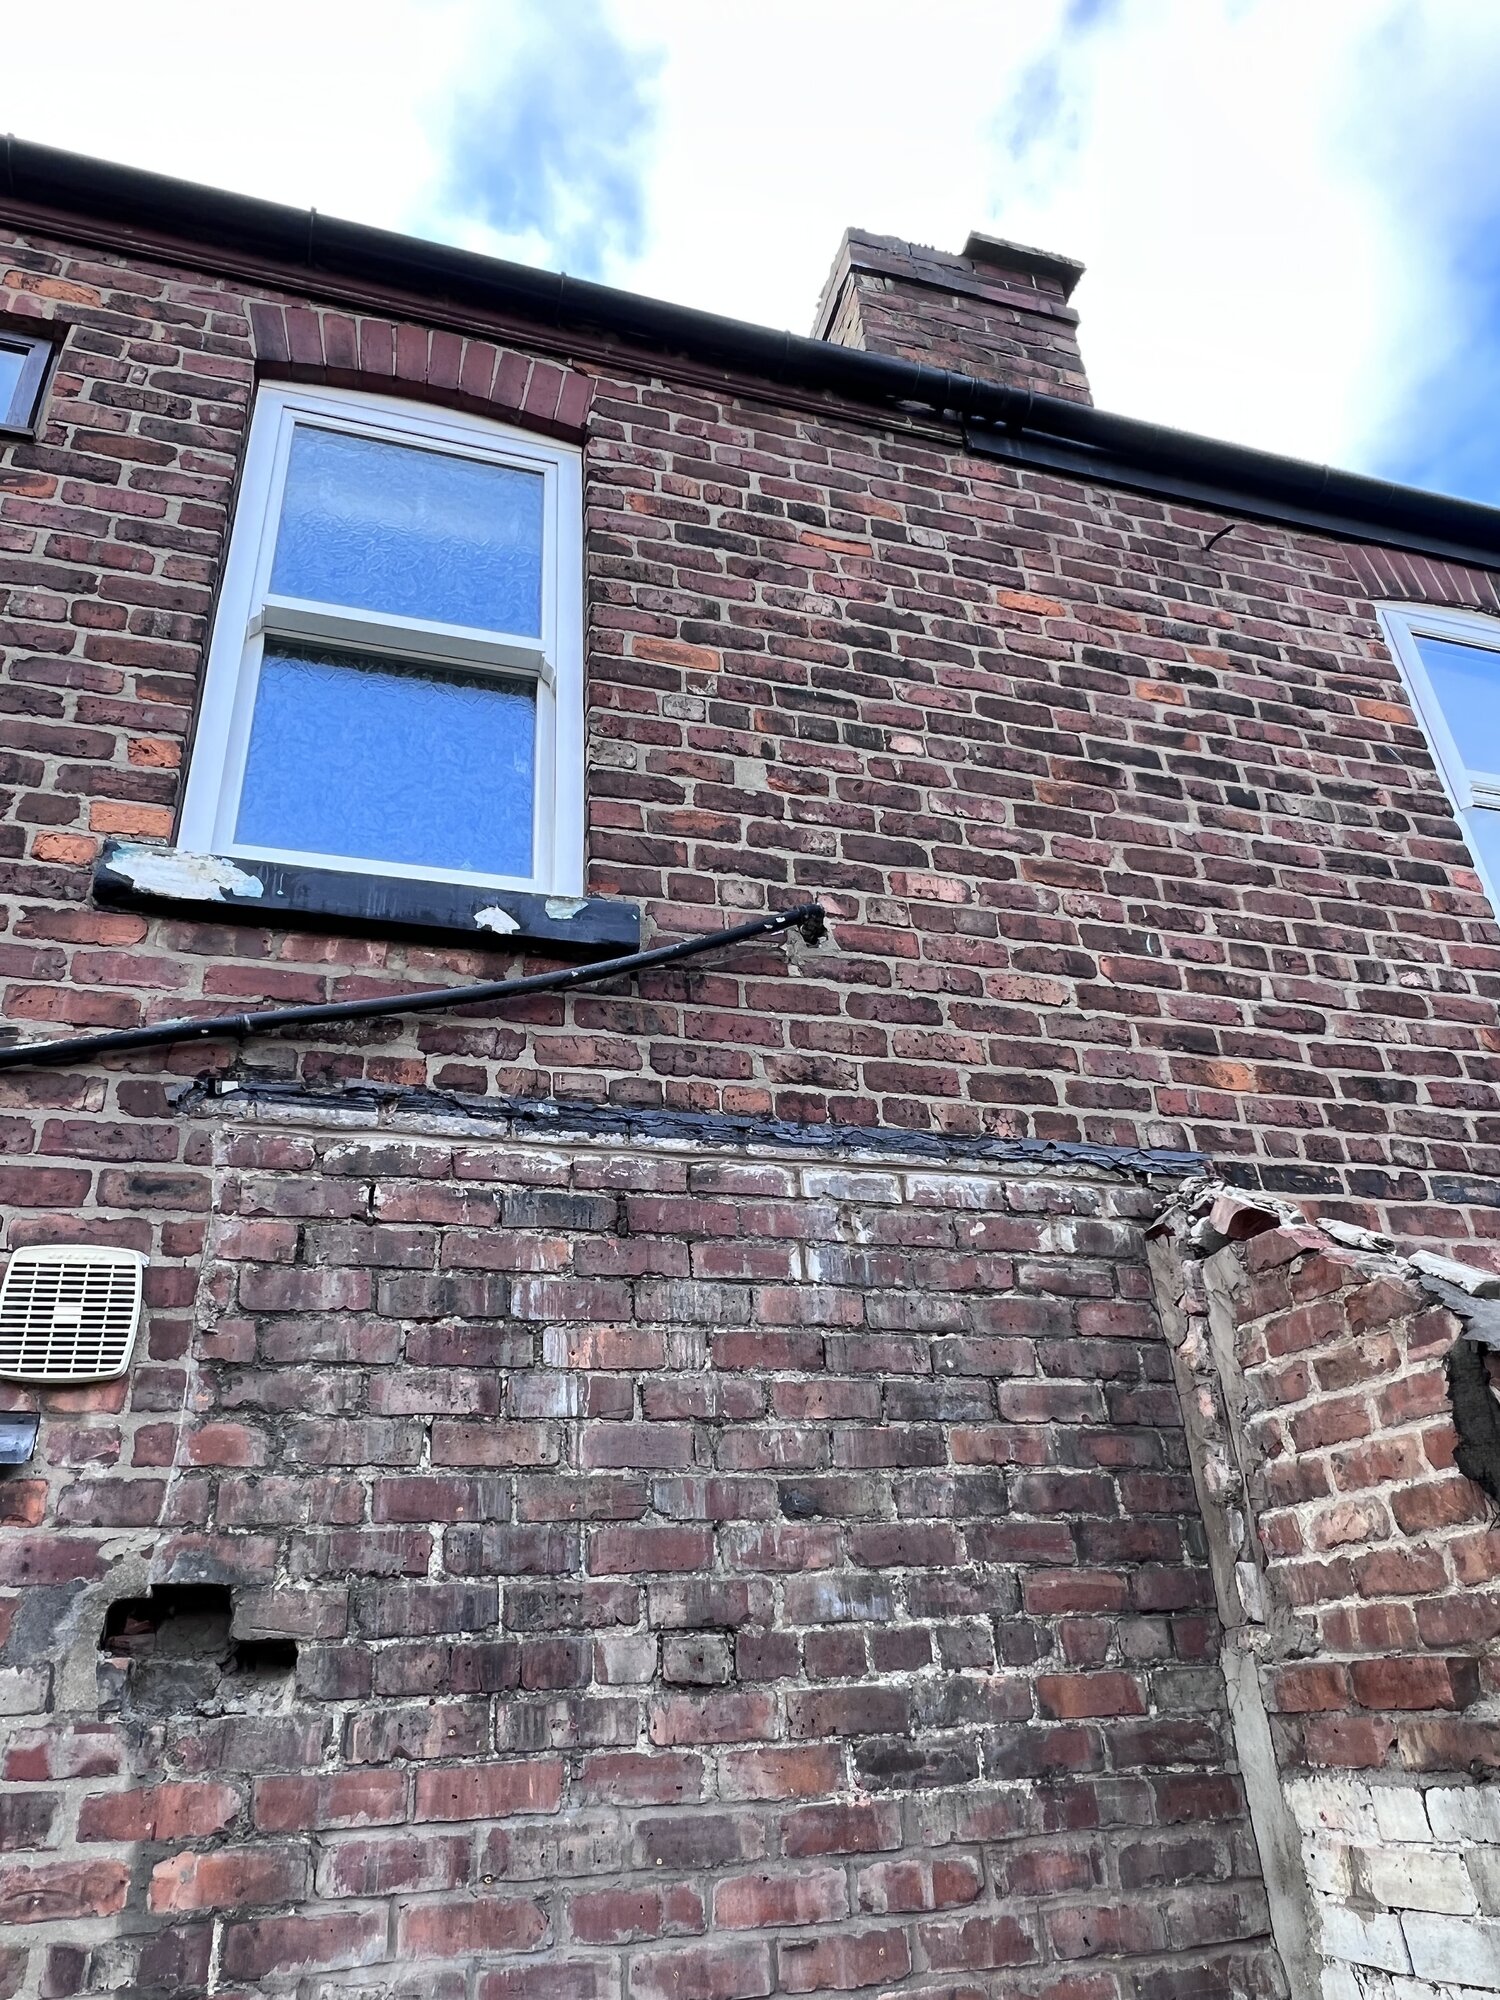
The exterior wall where the damp section is was previously inside the outhouse, which I pulled down last month so has been sheltered from the elements for most of its existence. There is some effervescence (I think?) on the exterior wall (picture 3). Picture was taken at night, can upload some daytime images if needed.

What could be causing the damp? Is it a coincidence that the concrete slab is right where the damp is?

Any advice would be much appreciated!
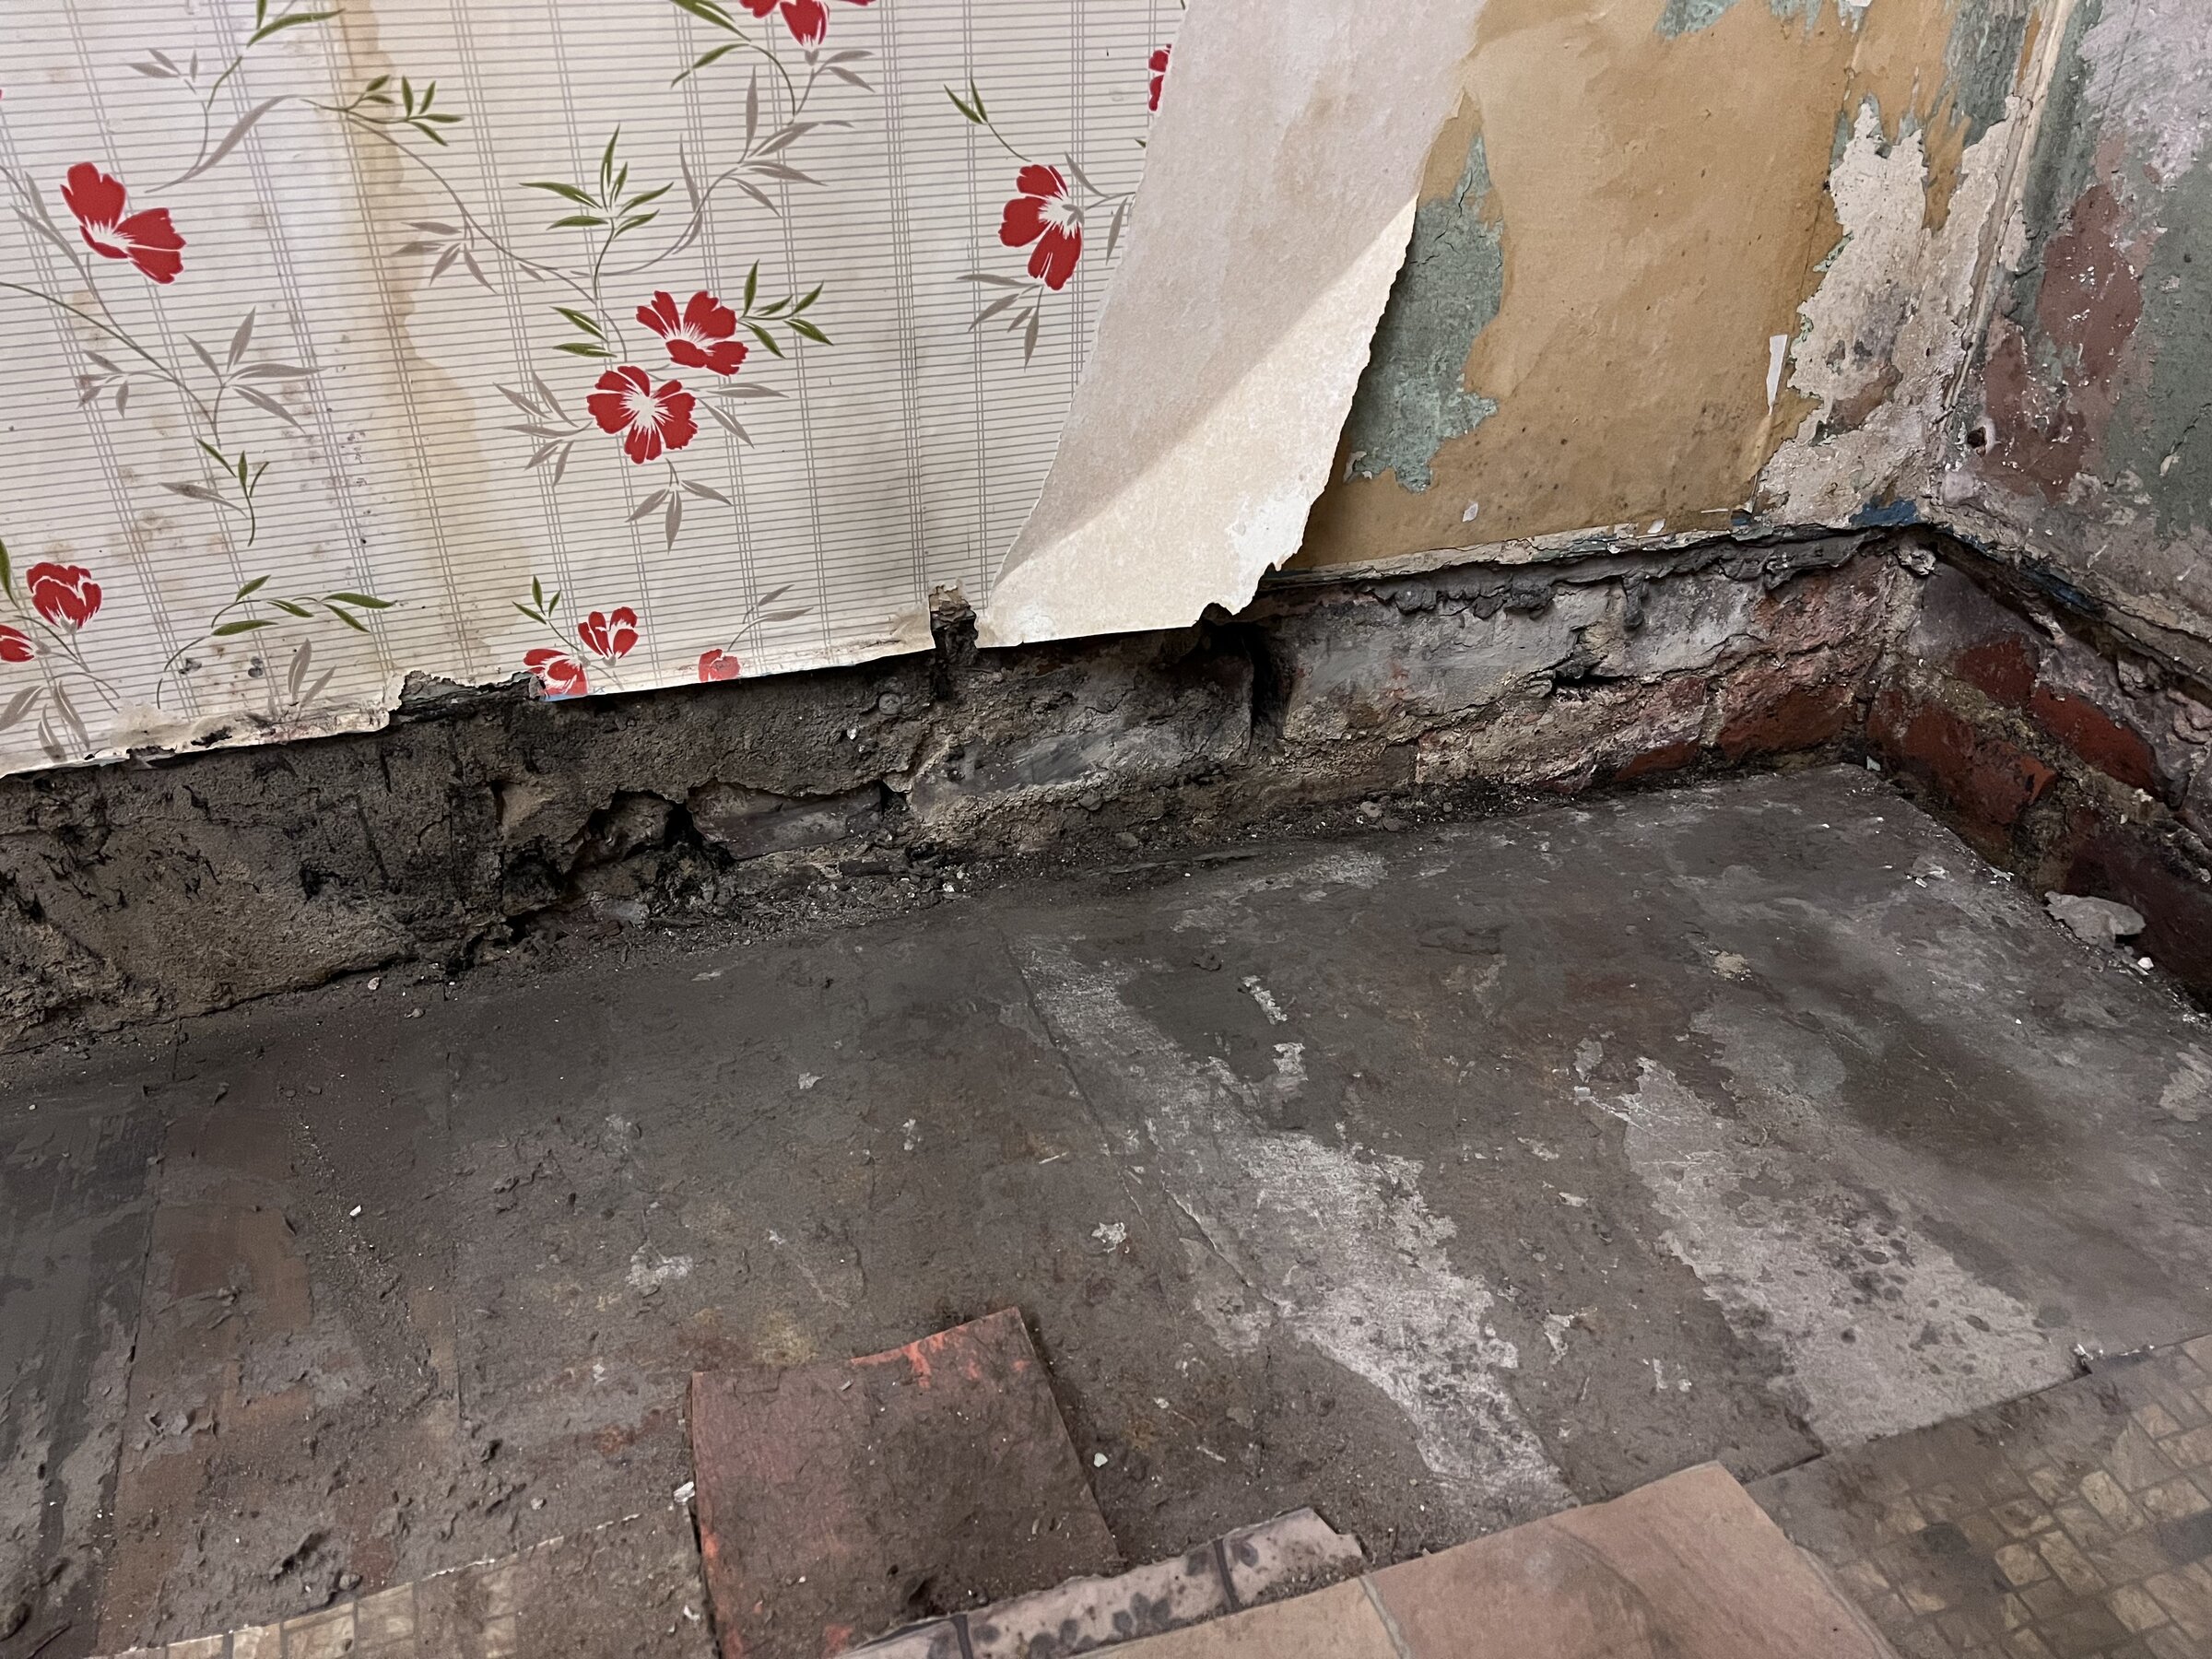
 
Sponsored Links
Kitchen, you say?

I bet it contains water pipes, sinks, washing machines etc full of water.

Over the last hundred years some of them may have started to leak.

Are any near the wet patch?

The concrete slab might have been laid to replace a rotten wooden floor, without repairing the source of water that caused it. This is very common and means it is harder work for the person who eventually digs it out and does the repair.

As Andy suggests, the downpipes, gullies and drains also leak.

Have you got a water meter?

Do not allow anyone who sells silicone injections near your home. They do not repair leaks.
 
Pictures from the outside showing guttering and down pipes.

Andy

Hi Andy, pictures of guttering and down pipes attached. Walls are solid brick 9 inches thick, I don’t think there is a cavity. Hole in the wall to the right of the kitchen window is a pocket hole for the outhouse timber so doesn’t go all the way through, and wall beneath this is completely dry.

Thanks

 
Sponsored Links
Looks like the ground is too high where the shelter was and I would advise a drain cctv on the drains/gully.

Andy
 
Kitchen, you say?

I bet it contains water pipes, sinks, washing machines etc full of water.

Over the last hundred years some of them may have started to leak.

Are any near the wet patch?

The concrete slab might have been laid to replace a rotten wooden floor, without repairing the source of water that caused it. This is very common and means it is harder work for the person who eventually digs it out and does the repair.

As Andy suggests, the downpipes, gullies and drains also leak.

Have you got a water meter?

Do not allow anyone who sells silicone injections near your home. They do not repair leaks.

Picture of the kitchen appliances attached. No pipe work seems to run near the damp patch, it all runs down the right side of the kitchen from the boiler in the bathroom above (I’ve exposed it, to the right of the window in the picture).

Interesting re. the concrete slab possibly being there to replace rotten wood! I’d assumed given position of chimney (can be seen in pictures in my response to Herts P&D) that this concrete was essentially a foundation for the chimney which was once there.

No water meter, I’m on rates. Main water feed runs from the front of the house under lounge and dining room floor then up to boiler in the bathroom, so don’t think the water mains is leaking, but I suppose I wouldn’t know without a meter?

Noted on the PCA Surveyors - ended up down a wormhole on this forum last night, spent hours reading a thread originally posted by Softus on the topic of rising damp!

Couple of initial thoughts: i) the ground outside in the right hand corner appears to be higher than anywhere else, and may even be higher than the floor level inside; and ii) the concrete slab is likely the coldest surface in the room, so condensation is likely to accumulate there. Would appreciate your thought on the above.

Thanks

 
Looks like the ground is too high where the shelter was and I would advise a drain cctv on the drains/gully.

Andy

Yes you’re right, pretty clear from the third picture that the outhouse brick floor is higher than the ground level elsewhere. What could a possible solution be? Dig up brick floor and pave at a similar level to the slabs, maybe install a French drain along the perimeter?

Thanks,
Tom
 
When you dig the trench for your French drain, there is a good chance you will discover water and be able to track back where it is coming fro .

Look for red worms or wild tomato plants which indicats drain leaks

Line mortar between bricks often washes away near a leak. Look at yours below ground level, you can hose out the mud and repack with stuff mortar mix. I use cement mortar below ground, even in an old house. It will not be "breathing" in the ground and will resist water.

Thanks John, I’ve now dug out a trench to a depth of 3 bricks to assess whether there is anything going on below ground. Mortar is intact and solid and no distinction between condition of brick and mortar below ground on the right side (where the damp is inside) and the left side (no damp inside).

Given no visible issues below ground and lack of Down pipes or drains on that side, would you suggest next steps may be to dig up concrete floor inside? Or wait and see whether the removal of the raised ground outside makes a difference?

For peace of mind (and given half the trench has now been dug!) I’ll likely install a French drain anyway.

thanks,
D94DB60C-1522-4517-BF5E-1C944C391F98.jpeg
843E52C3-826A-4D1E-9A30-12CC34846123.jpeg
EEC77988-9A99-4FA0-87EF-0C7D8C1800ED.jpeg

Tom
 
Well done, normally we wait at least 1 month before we get an up-date.

I would now leave it a week or so and see if it starts to dry, you could draw around the edge of a damp patch to see if it shrinks.

Andy
 
Looks to me like water has been running down the wall in that corner.

Could there have been a gutter or flashing fault?

Overflow pipe?

When you extend your trench, you can look at the gulley to see if it cracked and leaking (they usually are)
 
Last edited:
OP,
1. Remove all appliances, base units, skirtings & wall paper throughout the kitchen.
2. you need access to knock off plaster to at least 1m high where damp shows on the walls.
3. Crack out the slab & dig down to oversite level.
4. Examine for rot all wood flooring and joist tails in or near the walls. Crawl the floor if its possible?
5. post pics of any suspicious damp or rotted areas.

6. the exterior pointing on the kitchen wall & the return wall needs raking out to 30mm deep & re-pointing with sand and lime.
7. can you ID any DPC in the wall?
8. clean out the trap in the gulley.
9. remove the piled loose bricks away from any house walls.
10. clean off all mortar smears, and replace missing bricks.
 
Well done, normally we wait at least 1 month before we get an up-date.

I would now leave it a week or so and see if it starts to dry, you could draw around the edge of a damp patch to see if it shrinks.

Andy

In the process of extending the trench to the gulley at the mo, will then leave it for a week or so to see if it makes any difference and will update the thread if so.

cheers,
Tom
 
Looks to me like water has been running down the wall in that corner.

Could there have been a gutter or flashing fault?

Overflow pipe?

When you extend your trench, you can look at the gulley to see if it cracked and leaking (they usually are)

Absolutely, lead flashing on the outhouse and the outhouse roof itself was knackered. The roof timbers were very rotten when I pulled the outhouse down. So it’s highly likely that water has been running down the wall where the outhouse was.

Gulley looks in decent nick, though is a bit murky and full of leaves. Probably makes sense to get someone out to inspect with a drain cctv!

cheers,
Tom
 
OP,
1. Remove all appliances, base units, skirtings & wall paper throughout the kitchen.
2. you need access to knock off plaster to at least 1m high where damp shows on the walls.
3. Crack out the slab & dig down to oversite level.
4. Examine for rot all wood flooring and joist tails in or near the walls. Crawl the floor if its possible?
5. post pics of any suspicious damp or rotted areas.

6. the exterior pointing on the kitchen wall & the return wall needs raking out to 30mm deep & re-pointing with sand and lime.
7. can you ID any DPC in the wall?
8. clean out the trap in the gulley.
9. remove the piled loose bricks away from any house walls.
10. clean off all mortar smears, and replace missing bricks.

Thanks Tell80, kitchen will be taken back to brick and floors ripped up to investigate further inside. This might have to wait until next weekend though! The original lime plaster has been over skimmed with a gypsum plaster, so that can’t be helping the moisture content in the wall either.

Repointing exterior walls is definitely on the agenda, but I’m getting French doors fitted in the back wall so will wait until they’re fitted and brickwork has settled before repointing.

I haven’t identified a DPC no, though I understand in these types of properties it was usually slate in the mortar below the interior floor level, so might be tough to spot?

Will keep the thread updated with progress!

cheers
Tom
 

DIYnot Local

Staff member

If you need to find a tradesperson to get your job done, please try our local search below, or if you are doing it yourself you can find suppliers local to you.

Select the supplier or trade you require, enter your location to begin your search.


Are you a trade or supplier? You can create your listing free at DIYnot Local

 
Sponsored Links
Back
Top