• Looking for a smarter way to manage your heating this winter? We’ve been testing the new Aqara Radiator Thermostat W600 to see how quiet, accurate and easy it is to use around the home. Click here read our review.

Damp patches above fireplace 1930s house

Joined
5 Dec 2023
Messages
7
Reaction score
0
Country
United Kingdom
Hi all hoping for some advice.

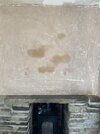
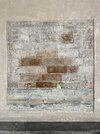
Got some damp patches showing through above fireplace / chimney breast.

Moved in 3 years ago and patches were there so nothing new. Was an open fire but now a log burner with lined flue.

Any ideas what might be the most likely cause?
Have recently sanded paint off the wall and washed the wall, and the marks just will not dry out despite all other walls of the room drying out. Thought this was the right time to show it off at its worst and ask you guys!

Have tried as much as we can to inspect the roof / tiles, chimney / pointing, and not sure if there some infected brickwork / plaster from previously burning coal? All possibilities still open really just wondered if someone could immediately recognise it.
Also weird tin foil underneath the latest top layer skim of plaster, what’s all this about?

Cheers
Dan
 

Attachments

  • IMG_6837.jpeg
    IMG_6837.jpeg
    308.4 KB · Views: 53
It might be the result of hygroscopic salts


The old soot in chimneys can soak up moisture and dump it during colder/wetter months.

A few years ago, one of my customers had the side of his house repointed because of damp patches on the third floor chimney breast. Each roofer who had visited previously told him that the roof was fine. After the pointing, new flaunches and "hats" for the pots, he got me to redecorate the room. I used SBR to seal the stains on the breast, filled/sanded and then lined and painted. Months later, the stains came back. He phoned a nice fellow at a "damp company". For free, the guy told him that it sounded like hygroscopic salts.

The customer hacked back to the bricks and used sand and cement. 5 years later, no signs of damp.

I suspect that the foil you found was supposed to prevent the damp stains.

If you have hygroscopic salts, using stain blockers may, or may not, fail. There is a risk that that salts will simply push their way through the stain blocker.
 
Have the patches changed in three years?
No real change in three years no. Same shape and positioning.

It was under white paint so harder to tell. Thought it was weather related whilst the paint was on (leak on chimney or something) but now the paint is off it perhaps points to some sort of salts / infected plaster issue as the post above details.

Last few days they’ve slowly dried out a bit, warm dry weather outside and window open.
Today has been sunny and dry all day, yet I’ve been in the room sweating buckets sanding ceilings, and the patches are darker and more pronounced today. Perhaps again pointing to moisture from inside being drawn to the patches.

That’s the latest working theory anyway.
Will hack plaster off when I get onto it and see what the bricks look like.
 
You won't actually see anything, but 99% it will be salt contamination. There's a good article here https://www.tracebasementsystems.co.uk/post/damp-chimney-breasts

They suggest a separation membrane, but if you are taking the plaster off I have had good success overboarding with plasterboard fixed with foam adhesive. Don't use water-based dab adhesive - the water will absorb the salts in the bricks and migrate to the surface as the water evaporates and the dab dries, giving you the same problem again where the dab is.

The key thing is to isolate the salts from the humidity in the room. I have also, although I'm not sure how much it helps, painted on an SBR/cement slurry on to the bricks before overboarding - I did this around a fireplace showing persistent damp patches with a 100% fix.
 
I had similar, hacked plaster above fireplace back to brick and re-did in thistle dri coat and skimmed. 10+ years on and all good
 
Was about to ask if rather than boarding I can use some kind of renovating plaster onto the bricks?

Sounds like there’s a few options out there, hasn’t seen the thistle one but will check it out. Thank you.

Have been using a lot of the limelite renovating plaster on various walls / chases so am getting to grips with that stuff. Some mention even of salt resistant properties in some of the plasters.

If I did try to use renovating plaster onto the bricks, so I need to use some kind of slurry coat first? @23vc did you apply anything before the dri coat?
 
No, think you just go straight onto dampened down brick. Or the bag will say. It’s grey in colour (or was at the time), easy to apply (a bit fluffy like the old browning) and seems very low suction so the skim took a while to go off on top of it.
 
Brilliant thanks @23vc

Will compare the specs on this one and the limelite, they sounds very similar by how you describe, so see which one makes the boldest promises about salts.

Will make an attempt at hacking off and re-doing in the next couple of weeks and will report back.
 
Bit of an update on this.

I’ve took a section of plaster off and am monitoring it.

When we dehumidify the room the patches do mostly fade away. When I’m in the room sweating, the patches get darker. Does this sound like the bricks are drawing moisture from the room?

I guess my plan is still to apply salt neutraliser, then plaster over in a breathable renovation plaster (with promises of salt resistant properties). Might do some repointing whilst I’m waiting.
 

Attachments

  • IMG_6871.jpeg
    IMG_6871.jpeg
    584.9 KB · Views: 32
Does this sound like the bricks are drawing moisture from the room?

yes.

I have never used renovating plasters, so have no experience of how good they are. However, the idea of a breathable plaster solving a salt poisoned brick problem is difficult for me to understand. The water in the plaster when it is applied will take up some of the salts in the bricks. The plaster dries by evaporating that water, but any salts that have been absorbed will still be left on the surface as the water evaporates in to the room, possibly leaving the same problem.

Having very successfully used the isolation method trapping the salts in the brick, and not allowing room air to get to them, this would always be my go-to solution but I am very interested to find out how you solve this, or not. Please, if you do use renovating plaster, post back the results in a year or so, because I think it will be informative.
Sorry @mrrusty i misread your post above about separation.

Can you explain your Sbr / tanking slurry method please. I’m still considering whether to seal the brickwork somehow to keep the salts in the brickwork (dryzone cream paint-on?). I don’t have the wall depth for overboarding.
 
If it's got plaster on it, you do have the room depth for overboarding. What I have done is strip to brick, make up a slurry of cement and SBR and paint it on - don't know how necessary this is, but it's easy to do - idea being it seals the brickwork, and then I've fixed plasterboard with foam adhesive. The PB is either 9mm or 12.5mm thick, and the adhesive layer is maybe 3-8mm. The adhesive is waterproof itself and stands the plasterboard away from the brick a little bit forming a barrier.

When using SBR slurry it sticks like s*** to everything, so wash it off tools and anything else before it sets. SBR = https://www.permagard.co.uk/media/uploads/SBR Bonding Additive Data Sheet.pdf

When using foam adhesive it will try and push the plasterboard outwards as it expands a little bit, so I tend to wack just a few screws and red plugs in to keep it in place - red plugs need a 5.5mm drill bit which is smaller than the screw head, so you can put the PB in place, drill right through, pop the plug on the end of a screw, tap it partially home and then tighten up.

It's worked well for me. Others will have their own methods - there's always different solutions to every problem.
 
OP,
You've done the right thing by hacking back to brickwork.
Why not hack off all the front of the c/breast plaster above the fireplace?
You could also, belt & braces, replace the affected bricks that you show?

No matter - The correct & professional remedy would be to now apply a lime render mix.
Mix three or four parts sand and one part NH lime.
Doing this will give you at least a 20yrs defect free decorated surface.

If ever the flue liner is removed then you could have the chimney flue swept.
 

If you need to find a tradesperson to get your job done, please try our local search below, or if you are doing it yourself you can find suppliers local to you.

Select the supplier or trade you require, enter your location to begin your search.


Are you a trade or supplier? You can create your listing free at DIYnot Local

 
Back
Top