Dealing with bodge job in drain

Joined
5 Apr 2017
Messages
33
Reaction score
1
Country
United Kingdom
Bit of a whiffy one this - not for the faint-hearted - maybe leave til later if you're about to have your dinner.

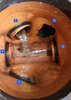
Long story short - we noticed an eggy smell kept appearing in the kitchen and wondered if there was a problem with the drains. Still not sure we've got to the (ahem) bottom of that, but we did identify a problemette. Some genius that lived here before us decided A) to pave over the top of the access to the main sewer pipe, and B) to bodge a hole in an existing drain for a patio grate to drain off to. Photo is attached (sorry, it's not pretty).

The numbered holes are as follows (in illogical order):
1. A mystery - really not sure what this one can be for. Maybe drainage from guttering? Not sure how likely that is. Never seen so much as a trickle from it.
2. Exit to main sewer pipe
3. Drainage from upstairs toilet
4. Drainage from kitchen sink
5. Here's the bodge - the drain lining has been butchered to allow a hole for that patio drainage.

The problem is... imagine someone has been busy dropping a log upstairs and it comes hurtling down when they flush - where does it go? Does it know to exit stage right in the direction of the sewer? Of course not, so very often it torpedoes straight across to opening no. 1, where there is no flow to flush it back out, so it just sits there. Sometimes, it even makes it into opening no. 5, and then it has even less chance of exiting, as the bodge has left a good-sized ledge of thick plastic to hold any adventurous excrement in place.

I'm therefore left with a sticky situation and wondering what to do for the best. As regards opening no. 1, I wondered if I could cap that off, as seems to have been done in our other drain (hoping these are standard sizes). But then what if that hole really is used for something? Just not sure how to be sure. So I wondered if there is such a thing as a mesh cap that would allow water out but not solids in. Haven't found such a thing yet. And then there's what to do about the bodge. At the very least I think it'd be good to trim off that jagged edge, but this is very tough plastic and access is awkward, so not sure how best to go about that (even assuming there's no risk of that channel eroding if the plastic is removed).

Any thoughts from the waterly wise on this unpleasant little conundrum?
 

Attachments

  • Exhibit A - the drain.jpg
    Exhibit A - the drain.jpg
    269.5 KB · Views: 338
Sponsored Links
I'm not sure about a mesh, but I have seen you can get one way valves which are like a flap that let water out but not back in and can be retrofitted which might work? I think they also work to keep rats and mice out too.

edit: maybe something similar to this? https://shop.thefloodcompany.co.uk/product/soil-pipe-non-return-valve/

With regards to the eggy smell in the kitchen, we're actually facing something similar with a smell by the kitchen sink that i'm trying to get to the bottom too (there aren't any blockages that I can see). I'm considering fitting an air admittance valve which apparently is supposed to open up to let air in and suck bad smells out with the waste water. Maybe this might help you too?

I'm no professional plumber so not sure how effectively any of the above will work but maybe it will be of some help.
 
Thanks @dan77714, that non-return valve is a new one on me but definitely worth a look. The air admittance valve is something I've seen before but it hadn't occurred to me for this situation so that's another one to look at - thank you. I hope it works out for you. The eggy smell is certainly not pleasant, but we had found it baffling how it comes and goes. Often worse first thing in a morning, and we wondered at first if it coincided with the central heating coming on, but not so sure about that. If in doubt, I now just flush that drain manually (with a watering can) and sanitise the kitchen sink with some drain unblocker and/or de-ponger stuff.
 
Sponsored Links
I’d swap the chamber out for with with 2 inlets on each side.

As the existing chamber is already damaged, that sounds like the best move

I have also seen, when pipes enter a chamber part-way up the wall, elbows fitted to direct the detritus downwards, rather than firing across to the opposite wall.

i've always thought that a nice big bath rushing down the pipes helps wash them out.
 
Thanks both. I did wonder if it might come to that (replacing the chamber) which might be a bit beyond me, but ultimately worth doing to get it sorted. That said, I will look into the elbow idea first, as that should direct it away from both inlets on the opposite side - as long as it's compact enough not to obstruct access and flow from the other inlets (we don't want pipe causing obstruction/backwash if there's a lot draining from the kitchen (left inlet), although there's maybe enough clearance that it won't be an issue).
 
A properly installed system shouldn't need bends in the chamber to direct waste in the right direction, the preformed plastic chambers are formed with the correct orientations in the channels to achieve this. You wont be able to attach a bend to the incoming connections anyway, the chamber is provided with sockets to accept the incoming pipework, therefore there is no spigot ends to push a socket onto. Also, your chamber is damaged and compromised, rats may find the breach a suitable point to make themselves a new front door into your garden.

Its a Mini Chamber so shouldn't be deep, I really would recommend you bite the bullet, and dig it out. As Ian has said, replace with a chamber with 2 inlets on each side, and couple the pipework in properly, using the provided inlets. No. 1 is connected to something, the residue is there to suggest some flow at times, possibly from a sink, (wont be rainwater). If you dont mind a bit of work, and are capable of digging out around the existing chamber, it shouldn't be too awkward to graft in a new base, and add risers as required.
 
Thanks @Hugh Jaleak, I take your point - it's bodged enough without bodging more (a real shame they didn't think to replace the chamber when the new drain was put in). I did wonder if it would be difficult (/impossible) to find an elbow to fit, given that neither the elbow nor the chamber are designed for that setup.

Regarding the residue at no. 1, it looks like the sort of waste we'd expect from the toilet side but in fact it's solidified/hardened, so I had been working on the assumption that it was caused by accumulated residue from no. 3 having shot over to no. 1 and remained there for some time, until we discovered it and flushed it out manually. That certainly seems to be what happens, and having tested we've found that none of the toilets or sinks seem to cause any flow from no. 1.
So my main concern about replacing the chamber is that it would resolve the problem of the dodgy 'no. 5' inlet but may still leave us with the same problem with no. 1. If the chamber is supposed to be preformed to direct waste the right way then I don't know why it's failing to do so currently, or at least I have no other explanation for waste ending up on the opposite side of the chamber. It's a strange one. :/
 
Waste hitting the opposite side of the chamber is a common issue with 'more modern' drainage. Years ago, everything was done by the book, falls (gradients) on pipework were carefully ensured, (although with more primitive methods of working them out, in practice they were not always correct!), and chambers were brick or concrete built and much bigger. Now it seems to be to get the waste from A to B in the quickest manner, falls, bends and chambers are whatever is easiest (or cheapest) to install.

I'd suggest the issue may lie with too steep a fall on the incoming drain, the waste comes into the chamber too fast and overshoots the channel. You may find this would improve with a bigger (the 450mm diameter) chamber, as both lateral inlets enter the main channel at 45°. Does beg the question, if there was an unused inlet, why on earth the connection for the patio drain was not made to it instead of knocking a hole though the wall of the chamber. (Maybe refer to my first paragraph...) If the inlet was never to be used, then a blanking pug should have been fitted at the time of installation, would probably have mitigated some of the crossflow, if not all.

If you dont plan on changing the chamber I'd look at rerouting the patio drain to connect into 1, and make good the hole in the chamber with some stiff concrete to prevent soil/rat ingress/egress.
 
It’s a badly designed chamber, a double inlet one with have more of a benching too control the flow, if you put a 45deg bend in the rear inlets you will be somewhere close to where you want to be.

F098354E-FF1A-4B0A-88B9-72BD9A0CE637.jpeg
 
I'd suggest the issue may lie with too steep a fall on the incoming drain, the waste comes into the chamber too fast and overshoots the channel. You may find this would improve with a bigger (the 450mm diameter) chamber, as both lateral inlets enter the main channel at 45°. Does beg the question, if there was an unused inlet, why on earth the connection for the patio drain was not made to it instead of knocking a hole though the wall of the chamber. (Maybe refer to my first paragraph...) If the inlet was never to be used, then a blanking pug should have been fitted at the time of installation, would probably have mitigated some of the crossflow, if not all.

If you dont plan on changing the chamber I'd look at rerouting the patio drain to connect into 1, and make good the hole in the chamber with some stiff concrete to prevent soil/rat ingress/egress.

Yes, it's a pretty steep fall - all the more reason to have a blanking plug if the mystery inlet isn't required, so that's what has been puzzling me all along. As to why that inlet wouldn't have been used for the patio drain, my hunch is that someone just thought it was far easier to run a straight channel from the drain and punch hole in the existing chamber rather than having to worry about accessing and connecting up to the spare inlet (i.e. doing a proper job). Would have been so much easier to tackle it then, though (assuming the drain was put in when the patio was done) - the whole chamber is now surrounded by block paving, and right up against the conservatory wall. :/
 

DIYnot Local

Staff member

If you need to find a tradesperson to get your job done, please try our local search below, or if you are doing it yourself you can find suppliers local to you.

Select the supplier or trade you require, enter your location to begin your search.


Are you a trade or supplier? You can create your listing free at DIYnot Local

 
Sponsored Links
Back
Top