Door cavity reveal, bridged, not closed

Joined
5 Jan 2016
Messages
233
Reaction score
8
Country
United Kingdom
Hi guys

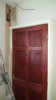
I am doing a job in our house, replacing the downstairs door frame with a new one and some plasterboard work.

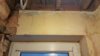
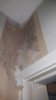
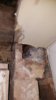
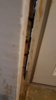
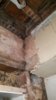
The living room door is situated next to the front door. Upon removing old plaster some issues have been found. Pictures are attached.

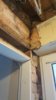
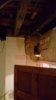
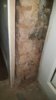
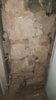
Its a 1940s build with cavity infill. The inner and out skin in areas has been bridged with mortar and bricks. Also not closed off. This was a drafty area. Theres several factors caused this. Pvc door had no foam in it and could see daylight. I can fix this.

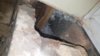
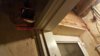
How would be best to close the cavity off? I know you can buy closers but as its a retro fit, its not going to be realistic as the bricks have been bolstered at different sizes. I was thinking a sheet of dpc layed vertical to the outer skin then filled with foam. Or mortar. Maybe both?

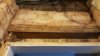
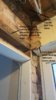
Another thing i have spotted is a beam supporting a row of bricks and possibly the entire bathroom floor seems to re resting on a quarter of a brick. I need to look further into this as there may be a support higher up.
 

Attachments

  • 20181124_153156-1494x2656-1494x2656.jpg
    20181124_153156-1494x2656-1494x2656.jpg
    212.7 KB · Views: 305
  • 20181124_151606-1494x2656-1494x2656.jpg
    20181124_151606-1494x2656-1494x2656.jpg
    254.7 KB · Views: 293
  • 20181124_151527-1494x2656-1494x2656.jpg
    20181124_151527-1494x2656-1494x2656.jpg
    215 KB · Views: 296
  • 20181124_153224-1494x2656-1494x2656.jpg
    20181124_153224-1494x2656-1494x2656.jpg
    102.3 KB · Views: 298
  • 20181124_151534-1494x2656-747x1328.jpg
    20181124_151534-1494x2656-747x1328.jpg
    260.2 KB · Views: 302
Sponsored Links
stand back an photo a bigger area inside the house an show the wall an door from from outside.

the wood lintel over the outside door looks like it could be water damaged.
one of the "joists" butting up to the lintel seems to be pinned with only two skew nails.
remove that blown insulation and check the outer cavity wall for penetratin damp.
mineral wool cav insulation is the worst kind of CWI.

dont do anything until exactly whats goin on is sorted.
eg whats happening on the right hand side of the door frame and lintel? where do you suggest fixing your vertical length of DPC?
 
Sponsored Links
Took a few more pictures. I will be removing more plaster today so i can see if theres another lintel.

I have seen horror stories with cwi but every house here is filled with it. I still have the paperwork for it in the 90s. I have uncovered all sorts in this house.

Bobasd, i was not sure exactly what picture angles you were talking about so i hope this is it. That water damage, are talking about the dark area of the wooden beam where it is resting on the brick?

Garyo, as for making the closers, would i cut slithers of sheet pir, put it flat against the outer skin wall then foam the remaining gaps where the inner skin is?
 

Attachments

  • 20181125_084038-2656x1494.jpg
    20181125_084038-2656x1494.jpg
    138.7 KB · Views: 215
  • 20181125_083737-2656x1494.jpg
    20181125_083737-2656x1494.jpg
    231.8 KB · Views: 188
  • 20181125_100255-1494x2656.jpg
    20181125_100255-1494x2656.jpg
    169.3 KB · Views: 187
  • 20181125_100745-2656x1494.jpg
    20181125_100745-2656x1494.jpg
    163.5 KB · Views: 199
  • 20181125_100828-1494x2656.jpg
    20181125_100828-1494x2656.jpg
    109.5 KB · Views: 188
  • 20181125_100711-1494x2656.jpg
    20181125_100711-1494x2656.jpg
    136.3 KB · Views: 203
I have added more pictures to the post above,

I removed some cwi by the beam. It looks dry and the insulation is dry. We have a porch so that wall is a bit protected from the elements.

When we moved in the shower tray was leaking, im wondering if it still is. I have uploaded a picture of the other side of internal wall, the shower tray is directly over this area and you can see the dark areas where it previously leaked.

Only way to know this is to drop some of the cieling on the otherside. I planned to do that anyway so looks like il be doing it sooner.

If that beam is water damaged, does it have to come out? Even if its solid?
 
Theres no other lintel support. It would appear that my bathroom floor is resting on only a 100x100 beam, thats notched down to half that, 50x100, then resting on whats only 100x25mm bit of brick.

I guess the right move is to geta concrete one placed in of the correct size and some rework on the bricks?

Structual engineer?
 

Attachments

  • 20181125_122815-1494x2656.jpg
    20181125_122815-1494x2656.jpg
    266 KB · Views: 163
whats supporting/lintelling the outer skin above the Pvc doorframe? fwiw, the frame was installed to far forward - should be min of 75mm fom face of elevation.
pics 3/5 & 4/6 show damp lookin 2" x joist lintelling the inner skin. probe the damp for rot.
how this joist is supported at the right hand end is not clear.
on the left , pic 3/6, its half lapped to pick up the dining room lintel.
pic 1/6 both lintels are then perched on your "quarter of a brick". this is a pressure point for two walls or 2 x panels of brickwork.

pic5/6 large water stain on plaster.
does this return wall go up to the loft?
are dining room ceiling joists restin on the outside wall like the hall ceilin joists are?
dont touch the dining room door lining until the above work has been done.

the CWI bein dry can be left alone.
but quite a bit of proppin might be needed to carry out remedial work -
both wood lintels should be replaced.
the ragged cavity opening needs rebuilding.

it might pay you to open up the right hand reveal and lintel bearin?

none of it is rocket science just slow careful work at one thing at a time.
 
Hi bobasd

outer skin is concrete lintel with 100-150mm overhangs. the pvc door is flush with the Rear face of the outer skin, incorrect?
its old and due for change.

All timbers are solid, checked all joists and beams. Theres signs of white marks that first appeared to look like dry rott but i have had someone look at it and been told its "dried out water damaged" and not formed into rott.

I have attached some edited pictures to hopefully show the layout better.

i have been advised i could remove the little row of bricks as this is an old "fire barrier" from the dining room to the entrance and also the beam they are sitting on, and replace with stud frame with two layers of plasterboard either side to slow the speed of a fire down. This little wall is actually quite loose and wobbles as the tie in bricks at the end are missing as pictured.

The water damage seems to be from where the shower tray sits, the tray is positioned over the top of the dining room door frame and hangs either side of the dining room and entrance.


i have took down a section of the living room cieling to inspect the joists, signs of previous water marks but all solid, no rott. although the was mould on the lath where the water had collected.

the whole lot is being re-boarded anyway so i thought stuff it!!

This leaves me a couple options.

option 1. Gain access to the gaping hole in the inner skin of the supporting wall, fit missing bricks, replace the partial brick
with a full brick. then replace door frame. problem with this is that it would mean leaving the wooden beam in and the "lapped notch" in the beam is the only part
resting on a brick still.

option 2

support 5 x joists, remove small fire check wall, remove wood lintel, replace with a concrete 150x100 x 1300 lintel, then replace door frame.

Any thoughts?

If cavity insulation is lost, what should it be filled back with to prevent cold spots?
 

Attachments

  • 20181125_100255-1494x2656.jpg
    20181125_100255-1494x2656.jpg
    124.8 KB · Views: 139
  • 20181126_192857.jpg
    20181126_192857.jpg
    184.8 KB · Views: 131
  • 20181125_132252.jpg
    20181125_132252.jpg
    162.2 KB · Views: 109
  • 20181126_192616.jpg
    20181126_192616.jpg
    120.1 KB · Views: 121
Last edited:
take down the panel of bricks above the Dining Room door and remove the wood lintel.

prop an then remove the outside door half lapped wood lintel, an any loose brickwork above.
then re-build the rough open reveal below.
install a new lintle.
then re-build the loose brickwork.

install a new wood lintel above the other door an frame up an plasterboard above.
one end of this lintel can be rested on where the half lap is now.
this lintel can be packed down to head of door height.
 
fibre glass from a loft roll will do
when/if you re-build the reveal.

main thing around what you have is to stop drafts.
 
Hi bobasd.

I follow what your saying, up to the point of the reveal. Are you referring to the bridged bricks? So they are all in a line.
 
the door opening reveal is the only reveal you have exposed - re-build it an as its re-built it will close the cavity.
 
Thanks. Sorry i posted before seeing your second post.

I will have a think then. If 50mm pir will fit, i will do that and foam. If not i do have a new roll of 100mm knauf base layer i could also use left over from loft.

Collecting acros tonight hopefully.
 

DIYnot Local

Staff member

If you need to find a tradesperson to get your job done, please try our local search below, or if you are doing it yourself you can find suppliers local to you.

Select the supplier or trade you require, enter your location to begin your search.


Are you a trade or supplier? You can create your listing free at DIYnot Local

 
Sponsored Links
Back
Top