New doors in timber frame house no cavity closers used and insulation put in cavity. Help!

Think I had something similar with window fitters this year. They didn't close the cavity and they didn't foam around the window. There are no gaps into the room but somehow I guess there must be a draught.

I feel for you OP. It's a minefield out there with blaggers and liars everywhere.
 
Sponsored Links
Think I had something similar with window fitters this year. They didn't close the cavity and they didn't foam around the window. There are no gaps into the room but somehow I guess there must be a draught.

I feel for you OP. It's a minefield out there with blaggers and liars everywhere.

It’s just so wrong. Fensa will certify it meets regs because he says it does when how can it??

I’m petrified that the cellotex is gonna sweat against our timber frame and start to rot it.

The whole reason we got them in was to fix cold bridging and now we have a far colder areas around both doors so likely to get damp. We have a house that’s not fire safe and our timber frame could rot making the house worthless.
 
noseall has explained what you need to do, insert a continuous vertical length of damp proof course between the celotex and the masonry, fold it round the corner and (hopefully) there's a little gap between frame and masonry where you can tuck it in. I would run a bead of silicone between frame and dpc. Make good the plasterboard, obviously it's primarily fixed to the timber but some expanding foam or blobs of no nails to gap fill when you press it against the dpm will make it more secure

Before:

IMG_20240122_153121996.jpg


After:

IMG_20240122_153026567.jpg


And for info: - a complete cavity closer in action, it's just a strip of PIR with two plastic "T" sections to hold it in place. You could fit some but you still need the DPM because of the exposed masonry. I try to wedge them in tightly so the plasterboard can be stuck to it for a bit of extra support.

IMG_20240122_153304120.jpg


If you're getting someone (else) in to sort it out, ask them to explain exactly what they're going to do so you understand it and maybe post on here for a biit of oversight.

The theory for the floor is broadly similar - masonry/waterproof barrier/insulation - just not too deep down the cavity with the insulation.
 
noseall has explained what you need to do, insert a continuous vertical length of damp proof course between the celotex and the masonry, fold it round the corner and (hopefully) there's a little gap between frame and masonry where you can tuck it in. I would run a bead of silicone between frame and dpc. Make good the plasterboard, obviously it's primarily fixed to the timber but some expanding foam or blobs of no nails to gap fill when you press it against the dpm will make it more secure

Before:

View attachment 330324
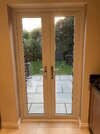
After:

View attachment 330325

And for info: - a complete cavity closer in action, it's just a strip of PIR with two plastic "T" sections to hold it in place. You could fit some but you still need the DPM because of the exposed masonry. I try to wedge them in tightly so the plasterboard can be stuck to it for a bit of extra support.

View attachment 330326

If you're getting someone (else) in to sort it out, ask them to explain exactly what they're going to do so you understand it and maybe post on here for a biit of oversight.

The theory for the floor is broadly similar - masonry/waterproof barrier/insulation - just not too deep down the cavity with the insulation.
Thank you. That is what it looks like inside ours and they did do a vertical dpm between the insulation and the masonry.

I’m worried the pir will sweat and rot the timber frame?
The pir only went down to an inch above the skirting board so expect we’re going to get cold bridging there.

IMG_0821.jpeg
 
Sponsored Links
I’m worried the pir will sweat and rot the timber frame?
Forget it, that's not what happens or will happen.

However, there needs to be a vapour check on the face of that timber before you plasterboard it. That vapour check should over lap the existing vapour check that will be (/ should be) on the frame below the plasterboard.

Otherwise it's as in the photos from cdbe regarding the DPC and cavity closure. Except you will need a layer of insulation up the entire reveal to remove the cold bridge created by that inner brick. 10mm should be OK. Or insulated plasterboard.
 
The vapour membrane was between the tf and the pir but it didn’t come out over the edge of the frame.

Want to get this right in my head before employing someone else to do this right so I appreciate all the comments.

Think I need to start trying to find a builder locally who understands. Thought I’d managed that but guess not.

The builder did try to fit in a 50mm cavity closer but the back of the masonry is not straight and has excess mortar sticking out. That pir board was just 25mm and a tight fit that had to be hammered in so not sure a pre made closer will work.

Is anyone allowed to recommend tradesman on here or not? Anyone in Essex?
 
Such a shame it doesn’t look too bad on the outside.. this is the kitchen one.
Lounge ones the same.
 

Attachments

  • IMG_0864.jpeg
    IMG_0864.jpeg
    264.9 KB · Views: 20
It’s just so wrong. Fensa will certify it meets regs because he says it does when how can it??

I’m petrified that the cellotex is gonna sweat against our timber frame and start to rot it.

The whole reason we got them in was to fix cold bridging and now we have a far colder areas around both doors so likely to get damp. We have a house that’s not fire safe and our timber frame could rot making the house worthless.

Yeh fensa is just a piece of paper really. I doubt anyone has ever been brought to task by them.
 
Here is the principle. Ensure the cavity closure is sealed to prevent air leakage. Expanding foam or rigid foam and flexible mastic.

Tape any joins of the vapour check and the frame membrane.

foto_no_exif (13).jpg


Edit. If that Celotex in the cavity was not there originally, omit that from that sketch and just have the cavity closer. The blue DPC should be a bit further up the cavity than it looks, say 100mm.
 
Thank you woody
Def helps me out a lot in being able to show any potential builders. The membrane I think is what I was seeing. Didn’t see a Vapoue check but they never cut back the whole plasterboarded area just a 6 inch section at the cavity so never got to see that far around.

I really appreciate your help.

How do you suss out if a tradesman can actually do a job before you hire them?

I asked the right things, got recommendations etc and still ended up with someone who wouldn’t listen to a word I said.. forget the gap above the skirting.. its normal.. timber frames are just draughty.. what’s a cavity closer I’ve never heard of it and where can I buy one… all sentences I’ve heard in the last week.
 

DIYnot Local

Staff member

If you need to find a tradesperson to get your job done, please try our local search below, or if you are doing it yourself you can find suppliers local to you.

Select the supplier or trade you require, enter your location to begin your search.


Are you a trade or supplier? You can create your listing free at DIYnot Local

 
Sponsored Links
Back
Top