
- Joined
- 26 Jul 2018
- Messages
- 8
- Reaction score
- 0
- Country

Hi All,
I thought I'd post a recent success I've had with my latest round of home improvements.
We live in a fairly standard 3 bed semi which was build in the early 2000's. As such, it has two decent sized bedrooms and one box room.
As happens when you have children my youngest has drawn the short straw and ended up in this room. Which was fine as a baby however over time it has become apparent that every little bit of space counts.
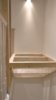
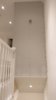
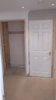
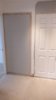
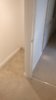
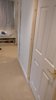
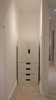
I thought about my options for a while and figured I had two ways to maximise space. First, I extend over the landing and lose valuable space where the kids play, not ideal. The second option was to move the cupboard on the landing over the stairwell and knock through the wall in the bedroom to create a walk in wardrobe. After a lot of consideration and my wife telling me so I opted for the second option.
So over the Christmas break last year I had some free time while the wife and kids were out. I was knocking about the house deciding how to best work off my Christmas belly. The options where go for a run or start work on this "little project". Running isn't my thing so I started work, to my wife's horror when she got home half the balustrade was gone. In hindsight I probably should have told her first") Any way a few weeks later the job was done. I've attached a few pictures of the process from start to finish. All in all this cost me about £400 including getting a plasterer in.
Any way a few weeks later the job was done. I've attached a few pictures of the process from start to finish. All in all this cost me about £400 including getting a plasterer in.
I must say I'm very please with the results.
I thought I'd post a recent success I've had with my latest round of home improvements.
We live in a fairly standard 3 bed semi which was build in the early 2000's. As such, it has two decent sized bedrooms and one box room.
As happens when you have children my youngest has drawn the short straw and ended up in this room. Which was fine as a baby however over time it has become apparent that every little bit of space counts.
I thought about my options for a while and figured I had two ways to maximise space. First, I extend over the landing and lose valuable space where the kids play, not ideal. The second option was to move the cupboard on the landing over the stairwell and knock through the wall in the bedroom to create a walk in wardrobe. After a lot of consideration and my wife telling me so I opted for the second option.
So over the Christmas break last year I had some free time while the wife and kids were out. I was knocking about the house deciding how to best work off my Christmas belly. The options where go for a run or start work on this "little project". Running isn't my thing so I started work, to my wife's horror when she got home half the balustrade was gone. In hindsight I probably should have told her first
Any way a few weeks later the job was done. I've attached a few pictures of the process from start to finish. All in all this cost me about £400 including getting a plasterer in. I must say I'm very please with the results.
Attachments
-
 IMG_20171228_163530.jpg101.9 KB · Views: 7,957
 -
 IMG_20180101_163011.jpg68.8 KB · Views: 8,844
 -
 IMG_20180217_175902.jpg65.3 KB · Views: 19,263
 -
 IMG_20180224_141053.jpg86.4 KB · Views: 7,587
 -
 IMG_20180303_074454.jpg122.4 KB · Views: 8,091
 -
 IMG_20180303_123204.jpg109.1 KB · Views: 6,453
 -
 IMG_20180425_185540.jpg91.2 KB · Views: 6,594
 -
 IMG_20180425_185720.jpg149.4 KB · Views: 6,705
 -
 IMG_20180425_190824.jpg101.4 KB · Views: 7,172
