
You are using an out of date browser. It may not display this or other websites correctly.
You should upgrade or use an alternative browser.
You should upgrade or use an alternative browser.
Failing putty (new shed window) (Ed.)
- Thread starter DIY67
- Start date
- Joined
- 14 Nov 2014
- Messages
- 1,819
- Reaction score
- 500
- Country

LolMight have to get that structural engineer back with his clipboard and his vis, put some cones out and some temporary lights too
At the end of the day it's just a shed
You were advised 2 years ago of how to address the problem, further advice is a waste of my time and yours. Goodbye.
Mold and moisture can affect paint severely. Apply undiluted thick bleach using brush in all areas you intend to cover. Use multiple application as needed. This will kill anything biological. Then fill, prime, and paint. Primer is a glue that enable adhesion. Even so, it will struggle with smooth sanded 2 pack wood filler.
Some say bleach is bad for you. So, get a china gas mask. I am a massive user of bleach and still doing OK. No doubt some will say my thinking was already affected.
I don't remember your mentioning primer before. I presume you don't use it which is a huge mistake.
Some say bleach is bad for you. So, get a china gas mask. I am a massive user of bleach and still doing OK. No doubt some will say my thinking was already affected.
I don't remember your mentioning primer before. I presume you don't use it which is a huge mistake.
- Joined
- 6 May 2025
- Messages
- 212
- Reaction score
- 74
- Country
For the sake of your sanity, I sincerely advise you not toI haven’t read the whole thread....
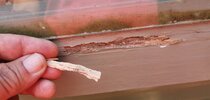
Your image seems to show you holding a bit of rotten wood that has come off. Is this falling-off what you are calling “bubbling”?The putty isn't blistering, it's the paint which is clearly illustrated.
Paint is not going to cure rotten wood.
The “wood hardener” products might; I’ve never tried them.
- Joined
- 6 May 2025
- Messages
- 212
- Reaction score
- 74
- Country
Wood hardener is basically a water-activated polyurethane compound. It works by sinking into the timber grain and where it comes in contact with water, it catalyses.The “wood hardener” products might; I’ve never tried them.
A problem is that it has to be used correctly, i.e. ALL rotted/punky (soft) wood needs to be scraped and wire brushed away BEFORE applying the wood hardener. After use it is normal to build up the timber to the original level using a 2-pack epoxy wood filler which is sanded and filed to shape after it has thoroughly set. I don't know if the OP did this - if he didn't then it won't work
Alternatively, the affected area is cut back cleanly, any remaining punky timber (there should only b e a minimal amount) is treated and a new piece of timber is spliced in and shaped to match. This needs to be done with and joints and joining surfaces as tight as possible and any remaining gaps filled with 2-pack filler. Appropriate on a 200 year old oak door, maybe not so much on a potting shed
Just saying...
I used Ronseal wet wood hardener on the rotten wood after I scraped the loose stuff out as it states that it turns rotten wood hard. I then filled with Everbuild wood filler (a single tube) sanded when dry and primed. Then painted with Weathershield.
- Joined
- 13 Sep 2015
- Messages
- 238
- Reaction score
- 145
- Country
If the OP is now observing rotten wood, they should do a thorough investigation of hidden areas of the shed (for example, the underfloor area) to ensure this has not escalated to a case of dry rot, which could have serious implications for the shed and neighbouring properties.
If - and let's hope - it is not dry rot, a highly effective method for stopping further rot on this sort of tannelised timber is to rub it with a freshly sliced potato. Maris piper is best, with the exposed face cut to a six pointed star shape.
Once the potato has been thoroughly wiped over the rotten surfaces and any neighbouring wood, wait six weeks in temperatures of 33 degrees or higher to allow the proteins in the potato juice to cure into the wood and create an acetylised compound impervious to rot.
After that, paint - and dare I say it, putty - as normal.
Absolutely — that's sound advice. If the OP is seeing signs of rot, especially in tannelised timber that’s supposed to resist decay, it's essential to rule out dry rot (Serpula lacrymans), which is far more aggressive than common wet rot.
Here’s a practical approach the OP should take:
1. Inspect hidden and enclosed areas: Start with the underfloor, inside wall cavities, corners, and behind cladding. Dry rot often spreads out of sight, thriving in still, damp, poorly ventilated spaces.
2. Look for classic signs:
A musty, mushroom-like smell.
Brittle, cracking, cuboidal wood.
Off-white or greyish fungal growths with strands (mycelium) or pancake-like fruiting bodies with rust-red spores.
3. Check for moisture sources: Blocked gutters, poor drainage, rising damp, or leaking roofs can all contribute to rot. Addressing the moisture problem is critical to halting further damage.
4. Act quickly if dry rot is suspected: Dry rot can travel through masonry and affect other timber structures, even in nearby buildings.
If the OP isn’t sure what they’re seeing, it may be worth posting clear photos or consulting a professional for a confirmed ID—early detection can save a lot of money and structural damage.
Would you like help drafting a checklist or visual guide to help them inspect for dry rot
If after all that ****** fails just buy another potting shed!
- Joined
- 13 Sep 2015
- Messages
- 238
- Reaction score
- 145
- Country
I believe getting another shed may not be an option. Based on the earlier photos in this thread, I strongly suspect the shed is either listed or has a TPO on it?
Ah well it probably needs listed buildng consent, best to consider seeking advice from a conservation officer from your local authority and put a maintenance plan in place that complies with heritage constraints.
DIYnot Local
Staff member
If you need to find a tradesperson to get your job done, please try our local search below, or if you are doing it yourself you can find suppliers local to you.
Select the supplier or trade you require, enter your location to begin your search.
Please select a service and enter a location to continue...
Are you a trade or supplier? You can create your listing free at DIYnot Local
Similar threads
- Replies
- 3
- Views
- 21K
- Replies
- 8
- Views
- 21K