Finally revamping the bathroom!

Joined
4 May 2009
Messages
112
Reaction score
3
Location
Surrey
Country
United Kingdom
A little while back the wife and I bought our first house and set about making it a home as detailed in the link. //www.diynot.com/forums/viewtopic.php?t=203825&start=0

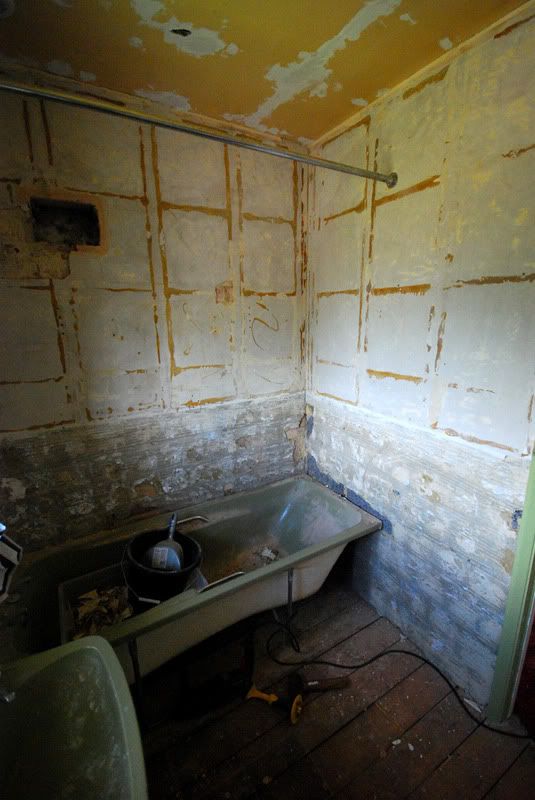
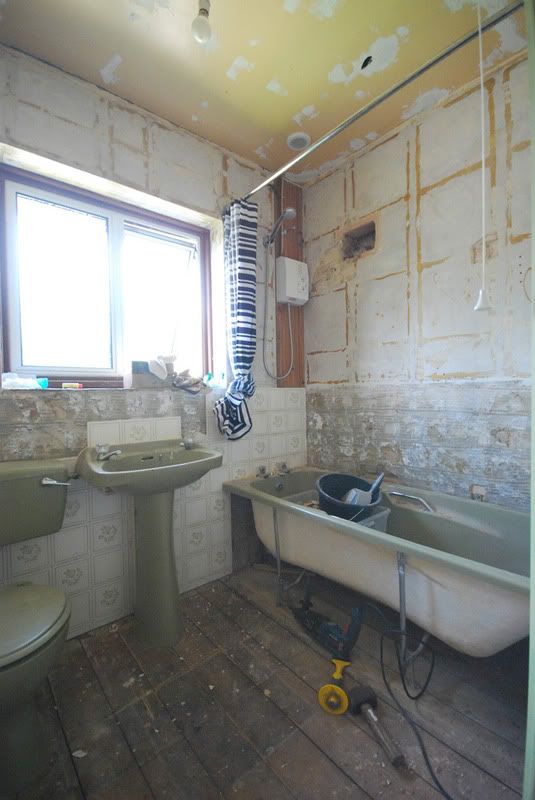
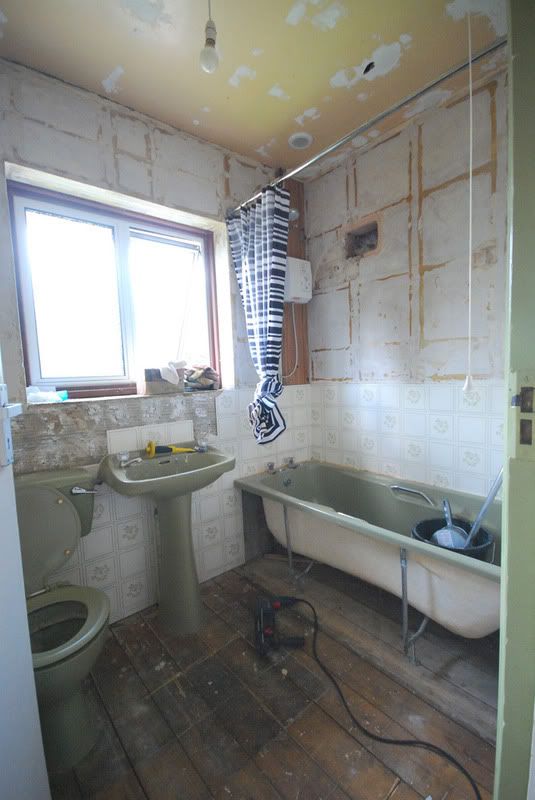
With a functioning if somewhat ghastly bathroom we decided to spend our time and money working on the rest of the house and so our budget was spent. Finally we have the money available to do the bathroom and so that's what I'll be covering in here.

As you can see it's in need of a little modernisation!


Thus far everything (including tools) has been supplied by TradingDepot, PlumbWorld, Screwfix, ToolStation, MachineMart, Tradetiler, TileBase, CarpetRight & good old ebay.

Everything is sitting at home ready for work to begin, I have already removed all of that particularly catching wooden panelling from the walls and ceiling as well as as many tiles as I could easily without removing the cistern, sink and those immediately around the bath.

Walls are in good condition with what appears to be a cement render behind the tiles and standard render and skim under the wooden panelling.

We'll be ditching the old electric shower which was limited to just 7.5kw because of the cabling and replacing with a Trevi Boost. The walls are going to be 16x10" tiles floor to ceiling with a 24x3" border at window ledge level. Flooring will be vinyl because I refused to tile or lay laminate on a suspended floor!

We are also turning the bath around because we wanted a bath screen which is not possible with the bath in its current orientation. This is because the bath is 700mm wide and the window is only 640mm from the wall. The shower screen would have nothing to support it!

I'd class myself as a solidly competent DIYer. I am confident in my ability to pick things up that I have not done previously and I have done or helped out on a lot of DIY in my 26 years. That's included installing 3 kitchens including proper joints in the worktop, some wiring where allowed, a little plumbing, painting, tiling, laying laminate and insulating and boarding the loft. I do however know my limits so will not attempt things unless confident that I can produce a solid result.

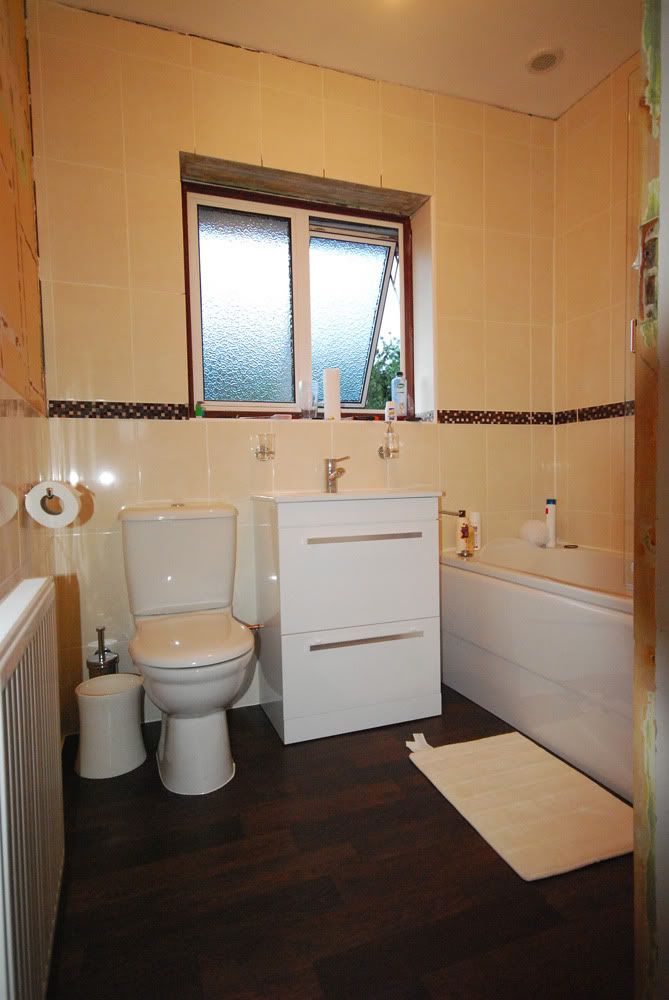
More pics and details as I go!
 
Sponsored Links
I've spent a good few hours today getting the old paint off of 3 of the walls which was under the wood panelling. A bit of hot water on a sponge made a lot of it come of fairly easily with a wide blade paint/paper stripper. The 3 walls I did were the key ones that NEED to be tiled as soon as possible. The 4th wall is on the opposite side of the room to the bath and has nothing on it apart from a radiator and a mirror, both of which we can do without until I've got more important things done. If I have the time on Friday I'll be attacking that wall but it's not a high priority.

Also today I got shot of about 80 old bricks via freecycle as the guy popped around to pick them up. Nothing to do with the bathroom but I'd thought i'd mention it as its a system that works well!

The bathroom ceiling has had its many nail holes filled today, I'll then be sanding them back and filling in any remaining bits.

I could probably have just tiled over it but I'd rather know that the adhesive is going to be sticking straight to the plaster.

A few patches of plaster/render had blown so I hacked them out which I'll be sorting out on Friday along with getting the rest of the tiles off and the Basin out. Then the hard work starts in earnest on Sunday when I swap the bath out!

Also picked up the final few supplies I needed today. Hopefully I'll be able to now do 99% of the work without having to pop out for anything. We shall see!

Incredibly Carpet Right have not got my vinyl at the store that I asked for it to be collected from. This is despite a call on Friday telling me that it was in ready to be collected and that yes I certainly could collect it on Sunday!
 
Final few bits have arrived at last, the chrome click wastes from Ebay and my tiling tools.

I'd bought a 5kg bag of sand & cement from Build Centre for just under a fiver last week as I need to fill a hole with a couple of bricks. Then I noticed that I needed to repair some blown plaster before I could tile so I plan on using some sand and cement since I don't need a smooth finish. Build Centre don't do bigger bags of readymix. B&Q however do the 25kg bag of the same readymix for £4.50! Needless to say I'll not be shopping at Build Centre again unless there is absolutely no other option.

Anyway, this Friday I rip the remaining tiles off and make any patches good with my sand & cement render. Stag night on Saturday and then on Sunday its time to rip the bath out and put the new one in. If possible I'd like to start tiling on Sunday too but I've currently got that assigned to Monday. It all depends how easily this bath comes out and the replacement goes in.
 
First thing this morning I started getting everything moved in the back bedroom so that I could get to the hot water pipe to cut in to make a cleaner route for the Trevi Boost. After shifting everything and getting the boards up I fond that the cold water pipe running to the loft runs alongside the hot. Annoyingly its on the wrong side so the simple T that I'd planned on putting in wasn't going to be enough.

So its day 1 and I've had to pop out to get something already!

Yesterday I also borrowed the parent wet vax which came in handy when cutting into the hot pipe. There was only a trickle coming out but the hoover made life much easier.

Once I'd run the full 3m of 22mm through from the back bedroom to the bathroom with a speedfit cap on the end I turned the hot water back on and checked for leaks. After a good hour with running and static pressure on it I was drip free!

I got the floor back down and the room back to normal and then I could finally crack on with removing the remaining tiles. Previously I had already got rid of any tiles not immediately around the basin and bath.

here is a shot of the bathroom before I started work on it today.
DSC_8977.jpg


After I'd cleared the long side of the bath and the head of the bath of tiles I broke for lunch. Even with a 2lb lump hammer and bolster, and a SDS+ with tile remover, these tiles were proving annoyingly difficult to remove.

A piccy while at lunch :)
DSC_8982.jpg

DSC_8983.jpg


After lunch I cracked on with the final wall of tiles. I also got the basin out and popped a speedfit cap on the hot and cold. With the basin and pedestal out I could get to all of the tiles behind much easier. I ended up managing to get just of 2 tiles off in one piece they were stuck on so well!

There are maybe 10 left behind the cistern and below which I cant get to yet. Apart from that the walls are clear and it was time to clear up and get the patching down on the walls. I mixed up some readymix sand and cement (5:1) with a little plasticiser and set to work wetting the bricks up before I applied the render. I managed to end up a tiny bit short but I need to do some more once the bath is in anyway so i'm not too fussed.

Tomorrow is a day off to go paintballing, then the work starts again on Sunday to get the bath installed!
 
Sponsored Links
Needless to say it started getting a bit busy so I just didn't have time to update as I went along! Most says I was starting at 8 as soon as the wife left for work and not downing tools until 7. One night I didn't stop until about 10.

Here is the nearly finished bathroom. Its taken longer than I would have imagined but I was doing it all on my own and I've never done a bathroom before so I'm happy enough. The result is what matters.

On Monday the mirror is due which will go on the wall above the radiator, once that's in place I can finish the tiling around it and the little around the window sill that remains to be done. Finally I'll put a bead of sealant around the ceiling to just finish it off.

The only real setback I had were the valve for the cistern having a crack in it so we had to continue bucket flushing for 4 days while the replacement came.

Trying to do this in a house that still needed the bathroom was a real pain though, I can easily see it being far far easier when yo don't have to put everything back so that it can be used again at the end of the day or having to do things in a very specific way so that you aren't without a bath or toilet for longer than absolutely necessary.

DSC_9011.jpg
 
What was wrong with that Avocado suite? ;)

Nice work buddy.
 

DIYnot Local

Staff member

If you need to find a tradesperson to get your job done, please try our local search below, or if you are doing it yourself you can find suppliers local to you.

Select the supplier or trade you require, enter your location to begin your search.


Are you a trade or supplier? You can create your listing free at DIYnot Local

 
Sponsored Links
Back
Top