
- Joined
- 30 Aug 2008
- Messages
- 223
- Reaction score
- 3
- Country

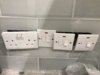
Hello all,
I think the pictures speaks for themselves. Bit stuck as to what can be done here...
These are isolators for various appliances. It's a new kitchen and its now obvious that the builder put the gangs to close to each other.
Any ideas on how to rectify with minimal demolition.
I think the pictures speaks for themselves. Bit stuck as to what can be done here...
These are isolators for various appliances. It's a new kitchen and its now obvious that the builder put the gangs to close to each other.
Any ideas on how to rectify with minimal demolition.
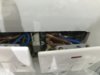
 so annoying as the kitchen is 95% ready.
")