Hive Dual Controls

Joined
23 Feb 2013
Messages
8
Reaction score
0
Location
West Midlands
Country
United Kingdom
Hi

I've bought a Hive receiver & theromostat with dual HW & CH controls to replace the existing Drayton HW & CH timer control and wired thermostat. I tried to set it all up last weekend and everything was going well until I tried to replace the thermostat.

I set up the hive hub, changed the receiver over and tested the manual push button controls for CH & HW and both fired the boiler up OK.

When I then removed the old wired thermostat and set up the wireless hive version, the hot water control on the hive receiver just stopped working (remotely and by pressing the button manually) and the option to control the HW was not available in the Hive app or via the thermostat. CH controls were still ok and could set the temp via the thermostat and switch on/off, but just nothing for HW.

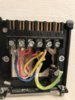
When I removed the old wired thermostat I terminated all the old wires individually in single terminal blocks & insulation tape and then shoved them back into the wall hidden behind the new hive thermostat mounting plate.

So must be something to do with the thermostat wiring, but have no idea what or why if the CH was still working OK as the thermostat only controls the heating doesn't it?!

After wasting 4 hours only to have to put the original controls back in place, it was a little frustrating to say the least!! It did at least all still work when re-connecting the original kit, but would like to start using the Hive controls that I paid over £100 for!

Any help much appreciated!

Thanks
Steve
 
Sponsored Links
The old room thermostat can't simply be disconnected as this would leave the heating wiring 'open circuit' and the heating will not operate. The room thermostat has to be decommissioned properly for the integrity of the circuit to be maintained.

1. Look at the wiring diagram for your make/mode of room thermostat that you are removing. If you don't have the instructions for it or find them online, a diagram is usually printed inside the lid. This will show which are the two live switching wires, and which is the neutral wire, if there is a neutral present. (Not all thermostats need, or have one)

2. Trace the thermostat cable from the thermostat back to its origin.

3. Take a photo, or make a note of where the two switching wires are connected at their origin.

4. Disconnect all of the wires going to the old thermostat and remove the cable and thermostat. All other wires to remain in place.

5. Insert a wire link between the terminals where the two live switching wires have just been removed from, so that they are now electrically joined together.

If you need any more help with this bit, post details of the existing room thermostat and its wiring connections.
 
Last edited:
Thanks for the reply - I think it's point 2 I'm struggling with - the thermostat is in the hall and the boiler controls are in the kitchen, so no way of tracing a wire as all cables are buried in the wall, there is a yellow wire in the thermostat. but no yellow wires in the boiler controls. I've taken pictures of the current wiring:

Thermostat:
image5.jpeg
image4.jpeg


Boiler Control:

image2.jpeg
image1.jpeg


Any further advise much appreciated.

The bit I really don't understand is why the heating would still work, but not the hot water when I'd previously disconnected the thermostat, if it only controls the heating?!

Thanks
Steve
 

Attachments

  • image3.jpeg
    image3.jpeg
    245.8 KB · Views: 514
At the thermostat:

Red wire = Live supply from the programmer
Yellow wire = Switched live to operate the heating
Blue wire = Neutral

To decommission it:

1. Trace the thermostat cable from the thermostat back to its origin.

2. Take a photo, or make a note of where the red and yellow wires originate from.

3. Disconnect all three of the wires in the cable going to the old thermostat and remove the cable.

4. Insert a wire link between the terminals where the red and yellow switching wires have just been removed from, so that they are now electrically joined together.

Unfortunately where / how the thermostat is connected would depend on the personal preferences of the original installer. Sometimes the cable goes to a wiring centre usually, found in the airing cupboard near to the motorised valve(s). Other times it may be connected in at the programmer, and it looks like there might be a yellow wire lurking away at the back of yours. But don't assume that it is the same one just because of its colour.

If you can't positively trace the thermostat cable, the same result could be achieved by leaving the old thermostat in place, removing the red link wire between L & 1, and taking the red wire out of the L terminal and putting it in with the yellow wire in terminal 3. Effectively then the thermostat becomes a junction box, the red and yellow wires joined together and the blue neutral on its own.
The bit I really don't understand is why the heating would still work, but not the hot water when I'd previously disconnected the thermostat, if it only controls the heating?!
I can see why you would say that, and I can only suggest that, the heating probably worked because the the old room thermostat was calling for heat (ie was 'on') and maybe the hot water didn't come on because the water in the hot water cylinder was already hot.
 
Sponsored Links
Just about to have another go at it, and now confused by why there would be a live & what appears to be a neutral going into the same block on the wall controller backplate?! There's a red and blue wire both going into the existing backplate at position 'L'.

There is a yellow wire that's terminated in a block along with a brown wire (no brown wires at the thermostat). And there's also a thicker grey wire behind there that's terminated in it's own block as well.

IMG_1641.jpg


If I connect the new Hive receiver to the old backplate with the wiring untouched, it will work the heating, but not the water, even though according the the hive wiring diagram, based on the current wiring of the backplate, both the 'hot water off' and 'heating off' connections wouldn't have any wires connected.

In the Hive instructions the diagram for the Hive dual receiver backplate suggests it needs connections in all blocks, whereas the single channel receiver doesn't:

upload_2019-1-21_15-34-50.png


Is it a case of connecting the yellow cable to the new receiver backplate in the 'hot water off' position and maybe the brown wire for 'heating off' and then closing off the yellow at the thermostat end with the red switching wire?

Or do I just give up and get a plumber/electrician to do it?!!
 
If it helps, this is the wiring diagram on the back of the existing receiver, which would suggest that there isn't currently any wire connected for HW & CH off:

IMG_1643.jpg
 
Unfortunately as you have discovered, different installers will use different coloured wires for the same function. So, don't get too hung up on the insulation colours. It's what the wire is connected to at each end that is the important thing. So in your case the blue wire that goes to L is being used as a live wire. Ideally it should have been fitted with a brown sleeve to identify that it is being used as a live, like the example below:

brown sleeve.JPG


Some, but not all heating systems have a wire connected to 'hot water off' but 'heating off' is virtually never used these days. However, whatever is in place now, provided it was working as it should originally will be sufficient, you don't need to add any additional wires.

The two programmer connections as you can see below from the two diagrams you provided, are exactly the same, and the terminals have the same function so it should be a straight swap, LP112 programmer for the Hive Dual Channel receiver, no wiring changes required.


existing.JPG


hive.JPG


The back plates are supposed to be universal, but sometimes the pins don't always connect as well as they should. So when you fit the Hive to where the previous LP112 programmer has come from, if you were using the original backplate, I would try using the new one that came with the Hive then both halves of the connection are new together. Make sure the conductors (not the insulation) are securely fixed in place, and in contact with the terminals

I suppose that there is a chance that the Hive is faulty, but it would be the first one I've known to be.

The thermostat cable will be the same at its origin as it is at the thermostat. The same cable sheath containing red, blue, yellow & earth wires.

Cable.JPG


However, you cannot just find a cable that fits the same description and assume it is the cable that goes to the thermostat. It will need to be physically traced, or a cable that you suspect to be the thermostat cable can be tested by someone competent in the use of a multimeter to determine that you have found the right one. If you can't do that then you can always leave the existing thermostat in place and modify the wiring as I described earlier.
 
Interesting about the hot water not working. Sjpriest79 is also reporting something similar here. I wonder if there is a faulty batch out there?
 

DIYnot Local

Staff member

If you need to find a tradesperson to get your job done, please try our local search below, or if you are doing it yourself you can find suppliers local to you.

Select the supplier or trade you require, enter your location to begin your search.


Are you a trade or supplier? You can create your listing free at DIYnot Local

 
Sponsored Links
Back
Top