Hive Install - Potterton EP2

Joined
23 Nov 2018
Messages
6
Reaction score
0
Country
United Kingdom
Hello,

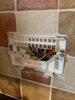
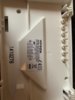
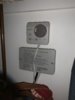
I am currently looking at installing a Hive heating and water system and have a Potterton Suprima 30 with an EP2002 programmer and a thermostat EP2 in the lounge. I have a second thermostat EP2 in the airing cupboard upstairs which is for the hot water and has a boost button (pictures below). The hot water and central heating can be controlled independently and I will be looking to disconnect the EP2 in the lounge and have the hive thermostat take its place.

I'm not sure on how to wire this up/adjust but from previous threads it sounds like others have had luck with this themselves. From what I have read, I have sort of followed, but would appreciate someone who has knowledge of this system giving some pointers.

Do I blank off both the EP2's (choc-blocks) and disconnected from the programmer unit, to take these out of the loop, or is there something else I need to do?
m9UdTFS8TDCV5A1WRwI26Q.jpg
LKtJBFCNQWSBifU10ZlaAA.jpg
WT6xtdNtTf+xtDgCfGYsUQ.jpg
cMLK7RwkSxCIafwJnlBNng.jpg
 

Attachments

  • VAieveyzQ32VWxUdqKnE7Q.jpg
    VAieveyzQ32VWxUdqKnE7Q.jpg
    283.6 KB · Views: 376
  • +Mz6SqVqQIeKh4XnlTs4kg.jpg
    +Mz6SqVqQIeKh4XnlTs4kg.jpg
    140.5 KB · Views: 204
  • D9E8uB+cRvque9WI1+bPAA.jpg
    D9E8uB+cRvque9WI1+bPAA.jpg
    136.9 KB · Views: 173
Sponsored Links
I have an EP2 in the front room and upstairs (one for CH and the other for HW).
Are you sure? You should only have one programmer, not 2! (the EP2 is the programmer)

The hot water cylinder thermostat will stay as it is. The Hive doesn't provide hot water temperature control it only turns the hot water on and off, so the existing hot water thermostat needs to stay.

With regards to the existing room thermostat, do you mean place the live and live switch wires together and blank out the rest?

You are correct about the live and switch wires at the PR2 room thermostat. If you are happy to leave the old thermostat in place, the red and yellow wires should be joined together. The easiest way to do this is to remove the black link and then put the yellow in with the red in terminal (4) TL. The blue wire can stay as it is.

Ideally though you should trace the cable back from the thermostat to its origin and disconnect all of the wires, then link together the terminals where the red and yellow wires have just been removed from. Then the old thermostat and cable can be removed.
 
You have already posted this question on the bottom of someone else's thread and I have replied there.

As you are a newbie, for future reference you might want to familiarise yourself with the forum rules. making duplicate posts and hijacking the posts of others are against two of them.
 
My apologies, I shall keep the conversation to this thread. I wasn't sure on the rate of response, and as I was researching what I needed to do, I've found that quite a few others have been through this and succeeded and so I just needed to understand the odd bit here and there to piece together.

I wish to remove the PRT2 in the living room, and put the hive thermostat in its position. I would need to trace this back to the programming unit presumably and disconnect and block off at both ends, before swapping it out. With this done, would I need to mess about with any wiring for the hot water heating unit, or is this purely the programmer and PRT2 downstairs?

Thanks for your help on this :)
 
Sponsored Links
The below photo shows the distant from the room thermostat and the programmer unit;

27ECA5D7-0F4A-42DF-B44D-419154C49DD3.jpeg


As this appears to be one in one with the Hive receiver plate, do I connect the two reds on 5 into a single end slot on the Hive plate;

20886391-E8FB-4FD4-BA86-E78B9EB563D3.jpeg


And then disconnect all of these and remove the old thermostat?

E3AD6E6D-E950-42BC-B27B-0FC46C95A5F7.jpeg


Would appreciate some pointers please :)
 
It doesn't work like that I'm afraid.

The Hive is not just a thermostat, it also has the heating and hot water time control built in, so in the case of your system, it can't go in the place of the thermostat, it has to replace the programmer in the kitchen. This is because:

1) You can't have two different timing devices trying to control the heating and hot water; and

2) This is where the wires that the Hive needs to be connected to are located, (they are not all present at the room thermostat)

You will need the Dual Channel Version of the Hive receiver for your system.

The wires at the EP programmer in terminals N, L, 3, & 4, transfer to the same numbered terminals of the Hive
N-N
L-L
3-3
4-4

The wires connected into the white terminal blocks that do not connect to the programmer stay as they are.

You can discard the link wire between the existing programmer terminals L and 5. The Hive has this link already internally so doesn't have a terminal 5. However it does mean that the remaining wire in 5 when the link is removed will need to go to the Hive L terminal.

Then the existing room thermostat needs to be removed / decommissioned. The professional way to do this is by tracing the 3 core cable (Red /Yellow /Blue) back to it's origin, which may well be the EP, (the red wire of the cable could be the one in terminal 4) or a wiring centre elsewhere. It all depends on the preferences of the original installer. Once you have positively identified and electrically tested the cable to make sure that you have the correct cable, note where the Red and Yellow wires are connected and disconnect the entire cable. Then a link is inserted into the terminals that the Red and Yellow wires have just been removed from.

[If this is too difficult and you don't mind leaving the old room thermostat in place, moving the yellow wire from 3 and putting it in 4 with the red wire will achieve the same thing electrically]

Do not underestimate the complexity of what you are planning to do. You should only do this if you are electrically competent and have a working knowledge of the functioning of your heating system.
 
Last edited:
I understand that this is being more complex and if the costs of install weren’t so high I’d probably go with that but I’m a good 75-80% sure of what I need to do. It’s literally just the room thermostat that is the sticking point as the other half wants it gone, so it would need decommissioning. I do have original documentation for the programmer unit so I can at least suss out what is what :).

Thanks for your help so far, it has been appreciated
 
OK, if you feel confident. Actually, yours isn't as difficult as some to do, apart from the extra EP terminal 5, the EP and the Hive are pretty compatible. The thermostat will be the tricky part. Post back if you need any more help.
 
Thank you :).

I looks like L and 5 are linked with a red wire and then there is another red wire which I presume heads off to the PRT2 thermostat.

N, L, 3 and 4 are in use (excluding 5 for the above) and a single yellow wire goes into 3 which traces back from the thermostat (guessing as it’s the only yellow I’ve seen). One blue (out of two) looks to head off towards the PRT2 where as the other heads upwards to the boiler.

So would it be correct that I blank off the wires at the PRT2 end and then keep the link from L to 5 in place, and then remove the blue from N (suspected to be going to the thermostat)? I’m unsure on the yellow as it’s currently attached where I wasn’t expecting :/.

193D1FF0-7185-4E01-8D03-3243284E7FDD.jpeg
FC1C21B3-7EF6-47EC-89F4-73D5FC76D58C.jpeg


Sorry if I’ve gone over some of which you’ve already pointed out, just wish to get it clear in my head :)
 
Last edited:
I looks like L and 5 are linked with a red wire and then there is another red wire.

That bit is right and I have already told you what to do with the link and remaining red wire.

You can discard the link wire between the existing programmer terminals L and 5. The Hive has this link already internally so doesn't have a terminal 5. However it does mean that the remaining wire in 5 when the link is removed will need to go to the Hive L terminal.

However....
which I presume heads off to the PRT2 thermostat

You presume wrong. The remaining wire in (5) is a permanent live, so it won't go the thermostat. The Thermostat will be connected to the Heating 'on' terminal of the EP (4) but it may not go there directly often it goes to a wiring centre or junction box elsewhere first. More about this later.
N, L, 3 and 4 are in use (excluding 5 for the above) and a single yellow wire goes into 3 which traces back from the thermostat (guessing as it’s the only yellow I’ve seen). One blue (out of two) looks to head off towards the PRT2 where as the other heads upwards to the boiler.
You guess wrong. Terminal 3 is for the control of the hot water, nothing to do with the central heating or room thermostat.

The thermostat cable may not go to the programmer, in fact most will go to a wiring centre usually in adjacent to the hot water cylinder / motorised valves
The professional way to do this is by tracing the 3 core cable (Red /Yellow /Blue) back to it's origin, which may well be the EP, (the red wire of the cable could be the one in terminal 4) or a wiring centre elsewhere.

You cannot guess and presume. The thermostat cable can be connected in elsewhere, depending upon the the personal preferences of the original installer. It may have to be physically traced back to its origin and tested it with a multimeter to be sure that you have found the correct cable.
 
I appreciate the explanations :). It has been extremely helpful! I have decided to elect the assistance of a electrician friend (who has the tools I need to trace it back properly) and he has apparently fitted one before so I can use the valuable knowledge you’ve provided to work out everything and get it installed.

I see these things as far more beneficial to learn myself (with help) and gain the understanding than to pay for it to be done and be none the wiser lol.

Thank you, you’ve been very kind to take the time to explain and steer me in the right direction :)
 
Just connect together everything that's linked with link wires usually to permanent live and then just put the switch wires like for like.
 

DIYnot Local

Staff member

If you need to find a tradesperson to get your job done, please try our local search below, or if you are doing it yourself you can find suppliers local to you.

Select the supplier or trade you require, enter your location to begin your search.


Are you a trade or supplier? You can create your listing free at DIYnot Local

 
Sponsored Links
Back
Top