How do I install a new ground floor Newel post into a concrete floor?

Joined
30 Mar 2022
Messages
9
Reaction score
1
Country
United Kingdom
Hi all,

I'm a newbie and have signed on to DIY-not to ask for help in installing a Newel-post into a concrete ground floor.

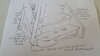
I've not long bought a house (about 45 years old) and I have started making some substantial changes. Originally the front door opened onto a very small hallway with the stairs in front of you and the lounge door on your right. You walked through the lounge/dinning room to get to the kitchen. I didn't like this so I've installed a new wall to create a larger hallway that give direct access to the lounge/dinner and also to the kitchen and I've removed the old partition wall that was between the stairs and lounge; I will need to strengthen the stairs and build a new Bannister.

The problem is I have no idea how Newel posts are originally installed in concrete ground floors.

I've searched the internet and though I can find many products for installing Newel posts in exiting properties (all rely on brackets or bolts and seem a bit flaky to me), but none say how they are originally installed.

It will need to be very firm with no support on three sides so, I would think it will need to be sunk into the concrete floor, but by how much and what about the damp proof membrane?
I know from other work that the damp proof membrane is about 10cm down (max.) and the floor has no heat insulation layer (built in the early eighties).
But it's likely I would need to sink the post more that 10cm for stability, so how can I ensure good damp proofing.

Is they somebody with experience of installing stairs in new properties who can advise me?

Thanks
 
Sponsored Links
The original would have been mortised and tenon jointed onto the ends of the ends of trimmers and housed and scribed onto the bottom step. The angled haunched double tenon is cut at the bottom end of the stringer, the newel post is angle mortised to accept the tenon and the joint is draw bored and pinned. The side and the front are housed and scribed to accommodate the tread(s) and riser(s). Often the bottom end of the newel has a steel peg inserted into it and also into the concrete, but some don't and depend on the stringers (inside, at the rear) being angle bracketed to the floor out of sight

Then original 1930s Art Deco newel post illustrated below on (L to R) the upper face, inside face and lower face. This one had a square wooden tenon at the bottom to locate into a square tenon in the (wooden) floor

Art Deco Newel Post Bottom 001.jpg
Art Deco Newel Post Bottom 002.png
Art Deco Newel Post Bottom 003.png
 
Last edited by a moderator:
Sorry about the poor quality pics. I'll try to do some better ones later on

The example above was retro-fitted into a Victorian building in 1937. The floor where is was fitted was timber, hence the tenon at the bottom of the newel post to fit into a mortise in the floor.

When doing a retrofit it may be almost impossible to peg to bottom of the newel post, given that you need to line-up both the mortises to the tenons at the ends of the stringers and get the housings in the right place, too. You might want to think about getting the mortises right (possibly converting to a loose tenon arrangement which will be easier to fit), and also the housings, but then fit a pre-drilled flat steel plate to the underside of the newel post which gets slightly recessed into the concrete floor (SDS, rotation stop, chisel) and fixed down after you've gotten the newel post glued up and set. The resulting recess can then be filled with a bit of cement screed. I'd advise against trying to sink the newel post dee[ into the screed - screed really doesn't have that much strength, but I also think you'll possibly encounter problems getting the rise on the first step correct

As you can see from the photos, doing the housings around a newel post isn't a 5-minute job and takes a goodly amount of accuracy and attention to detail

Do you have a photo of the existing newel post or stair bottom?
 
Last edited by a moderator:
Hi JobAndKnock
Thanks for that information. I hadn't realised that newel posts are not normally sunk into the ground, they always seem far to solid to rely on the bottom step and stringer for their rigidity; a leverage of around 120cm to about 15cm doesn't seem very good to me.
I've added a photo of the bottom of my stairs, you can see were the wall was and the cement floor. It will need strengthening since it was relying on the wall for added strength, but even with the wall it was still very creaky.
I think these stairs will be far to weak to hold the newel ridgid, it looks likely I'll have to make it up as I go along.
Thanks for your help.
Kind regards,
BoxedIn
 

Attachments

  • 2022-04-01 Bottom of stairs.jpg
    2022-04-01 Bottom of stairs.jpg
    238.5 KB · Views: 144
Sponsored Links
Hi jobAndKnock
I had a think about it and have come up with a plan, though I'd run it by you if that's OK; I'm no expert.
I thought I'd put the newel back and through to the second tread for more stability and replace the bottom tread and riser with a curved one for apperace.
With and added timber fixed to the wall string, support for the stair at about the fourth tread and timber support below the second tread I thought I will be able to fix the new newel firmly from two sides into the stair. If I then sink the newel into to floor less than 10cm and concete around it I can key the bottom of the newel into the concrete floor by say fixing a few screws into the botton of the newel. It should be then very firm and stable.
It all sound a bit complicated so I've done a quick thumbnail to help. Let me know what you think.
Kind regards.
BoxedIn
 

Attachments

  • 2022-04-01st New newel proposal.jpg
    2022-04-01st New newel proposal.jpg
    136.1 KB · Views: 191
I hadn't realised that newel posts are not normally sunk into the ground, they always seem far to solid to rely on the bottom step and stringer for their rigidity; a leverage of around 120cm to about 15cm doesn't seem very good to me.
Well, there is the pinned tenon, maybe 250mm tall, together with a snug housings to accommodate the bottom step and the extra strength you'll get from where the handrail joins the newel (traditionally a bolt and castle nut affair). Without the handrail joint the newel post is a lot weaker. And all of this gets glued and cramped together as well so it really can't go too far wrong if your joints are accurate

The fixing plate, if it exists, could well be 250mm x 100mm x 4mm steel but there might just be three big screws (6 x 130mm) going diagonally into the floor through the sides of the newel post, with the holes plugged and planed in so they don't show.

As you may have gathered, there is somewhat of an element of make it up as you go along in all of this
 
Thanks JobAndKnock
Cutting tenons seems a bit to much work to me, I'm more your screw and glue type of person.
I like your idea of screwing diagonally into the floor though, it would save a bit of work digging up and relaying; got plenty of large torx fixings.
The hand rail will certainly add a lot of strength back to front, but it still seems a bit of a weak design from side to side.
I wasn't aware of the bolt and castle nut usual method, not sure how this works, I'll have to look into it.
Currently the stairs is not connected to the floor at all, (i.e. no fixing plate).

I won't be starting this any time soon because of a few higher priorities, but when I do I'll feel a lot more confident of it.
Thanks for your help,
BoxedIn
 

DIYnot Local

Staff member

If you need to find a tradesperson to get your job done, please try our local search below, or if you are doing it yourself you can find suppliers local to you.

Select the supplier or trade you require, enter your location to begin your search.


Are you a trade or supplier? You can create your listing free at DIYnot Local

 
Back
Top