Stair Project - Newel posts off-set to the side of stair stringer

I've done a rebuild of a the same type of stairs that you've got Lowki, and I've also built a set of stairs for a loft conversion. The newel post was missing on the rebuild, so I got a piece of wood to match the cut down newel, drilled a hole in the bottom of the new post, and the old post, inserted a dowel rod, end then glued it in; and it's still fine 12 years later. The problem you've got is the offset, so you really need to dig out the old newel post, cut away a bit of the bottom stairs, and cement the post back in for stability. This is why people can slide down banisters without them breaking. At the top of the stairs, you'll need to lift the floorboards, cut out the old newel post, possibly put in a beam across the joists, and bolt the newel post into this. Try your local library for a book on building stairs.

Your local wood yard will have the parts for bottom of the stair posts, and you may need a bit of decorative moulding to go underneath to bring the existing stringer out to the required width. Then you'll use the zipbolts to attach the handrail, and then fit the stair posts etc.

I like the last picture that you posted, it's going to look good when you've finished.

Hi there Doggit,

Thanks for the input.. the current bannister 'planks' really are an eye-sore.! I thought there must be several out there that have undertaken something similar!

I'm still torn and debating back and fore whether to go whole-hog and replace/re-position the newels so they're on the stringer centreline; or, to leave them in their 'off-set' position and do something on the stairs like in my last two posts... You may have seen/read that my stringer is nailed to the side of the top and bottom newels which makes me a little nervous of disturbing things to that extent.

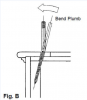
Was it only the dowel rod and glue holding the newel base and top together.. no additional fixing through the side..?

Which picture are you referring to..? The horizontal turn Burbidge HT piece.. or the previous pic (of a video clip) with the mitre joint and rake joint on a handrail..? I'll probably have an oiled finish hemlock handrail, newel 'tops/caps', and maybe baserail; and then white glossed newels and spindles.. something similar to this but 'square' as opposed to 'turned' :

eg.JPG


Thanks again..
 

Attachments

  • eg.JPG
    eg.JPG
    22.1 KB · Views: 644
Sponsored Links
The zip bolts are more for joining two loose pieces of wood together. A mitre joint where two pieces of handrail meet, can just be glued. The baserail should sit directly over the stringer, and if it can't, then I'd say that the geometry and alignment is out somewhere. You're Bottom newel post should sit in the centre of the stringer, the upper newel post will then be in direct alignment, and you'll then turn the upper handrail with a mitre joint to line up the the final newel post.


Hi Doggit,

In terms of the stair handrail/baserail arrangement (in case I leave the newels off-set as they currently are), have a look at the following youtube vid from 3 minutes in :
That guy has his spindles sitting on the treads as one would with an 'open string'... I would pack-out the string on the inside to add width and have the baserail sitting on-top.. the handrail would follow what he's done in order to connect to the newels from the side (allowing for the offset)..
I'd then be able to have a conventional balustrade on the landing sitting between the existing top and landing newels...
 
The picture was the oak looking 90 degree which you'll use to ling the top newel to the final one.

This sort of work can be done by a competent DIYer with a reasonable set of tools. You'll need a compound mitre saw for cutting the stair posts, and base rails etc, but beyond that nothing much other than a drill and a sharp set of chisels. As long as you can get the bottom newel post out of the concrete floor (hire a small breaker from a tool hire shop) then you can just drop the new one in with postcrete. Stairs are fairly simple once you understand them; they are a wooden system for getting between two floors - I built mine for a loft conversion using a router and a template. You'll need to lift the floorboard upstairs to get at the upper newel post, and you may have to be a bit creative because it'll very likely project downwards under the floor, and you'll very likely need to leave that part in place, and just bolt the new post into the joists, or a cross member set across two joists, and I'd be tempted to investigate this one first. Once you realise how they are set up, you'll have no problems with the final post, and the downstairs one whilst hard work, is a dodle. The it's just carpentry basics for the baserail, the hand rail, and stair posts. Make sure you've got a fine tooth blade on the saw though.
 
Just seen the video, and it's a bit odd. He's competent enough to make a very nice handrail, but then been a bit lazy with the newel posts. I think the bolt he's used to fix it to the floor isn't providing much strength, which is why he's then had to offset the post, and as a consequence of that, then set the stairposts on to the stairs. But it could be that having a laminted floor, he didn't wanted to cut into it. But he could have got round that bolting to the front of the stringer rather than the side f it.
 
Sponsored Links
Would'nt use zipbolts for this as Doggit says just mitre and glue and clamp.
For the bottom newel some old Victorian staircases would have the bottom newel into the suspended floor joists, but modern manufactured stairs just have the strings mortised into the newels and glued and doweled or screwed to the strings, the same at the top and then the back of the newel is just notched over the top stringer with a couple of screws through the newel into the stringer. I have only just last weekend fitted a new staircase and did bolt through the trimmer, but only because it wasn't possible to notch the newel due to the position of the last riser as it was at the top of a turn. ( I could put up some pictures tomorrow if you like)
A doweled newel to newel base would be fine just glued, that's how they are fitted anyway with a newel base and newel only that the dowel is turned as part of the newel. Just make sure that the mating surfaces are both perfectly flat and square.
Don't do what that guy has done in the video it will look crap, but I have seen some old staircases with the spindles fixed to the outside of the string, but these have usually had decorative profiles at the bottoms.
If you can't mortise your handrails into the newels then just glue them and screw through the newels, to be honest once all the spindles and spacers are fitted the whole thing will be sturdy enough, or alternatively the best fittings are stelten fixings which stairplan sell, they are essentially metal mortise and tenons and are rock solid and really pull the joints up tight. That's what I will be using when I come to put the handrails on.
 
Last edited:
The picture was the oak looking 90 degree which you'll use to ling the top newel to the final one.

This sort of work can be done by a competent DIYer with a reasonable set of tools. You'll need a compound mitre saw for cutting the stair posts, and base rails etc, but beyond that nothing much other than a drill and a sharp set of chisels. As long as you can get the bottom newel post out of the concrete floor (hire a small breaker from a tool hire shop) then you can just drop the new one in with postcrete. Stairs are fairly simple once you understand them; they are a wooden system for getting between two floors - I built mine for a loft conversion using a router and a template. You'll need to lift the floorboard upstairs to get at the upper newel post, and you may have to be a bit creative because it'll very likely project downwards under the floor, and you'll very likely need to leave that part in place, and just bolt the new post into the joists, or a cross member set across two joists, and I'd be tempted to investigate this one first. Once you realise how they are set up, you'll have no problems with the final post, and the downstairs one whilst hard work, is a dodle. The it's just carpentry basics for the baserail, the hand rail, and stair posts. Make sure you've got a fine tooth blade on the saw though.

Hi Doggit,
Thanks...
Do you recall from your rebuild of the same type of stairs whether the stringer was secured at all to the top and bottom newels..? As mine is here (with two nails in each) - makes me nervous removing the newels.. :
5 bottom stringer nailed to bttm newel.JPG 9 top stringer nailed to newel.JPG

In case I'd replace/reposition the bottom newel, I was thinking to saw it off flush with the floor, then use the timber remaining in the ground to fix the new newel (re-positioned on stringer centreline) with one of those SuperUT bolts and the following trick/method :
super-ut bending plumb.JPG
There's such a small amount of the stringer sitting on the concrete at the bottom as it is (maybe 30mm), I don't want to disturb the concrete and stringer by removing the existing post.. :
6 bottom newel and stringer.JPG 7 understair bottom newel and stringer 1.JPG 8 understair bottom newel and stringer 2.JPG
 

Attachments

  • upload_2016-2-23_11-32-42.png
    upload_2016-2-23_11-32-42.png
    43.3 KB · Views: 497
Would'nt use zipbolts for this as Doggit says just mitre and glue and clamp.
For the bottom newel some old Victorian staircases would have the bottom newel into the suspended floor joists, but modern manufactured stairs just have the strings mortised into the newels and glued and doweled or screwed to the strings, the same at the top and then the back of the newel is just notched over the top stringer with a couple of screws through the newel into the stringer. I have only just last weekend fitted a new staircase and did bolt through the trimmer, but only because it wasn't possible to notch the newel due to the position of the last riser as it was at the top of a turn. ( I could put up some pictures tomorrow if you like)
A doweled newel to newel base would be fine just glued, that's how they are fitted anyway with a newel base and newel only that the dowel is turned as part of the newel. Just make sure that the mating surfaces are both perfectly flat and square.
Don't do what that guy has done in the video it will look crap, but I have seen some old staircases with the spindles fixed to the outside of the string, but these have usually had decorative profiles at the bottoms.
If you can't mortise your handrails into the newels then just glue them and screw through the newels, to be honest once all the spindles and spacers are fitted the whole thing will be sturdy enough, or alternatively the best fittings are stelten fixings which stairplan sell, they are essentially metal mortise and tenons and are rock solid and really pull the joints up tight. That's what I will be using when I come to put the handrails on.

Hi Chappers..
Yes please.. a couple of pics would be great if not too much trub.
Noted and thanks re doweled joint newels.
Re the video : are you referring to the spindles fixed on the side of the stringer, or the mitre/rake joint on the handrail..? The spindles do look crap... I thought that the handrail mitre/rake joint looked good and sorts the issue of the offset and allowing the handrail to connect to the newel side... tricky to get a good finish and all aligned etc ok.. (??)
I have seen those stelten fixings and was probably going to use them.. thanks.
 
Hi guys,

With all this 'going round in circles' I'm doing, I've thought of this latest idea.. let me know your thoughts :

With the newels being aligned on the same vertical plane, why not make this a feature instead of a hindrance..
newels inline on vertical plane.JPG You can just about see the three newels aligned in this shot.

So, I'm thinking a full length handrail/baserail/spindles on the stairs between the existing newel centreline, and then a handrail with modified baserail and decreasing length spindles (all on the same vertical plane) on the landing..
I sketched this to help describe it :
inline.JPG


I've opened up the apron to double-check something like this could be done...
opened apron trimmer joist.JPG base of landing newel.JPG base of top newel.JPG

The two 2x2s could be removed ok.. the bottom one has the downstairs ceiling plasterboard edge nailed to its underside but I would need to trim the ceiling back a little anyway and could then fix/screw it to the trimmer/joist instead.
I'd also need to pack-out the outside of the stair stringer to run the baserail up on..

The main issue I see here is the gap between the edge of the stair handrail and the landing apron on the way up..
Once I've added say 10mm (for plasterboard/ply/mdf) as a fascia to finish the side of the trimmer/joist, there'd only be about 5-10mm gap for hands/fingers to pass..
Possible solution : Have the stair and landing balustrades slightly offset from that vertical plane between the newels, like this ? :
MISALIGNED HANDRAILS.JPG

Not sure I could pinch enough width though, even with the handrail up to the edge of the newel....

Another idea to add to the mix... With each of these ideas having their own set of 'niggles' to over-come, am I best just going whole-hog and replacing/repositioning the newels.........?!?!?!? Sigh :)
 
yeah that is a possibility and though rare is not unheard of on a single balaustrade, and I suppose would be compliant provided the gap between the stair spindles and the apron was kept below 100mm, however the stair balaustrade might look a bit strange like that.
I would stick to either offsetting the handrails from the existing newels or repositioning them.
Just to add another equation into the mix have you considered just replacing the whole flight, you could then cut your newels in properly would only add about £150 to the whole project.
Will post some pics later
 
Sorry Lowki, but I'm getting overload on this, so I'm going to fudge the answer slightly. Quite often, there's no standard solution to these sort of problems, and you just have to take things apart, and trust to your abilities to put it back the way you want it to appear.

There was no bottom newel post on one of the stairs that I did (12 years ago), so cut a section out of the bottom of the new newel post, and offset it onto the old post, and then put the cut out on the other side, and glued it all together. This effectively moved the newel post a couple of inches across, and lined it up with the stringer. Now, having a more powerful set of tools, I'd take up the concrete, take out the old post, and then re-position it in line with the stringer, and start from there.

As to the top of the stairs, you can't really get a top newel post, and a return one as well, so you need to realign the top post onto the middle of the stringer, and then take the top handrail out of the side of the top post, turn it 90 degrees, and run it to the last newel post. So I'd cut down the top newel post flush with the floor, and then trim and notch the new newel post to set it in line with the rising stringer, and bolt and glue through the stringer, into what's left of the newel post. This is the sort of job that requires woodworking skills more than anything else, as you can't rip the stairs out to set the posts up the way you would from scratch.
 

DIYnot Local

Staff member

If you need to find a tradesperson to get your job done, please try our local search below, or if you are doing it yourself you can find suppliers local to you.

Select the supplier or trade you require, enter your location to begin your search.


Are you a trade or supplier? You can create your listing free at DIYnot Local

 
Sponsored Links
Back
Top