Stair Project - Newel posts off-set to the side of stair stringer

Joined
19 Feb 2016
Messages
21
Reaction score
0
Country
United Kingdom
1 bottom newel and stairs.JPG 2 top newel and landing.JPG 3 double joist top stairs.JPG 4 landing newel.JPG 5 bottom stringer nailed to bttm newel.JPG 6 bottom newel and stringer.JPG 7 understair bottom newel and stringer 1.JPG 8 understair bottom newel and stringer 2.JPG 9 top stringer nailed to newel.JPG
Hi all,

This is my first post and would greatly appreciate your thoughts/input on any of the points raised... apologies it's a little lengthy!

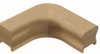
My next project at home is to (if possible!) replace the current 'plank-style' bannister on the stairs & landing with a more traditional handrail/baserail and spindles arrangement.

The house is an early 1970's mid-terrace 3-bed and, as I understand, the staircase is a "housed & wedged" routed/boxed stringer type. I assume in order to limit cost and for ease/speed of installation when the houses were built the stair newel posts were off-set to the side of the stair stringer with the 'plank' handrails simply screwed/nailed to the side of the newels. The top of stairs newel has the stair 'planks' on one side and the landing 'planks' on the other side.

The three newels are all the original, single piece, full 92mm posts and are fitted/fixed as follows :

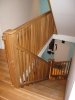
Bottom newel : Set into the concrete floor.. unsure of depth. Very solid. Timber has twisted a little over time.. (see pic)

Top newel : Bolted (x2) - one bolt to the double joist at top of stair, another bolt (at 90 degrees to the first) to the header joist on the landing. Quite solid. (see pic)

Landing newel : Bolted (x2) - both to the header joist on the landing. Quite solid. (see pic)

My observations on the stair stringer as follows :

- From what I can see, only about 30-40mm of the stringer timber sits on the concrete floor at the bottom.. (see pic)

- The stringer is nailed (x2) to the side of the bottom newel (see pic)

- Unsure how/where the stringer is fixed to the double joist at the top of stairs (see pic) (I haven't disturbed the top part of the under-stairs or ceiling as yet..).

- The stringer is nailed (x2) to the side of the top newel. (see pic).

My thoughts so far are that in order to achieve a decent end result I will have to replace/re-position all three newels so the top and bottom newels are aligned with the stair stringer.. and that :

- The landing newel should be straight-forward..

- The top newel would need to be somewhat 'butchered' to be removed.. I say this as it would have presumably been fitted/bolted before the stairs went in.. (the bolt fitted at 90 degrees in to the landing header/joist is not accessible and covered by the stair stringer at the top). The replacement newel could be fitted with something like a Zipbolt Super UT (screwed into the double joist at the top of the stairs) and aligned with and morticed over the stringer.

- The bottom newel could be sawn-off at floor level.. I was thinking the remaining part set in the concrete could be screwed into at an angle using another Zipbolt Super UT then bent plumb to fix the new re-aligned newel to..

Things I'm not sure about :

- The structural significance of the stringer being nailed to both the top and bottom newels and if this fixing is broken with the newel removal/replacement..? Is it nailed for rotational stability in the stringer for resistance to twisting..?

- The small amount of stringer timber sitting on the concrete at ground floor and if the bottom newel is removed.. again, the significance of the two nails through the stringer into the side of the newel..?!? Would additional support need to be added at the base of the stringer under-stairs..?

- Ditto at the top of the stairs... and any idea on how this type of staircase is ordinarily fixed to the joist at the top stairs in a house of this type from the 70's..?

- The depth of the concrete slab and how deep the bottom newel sits into the concrete.. Discounting the use of any remaining newel in the concrete floor, would the Super UT bolt straight into the concrete with a resin fixing be an option..? Would need about 140mm depth for the UT bolt.. Any other alternatives..?


Apologies again it's a lengthy read..

Many thanks in advance for any thoughts/input/experience you may have..
 
Sponsored Links
I'll give my opinion, although I'm no expert.
If you packed out from the stringer to allow the fixing of a base rail, and assuming that a handrail will clear where it passes the floor, won't it save moving the newels?

As you said the return at the landing is no problem, I think there's a special fitting to allow the handrail to butt up to a wall.
I think that's the way I'd approach it rather than moving the newel posts.
 
Any reason why you can't just leave the existing newels in place. But if you must remove them then you won't compromise the structural integrity of the staircase
 
twisted newel 1.JPG twisted newel 2.JPG
Hi Himaginn & Chappers,

Thanks for the responses.. can of worms........ :)

I was initially thinking of the method you (Himaginn) describe but because of the following reasons I've continued scratching my head for other options..

- The stair handrail would need to attach to (at least) the bottom newel from the side.. this would involve a double-cut joint (an angled cut from rake to level, then a 45' mitre cut for the 90' horizntl turn to the newel).. I bought a cheap Burbidge HT fitting on ebay to eliminate the need for the mitre turn cut so the handrail connects to the HT fitting with a rake cut and the HT fitting connects to the side of the newel.. the HT fitting would need to be 'chopped-down' on one of the ends a little so the handrail was as close to the newel as poss..

- The bottom newel has twisted a little over time so I think using it as it is to connect a handrail/fitting would need some scribing etc and the end result probs not the best.. (pics attached)

- Stair handrail would need to connect to the top newel in the same method mentioned above, unless I either replace it or use it as a base/stump to create a double newel for stairs and landing..?

- If the landing handrail/baserail is fitted between the landing and top newels it's a very tight squeeze for the handrail to pass on the stairs (at landing floor level).. Options to combat this would be to use the side handrail connection to the newels (mentioned above) on the landing as well as the stairs.. or.. to move the landing newel 'away' from the stairs a little..

- The side connection to the newel method also wouldn't look quite right because when the handrail cut for the rake is made and in order to have enough timber to play with for the joints it would level off high on the post at the bottom and low on the post at the top (if you get what I mean!).

- Once the above are overcome for the handrail.. the baserail also has it's own issues in looking 'reasonable' at each end between newels..

- The first and last spindles would a little strange sitting adjacent to the newels at top and bottom

- With the above in mind I was thinking that if I'm going to do this then I should do it properly... Assuming that replacing/repositioning the newels is the 'proper' thing to do here..

Like I said.. can of worms.... :)
 
Sponsored Links
Hi again Chappers,

Just to clarify : you reckon that the stringer would be fine as it is if the top and bottom newels are removed/replaced..?

Is it normal to have such a small amount of timber from the stringer sitting on floor at the bottom bearing weight..? Difficult to get head around the 'physics' and loads/forces etc..

Would you say my assumption regarding the stringer nailed to the newels sides is correct..?

thanks
 
yeah no problem particularly if you are then going to cut new newels over the strings.
At the top I would try to knock out the top nosing, cut the new newel over the string and notch it back over the trimmer, with a housing cut to take the nosing back into the newel and glue and screw it all back through the string and similar at the bottom.
Then for the landing balustrade mitre a small return to the main run and put your first spindle in the corner at the intersection. then just cut the hand and base rails around the existing newel at the far end
 
I'm sorry, but all this jargon is doing my head in. I'm only a DIYer so I'm struggling to follow the jargon. But I accept that it's necessary to explain the situation.
I think, if it were me, and I understand your problem of the off-sets of the newels, etc. I would consider one of two options:
Option 1: (the preferred option) the lower bannister terminates at the upper floor level, and decreasing height spindles fill are acceptable. The landing spindles will also fill in the gap, so no problem. There may be some work to 'extend' the floor/ceiling to accommodate that. I'm sure I have a recollection of using a bannister so far, then using the individual landing spindles for the remainder of the flight.
Option 2: Build out the newels to allow the bannister/spindles to sit appropriately. But this might not be aesthetically pleasing.

The problem of the twisted newel is not really a problem, you just use an adjustable angle thingy to transfer the angle to your workpiece.

I would willingly bow to chapper's superior knowledge.
 
yeah no problem particularly if you are then going to cut new newels over the strings.
At the top I would try to knock out the top nosing, cut the new newel over the string and notch it back over the trimmer, with a housing cut to take the nosing back into the newel and glue and screw it all back through the string and similar at the bottom.
Then for the landing balustrade mitre a small return to the main run and put your first spindle in the corner at the intersection. then just cut the hand and base rails around the existing newel at the far end

Hi Chappers,

Thanks for the reply..
I think I'm on a similar page with what you describe..
Something like this in terms of the top newel position :

1364411250.jpg


And the newel bolted (with 2 or 4 bolts) through the double joist/trimmer as in my following photo (like the existing newel is) :

double joist top stairs.jpg


I say 2 or 4 bolts as there'd likely only be 30mm of the newel available either side of the stringer in the centre..

I was initially thinking to sit the newel directly (and in full) over the joist/trimmer (on the stringer centre-line) and fixing it with one of those Super UT bolts (http://zipbolt.com.au/assets/img/blister/14100.png) - wickes do something similar.. quite chunky things.. 280mm in length.!!

What do you see as the pros/cons.. I suppose your method adds stability/rigidity to the stringer after its current nailed fixing to the top newel is lost (?).


And something like the following for the landing turn from the top newel :

landing turn.jpg


Regarding the bottom newel :

As the newel will have to be fixed to the concrete floor, I don't see there'd much more than about 25-30mm of the newel that can be 'notched' to be housed/sit over the bottom part of the stringer.. I expect this could then be used to provide the rigidity/stability to the stringer with glue/screws (as the current nails/newel does..). A little work also maybe needed on the bottom tread/riser... same as at the top as you mentioned (?)..

Fixing the newel to the concrete floor...
Other than the Zipbolt super UT (and similar bolts from other manufacturers), I haven't seen much else available for this purpose... Maybe the following fixing plate ? or a resin fix and threaded bolt (the same principle as the super UT bolt) ? :
newel501_fs.jpg


My main worry has been depth of the concrete slab and the dpm etc etc.... Am I worrying about nothing if a resin fix in concrete is used..?
That led me on to thinking of using what would be left of the old newel sank in the concrete.. and using this timber as a means to secure a new post... and using the Super UT with the following trick (the diagonal/angled plane would mean less depth into the conc floor for the bolt..) :

bending plumb.JPG


Appreciate your thoughts.. and thanks again for your prev reply.!
 

Attachments

  • Capture.JPG
    Capture.JPG
    111.7 KB · Views: 543
I'm sorry, but all this jargon is doing my head in. I'm only a DIYer so I'm struggling to follow the jargon. But I accept that it's necessary to explain the situation.
I think, if it were me, and I understand your problem of the off-sets of the newels, etc. I would consider one of two options:
Option 1: (the preferred option) the lower bannister terminates at the upper floor level, and decreasing height spindles fill are acceptable. The landing spindles will also fill in the gap, so no problem. There may be some work to 'extend' the floor/ceiling to accommodate that. I'm sure I have a recollection of using a bannister so far, then using the individual landing spindles for the remainder of the flight.
Option 2: Build out the newels to allow the bannister/spindles to sit appropriately. But this might not be aesthetically pleasing.

The problem of the twisted newel is not really a problem, you just use an adjustable angle thingy to transfer the angle to your workpiece.

I would willingly bow to chapper's superior knowledge.


Hi Himaginn,

Sorry.. my fault drivelling on..! I've been chewing over the issues with this 'project' for a good couple of months now... good to get it all 'out there'..!
Certainly more food for thought with option 1... though not sure how it would look from halfway up the stairs (ceiling line) onward up the stairs to the top newel.. but will have a closer look to see what could be done..
With option2 : I agree, maybe difficult to achieve a decent looking result even with a painted finish.. and quite bulky/sizeable newel bases to boot.
All food for thought as I said.. don't hesitate to add anything else.
Many thanks for your input!
 
If you cut your top newel as per the sketch so it is slotted over the string and stepped over the trimmer, you shouldn't need to bolt it through the trimmer.
Glue and screw it to the newel and a couple of screws through into the trimmer will be sufficient, but if you feel happier you could bolt through the whole lot. If you want newel hanging below your string like that though you will have to piece it back in as you will be cutting a slot through it unless you can either remove the trimmers or the staircase whilst fitting the newel.
For your bottom newel you can cut it as far over the string as you like, you will just have a stepped cut, cut back to the first riser, again glue and screw it to the string, as for fixing to the ground don't worry too much about that, bottom newels are hardly ever fixed down, but again if you want to then I would just skew a 4" screw through with a brown plug.
Hand rail return as per the photos you have attached

Hi Chappers,

Thanks for that... this option sounds feasible.. still just the whole top/bottom newel saga and the 'stringer being nailed to the newels' niggling at the back of my mind..

At this stage I'm caught between that option and the following :

- Leaving the newels where they are...(!) maybe cut them down to stump 'newel bases' and replacing the top part (a requirement at least on the bottom newel with its twisting)
- Beef-up the stair stringer on the inside and run a stair baserail on the stringer.
- The handrail to connect to the top and bottom newels with something like the following joint (the pic shows bottom of course.. an opposite rake-cut for the top newel!) :

mitre-rake-jpg.11168


This was the joint I was trying to describe in my Friday 7:56pm post and that the mitre cut part could be replaced with a Horizontal Turn (HT) piece like this :
ht.JPG


- With the stair baluster sitting on the 'stairs-side' of the top/bottom newels, the landing baluster would have enough 'space' to run/sit conventionally between the existing top & landing newels.. ie - enough gap as the stair handrail passes the landing baserail/apron..


Is this likely the 'best' way forward here..?!?


Thanks as always......
 

Attachments

  • ht.JPG
    ht.JPG
    40.6 KB · Views: 633
yep you could do that , cut the newels down and refit with say turned newel tops. Your base rail should fit straight on top of the string, but would need notching around the newels top and bottom, as would the handrail. I would just mitre a piece of handrail for the return onto the landing, exactly as in the pictures you posted
 
I've done a rebuild of a the same type of stairs that you've got Lowki, and I've also built a set of stairs for a loft conversion. The newel post was missing on the rebuild, so I got a piece of wood to match the cut down newel, drilled a hole in the bottom of the new post, and the old post, inserted a dowel rod, end then glued it in; and it's still fine 12 years later. The problem you've got is the offset, so you really need to dig out the old newel post, cut away a bit of the bottom stairs, and cement the post back in for stability. This is why people can slide down banisters without them breaking. At the top of the stairs, you'll need to lift the floorboards, cut out the old newel post, possibly put in a beam across the joists, and bolt the newel post into this. Try your local library for a book on building stairs.

Your local wood yard will have the parts for bottom of the stair posts, and you may need a bit of decorative moulding to go underneath to bring the existing stringer out to the required width. Then you'll use the zipbolts to attach the handrail, and then fit the stair posts etc.

I like the last picture that you posted, it's going to look good when you've finished.
 
yep you could do that , cut the newels down and refit with say turned newel tops. Your base rail should fit straight on top of the string, but would need notching around the newels top and bottom, as would the handrail. I would just mitre a piece of handrail for the return onto the landing, exactly as in the pictures you posted

Hi Chappers,
Thanks... I'd probably plan the stair baserail to sit on the stringer as far away to the side of the newel it needs to be to accommodate this handrail joint at the top and bottom newels:

mitre rake.JPG


Then beef-up the inside of the stringer as required..

Any tips for making this type of joint on a handrail..? Any experience with something such as the zipbolt below for the mitre joint..? maybe something similar for the rake-cut joint aswell ? not sure if there'd be sufficient timber to work with to use this type on both joints :

mitre zip.JPG
 
The zip bolts are more for joining two loose pieces of wood together. A mitre joint where two pieces of handrail meet, can just be glued. The baserail should sit directly over the stringer, and if it can't, then I'd say that the geometry and alignment is out somewhere. You're Bottom newel post should sit in the centre of the stringer, the upper newel post will then be in direct alignment, and you'll then turn the upper handrail with a mitre joint to line up the the final newel post.
 

DIYnot Local

Staff member

If you need to find a tradesperson to get your job done, please try our local search below, or if you are doing it yourself you can find suppliers local to you.

Select the supplier or trade you require, enter your location to begin your search.


Are you a trade or supplier? You can create your listing free at DIYnot Local

 
Sponsored Links
Back
Top