How to cut this fence panel?

Joined
16 Jan 2004
Messages
56
Reaction score
1
Country
United Kingdom
Hoping for some good advice! We are replacing an old fence and would like to use similar panels to the old ones, which are similar to this: http://www.wickes.co.uk/Wickes-Bris...JNE1gBbMAXmjJ3tMIhJeKxoC_QXw_wcB&gclsrc=aw.ds

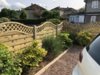
The difficulty is that due to the length of the fence, we will need one partial panel (approx 1/3), at the end which joins onto the house wall. But we are a bit worried about how hard this will be to cut and then fix up securely so it will last. As you can hopefully see in the picture, the lower part is a sort of woven effect and the top part is trellis, and on the panels, the ends of the pieces are sort of sandwiched into the frame; but obviously we'll have to cut off the frame part at one side. I have wondered whether we can reuse this by moving it along to the cut edge, although it would be a bit short due to the curve of the fence (and I'm not sure how easy it would be to remove from the end of the fence). We could use a different style of course, but would still need to cut it, and I do prefer the look of this one.

Has anyone done this before or got any advice on the best way to do it please? Very grateful for any tips!
 
Sponsored Links
All I can suggest is taking care and temporarily fixing a couple of bars vertically on each side of the panel centrally

That will allow you to cut the panel in half vertically and keep it together while you get two goes at getting it right.

Remember that you will need a post against the wall or house so can use that to hold the panel together and then fix it to the house . Look for a different bit of timber in store (treated)
 
Thank you! Just checking, do you mean fix them on the side of the cut that we are keeping, not on the side we don't want? I have thought something like that would help, only thing is it's still a bit tricky as the different bits of the panel are at different "levels" if you see what I mean (some at front, some at back rather than all flat). But if we could fix something on tight enough, hopefully it would keep them all together...

Re the post, I think we will try to reuse the one that's already there, as although it's quite old, it looks in good condition still and is still well fixed to the wall. (It doesn't go all the way to the ground, so no rot at the bottom). But if that doesn't work for some reason we'll buy one.
 
These panels are normally just slats sandwiched between a pair of vertical battens at each end, but it looks like your panels are a bit more akward, so you need to look at how the end bars are attached to the slats. Essentially, as Tiger suggests, you need to fix a piece of wood on to the panels so that you can then cut the slats, then reattach the end piece again; the caveat being that the end piece may not be tall enough for where you cut the panel. If you're not desperate to do the job, I'll have a look at the panels next time I'm in Wickes.
 
Sponsored Links
Thanks Doggit!

It looks to me like the end bars have 3 parts going down them on the inside - so there's the front layer, then a gap where the front parts of the trellis/weave go in, then a middle section and then another gap where the behind parts of the trellis and weave go in, and then the back section - like a double-decker sandwich.

I don't think we'll be trying to do it for a week or so anyway, as we're busy this weekend, so I've got a bit of time to think about it!
 
its hard to tell they are only 40mm thick so assuming all the edge timbers have a groove and the ends off the internal components may be thinned
until we know the structure wont know the correct suggestion
perhaps a wooden post with a say 20x45mm groove
 
Yeah

What I mean is four random bits of wood in pairs used to allow you to hold everything in situ while cutting down the centre line . That way you get two tries at reducing further. Perhaps just using two bolts to sandwich the temporary bars , fixing them together , being longer than the panel, clamping them to grip the panel.

I would do it by hand to minimise damage and take care to manufacture the new end post so it holds everything together. If you have a circular saw you can make two cuts then drill the waste out to make a groove - or even just drill it out
 
Sorry Aargh, I had a look in my local Wickes today, and they didn't have any of those panels in stock, so you may need to send some pictures when you get them. I think everyone's in agreement that it can be done, but it'll be down to your woodworking skills, or if you can get the end bar rebuilt for you, to the required height.
 
he will need another bit off timber i assume 40mm with a 25mm ish groove in it as the ends are the shortest bits off the panel at 1/3 width is perhaps 75-100mm taller
 
I’m aware this is an old thread but I have the same issue
What was the outcome please of this has anyone else cut a re edged one of these ?
 
Yes, secure temp timber either side and cut to width, remove any timber from slot on cut off section [slotted end section] and refit.
 
Cut one of these down recently, not too hard depending on the tools you have at hand...

Cut vertically down the panel to the width you require (obvious!).

Wreck the rest of the panel to obtain a usable upright and fit that to the TOP of the narrower panel you intend to re-use - all your grooves for the trellis and slats should line up (trellis is equal height across the width of the panel)

You'll be left without an upright at the bottom of your new panel, I just knocked up an extra length out of scrap on the table saw and carefully cut grooves into it for the slats.

Uprights are dovetailed to the horizontals so take a bit of careful cutting to remove.

Naughty Wickes saying those panels are 1800mm and 6ft wide at the same time.
 
Completed this job last weekend
I cut 1 panel through as needed 2 half panels
Once you have cut them, very carefully,
You then need a longer timber to reedge the now higher end of each half panel. You need a piece 40x45 with a 27mm groove in it. This then cups the edge of the lap boards. All I then did was fix a piece of thin batten to keep the lap effect so effectively Weeved between them. You then need to cut 3 tenons on the 3 main structural rails. So that the groove in the piece then slots over them too. Then I secured with 3 screws in the edge into these 3 rails. Hope this helps people in the future
 

Attachments

  • 0AC6FC8F-D92E-46A9-926D-4B0970E85341.jpeg
    0AC6FC8F-D92E-46A9-926D-4B0970E85341.jpeg
    568.5 KB · Views: 304

DIYnot Local

Staff member

If you need to find a tradesperson to get your job done, please try our local search below, or if you are doing it yourself you can find suppliers local to you.

Select the supplier or trade you require, enter your location to begin your search.


Are you a trade or supplier? You can create your listing free at DIYnot Local

 
Sponsored Links
Back
Top