How to replace mains cable Dimplex Oil Filled Port heater

Joined
22 May 2004
Messages
30
Reaction score
0
Country
United Kingdom
I am trying to replace the mains cable on a Portable Dimplex Oilfilled radiator unit but I just can't figure out how to get to the bottom plastic section. The mains cable has got cut inside due to the bad design.

I have tried removing the plastic cap using the screwdriver edge but no luck. The model no is DYOFIS I think it is 2yrs old purchase from B&Q.

Any advice?

Mike
 
Sponsored Links
buy a new (decent) one.

if as you say the cable got cut by poor design, then the new cable will go the same way, and its probably sealed so you cant change it
 
plugwash said:
cut your way in with a dremel?

Okay so the mains cable has been moulded!, once again so much for saving the planet! slogan that everyone including Dimplex is also drumming home.

When a perfectly working appliance has to be thrown away because the mains cable can't be replaced! that is really bad?

I will have to dig out the B&Q receipt I think it had 3 yrs warranty.

Thanks guys.
 
Sponsored Links
Old thread I know. But I’ve just replaced the mains cable on one of these. After a bit of thought, it’s not so difficult.
1. Make sure it’s unplugged and safe!
2. Remove the wheels from the cable end.
3. Just under the hand grip (top grey bit) there’s a small plug, remove it with a small flat screw driver. It’s push fit.
4. Remove the cross head screw you can now see.
5. Once screw is removed the whole end will be able to lift up and gently turn it over. Careful there are wires connecting the heater element.
6. Remove 3 screws from inside to take off the cable stow - it covers the cable connections.
7. Undo the earth strap inside the cover and the live and neutral from the connector block.
8. Fit a new flex of suitable size. It’ll need a terminal crimping for the earth.
9. Put it all back together.

Took me about 40 mins I guess to work it out and replace it.

And no, it’s not molded.
 
I had the same problem - puppy chewed the mains cable (luckily not while in use). On my model you needed a special "tri-wing" screwdriver (like a triangular Phillips I guess to stop you taking apart - I had one a bit too small in an ifixit kit for electronics) on the bottom in between the two wing nuts. As my largest tri-wing was on the small side I gave it a squirt of penetrating oil first as I guessed I had one shot not to strip the head and it worked. You could feel the whole side was now free at the bottom but the threaded rods for the foot wing nuts still held it on.

There was clearly a bolt at the top holding the side on, but I didn't have a plug hiding a screw as described above. I carefully levered the temperature control knob off the variable resistor spline, which revealed a deepset Phillips bolt head. After that it was exactly the same as described above. All other screws were Phillips.

Looking around for some flexible 13amp armoured (puppy proof) cable.

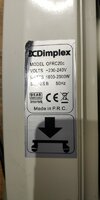
Dimplex Model OFRC20c 1800-2000W

Stupid tamper proof screw. You could just cut the head off. I replaced with a phillips screw - guess you could have cut a slot instead.
2_dimplex_IMG_20221127_175600.jpg


Temp control knob slides off. Location of deepset bolt.
3_dimplex_IMG_20221127_175529.jpg


Back of temp control - deepset bolt moulding above variable resistor.
4_dimplex_IMG_20221127_173951.jpg


New cable installed. Terminal block can pop out to ease wiring in new cable. 2 lugs clip it in. Earth requires crimped ring.
5_dimplex_IMG_20221127_173945.jpg


Tested continuity from plug pins to heating element / earth tested entire rad. All working - thanks everyone!
 

Attachments

  • 1_dimplex_IMG_20221127_175540.jpg
    1_dimplex_IMG_20221127_175540.jpg
    51 KB · Views: 55
Last edited:
I saw that armoured flex - looks great. I couldn't find out if the OD 8.67mm would fit in a British plug. In any case wife was freezing so used an old running machine power cable that was chunkier than the original. Thanks everyone - saved me just chucking it and buying another!
 
Old thread I know. But I’ve just replaced the mains cable on one of these. After a bit of thought, it’s not so difficult.
1. Make sure it’s unplugged and safe!
2. Remove the wheels from the cable end.
3. Just under the hand grip (top grey bit) there’s a small plug, remove it with a small flat screw driver. It’s push fit.
4. Remove the cross head screw you can now see.
5. Once screw is removed the whole end will be able to lift up and gently turn it over. Careful there are wires connecting the heater element.
6. Remove 3 screws from inside to take off the cable stow - it covers the cable connections.
7. Undo the earth strap inside the cover and the live and neutral from the connector block.
8. Fit a new flex of suitable size. It’ll need a terminal crimping for the earth.
9. Put it all back together.

Took me about 40 mins I guess to work it out and replace it.

And no, it’s not molded.
Spot on! The secret is in recognising the cap under the hand grip that conceals the screw for the lid. The rest is down to experience and common sense.
 
I was always under the impression that product standards or the plug and socket regulations required that the flex be replaceable using only basic hand tools (so that it was likely that damaged flexes would get replaced, rather than bodged or ignored) but clearly not!
 
I was always under the impression that product standards or the plug and socket regulations required that the flex be replaceable using only basic hand tools (so that it was likely that damaged flexes would get replaced, rather than bodged or ignored) but clearly not!
Perhaps you can provide a link to such regulations.
 
We get so much environmental propaganda pushed on us, but wasn't it originally "reduce, reuse, recycle". Much less energy used to repair a perfectly good product than throw the whole thing away and manufacture another and ship it from China just because it needs a new flex. Regulation/law promoting repair/serviceability would be better for the environment and UK jobs - I hate this landfill attitude to everything. I am still using a Stanley plane my grandfather bought (and his WW2 fireman's axe) - you can still buy any of the components.
 

DIYnot Local

Staff member

If you need to find a tradesperson to get your job done, please try our local search below, or if you are doing it yourself you can find suppliers local to you.

Select the supplier or trade you require, enter your location to begin your search.


Are you a trade or supplier? You can create your listing free at DIYnot Local

 
Sponsored Links
Back
Top