Insulating pitched roofs and eaves

Joined
15 Apr 2010
Messages
45
Reaction score
0
Location
Kent
Country
United Kingdom
Hi All

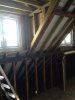
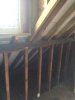
Semi detached Victorian Just had a new roof and I need to insulate it now. We have 2 rooms up on our 2nd floor. Just had 2 new dorma formed on the back of the roof, had a terrible single plastic dorma removed.

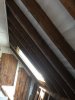
As you can see in the pics we had cold eaves before. I plan to insulate the pitch from the bottom of the pitch to the 2nd purlin and ceiling. Now my rafters are 4x2. To get the required insulation I'll need to add 2x2's to deepen existing rafters. Push 100mm solid insulation between rafters. Then insulate further approx 60mm across underneath to stop thermal bridging. Then I need to plasterboard. Can anyone recommend how I should go about this and materials to use. I'm a little worried about all the extra weight, should I be?

Any help or ideas muchly appreciated.

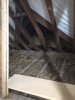
Ps. I'm going to board the eave floors again with chipboard. Should I remove all that junk and insulation first?
 

Attachments

  • image.jpeg
    image.jpeg
    76.9 KB · Views: 274
  • image.jpeg
    image.jpeg
    81.7 KB · Views: 256
  • image.jpeg
    image.jpeg
    60 KB · Views: 340
  • image.jpeg
    image.jpeg
    83.4 KB · Views: 229
Sponsored Links
Has anyone deepened their rafters to allow more insulation?
 
Has anyone deepened their rafters to allow more insulation?
Yes, when we re-did the first floor of my chalet bungalow to make it a dormer bungalow. Rafters were 3x2; I screwed more 3x2 to them for a total depth of 6" (150mm). In my view the greater depth should make the rafters more rigid, especially if the new timber is hard up against the purlin. I fixed 100mm Kingspan between, allowing a 50mm ventilated air gap above. Then 25mm underneath. Two layers of plasterboard (one Sound block), for sound proofing.

The answer to most of your questions is "screws" ;) Fix the extra timbers with good wood screws. Cut the insulation board to a loose fit, hold in place with skew screws, and if you like fill the gaps with expanding foam (not essential in my view as you're overboarding as well. But enjoyable). Remove surplus foam (best tool is an old breadknife with small serrations). Fit your underneath sheets to the battened rafters with plasterboard screws. Tape joints with proper insulation board tape, or gaffer tape. Fit plasterboard by screwing through plasterboard and insulation onto the battened rafters. 60mm sounds over-specced for underneath, unless the requirements have changed since I did mine. If you use 25mm, then you'll be able to fit the insulation with 38mm screws, and the plasterboard with 60mm. Then get someone to skim it all ;)

Hope this helps. That's how an amateur did it; possibly a Proper Builder will be along in a moment.

Cheers
Richard
 
Thanks Richard, that helps a lot that someone else has done this. I have 4 x 2's and plan to stick another 2 x 2 under them to allow 100mm pir board, 50mm gap and then additional 50-60mm insultation underneath and plasterboard. I think the very very quick chat I had with BC said 60mm underneath, but I think the different venders have different thermal stats so will confirm.

Richard, the thing that scares me is adding the 2 x 2's to the existing rafters. Do I need to cut the 2 x 2's and miter them to sit on the wall plate and cut to the angle of the first purlin all flush etc then screw them on. Then again carrying through the additional 2 x 2's cut them again to sit on the purlin upto the next pulin in the middle and so on to them all. Anything to avoid here with adding new wood to older, what timber should I get and the best screws to use?

Then, I have a small cold loft area which starts on the second purlin up of the pitch up if you get what I mean. I don't plan to insulate the pitch up there as it's a cold loft area - but do I need to continue to add the deepth of the rafters as I've done below for any strength reason's? Last question, are my current purlins upto all this additional weight, the existing covering to the pitch's to the attic rooms I pulled down was a hardboard and paper finish. Not sure if that was due to budget or to keep the weight down when it was done back in the day.

Thanks again for your thoughts & muchly appreciated.
 
Sponsored Links
I think the very very quick chat I had with BC said 60mm underneath
You can get 100mm plasterboard screws if necessary.
Do I need to cut the 2 x 2's and miter them to sit on the wall plate and cut to the angle of the first purlin all flush etc then screw them on. Then again carrying through the additional 2 x 2's cut them again to sit on the purlin upto the next pulin in the middle and so on to them all.
You could, but I wouldn't be as fussy as that. Just cut to length.
Anything to avoid here with adding new wood to older, what timber should I get and the best screws to use?
It's not really doing any structural work, just just 2x2 rough sawn timber would do. Good wood screws. Use 75mm and they'll be an inch into the rafters, which is plenty. Pilot the holes first.
I have a small cold loft area which starts on the second purlin up of the pitch up if you get what I mean. I don't plan to insulate the pitch up there as it's a cold loft area - but do I need to continue to add the deepth of the rafters as I've done below for any strength reason's?
I wouldn't have said so. I'd chuck 300mm of rock wool up there though.
Last question, are my current purlins upto all this additional weight
I'd have thought so. What are you doing at the bottom? Will the bottom purlin still be supported by the strutting forming the dwarf wall? Are you insulating behind that down to the eaves, or insulating the dwarf wall. Will that space be open, or a cupboard?

Usual disclaimer applies, I am neither a builder nor a structural engineer.

Cheers
Richard
 
Sounds like good advice Richard thanks. Yes, planning to leave the strutting/Hangers or whatever their called as look supportive. I plan to have some eave space and also have some cupboards also. I'm going to insulate all the way down the pitch to the wall plate so can use eave space.

If I did sister and beef up a couple of those struts do you think I could remove 1 or 2 for cupboard space?
 
If I did sister and beef up a couple of those struts do you think I could remove 1 or 2 for cupboard space?
They add to the structure but the purlins wouldn't need all of them for support. I imagine they were also studding for an original dwarf wall? So I would.

Cheers
Richard
 
Yes they we're Richard, we had the hardboard affair on the front eave's. Then the back eave's upright and pitch was to a plasterboard finish thinking back to me removing. The roof has been patched historically and also sported a crap double glazing dorma at the back so maybe modernised back a while.

Just on the structure, the actual floor up on the 2nd floor/attic is a raised 4 x 2 sub floor across the existing 1st floor roof joists the other way again. The eaves don't have this extra joists so don't plan on putting anything mega heavy in them, just plan to chip board 18mm for general storage 'xmas dec's' and also maybe a couple of cupboards as mentioned.

The supporting walls downstairs on the 1st floor seems to be mainly 2 walls a 'hallway' that runs diagonally in the middle of the house left to right if you we're looking from the front of the house. These would be directly under the middle of the floor of the attic rooms on the 2nd floor if that makes sense. The bottom of those strutts don't rest onto anything supportive below, their not even cut onto the joists, their cut onto the floor boards I noticed. I noticed as I need to raise a floor boards few to run some ethernet & alarm cable so will be avoiding touching these one's if possible.

Last questton Richard, should I remove the insulation on the eave flloors or just board over it with chipboard?
 

DIYnot Local

Staff member

If you need to find a tradesperson to get your job done, please try our local search below, or if you are doing it yourself you can find suppliers local to you.

Select the supplier or trade you require, enter your location to begin your search.


Are you a trade or supplier? You can create your listing free at DIYnot Local

 
Sponsored Links
Back
Top