Masons mitre. Ok maybe not!!

Joined
13 Feb 2022
Messages
11
Reaction score
0
Country
United Kingdom
So, lets see if anyone can help me out here. Feel free to laugh!

Having done some routering in the past i thought stuff it, il have a go at doing a masons mitre to replace my kitchen tops (600 x 40mm laminate).

Makita 1/2" router - check!
New 50mm 1/2" cutter - check!
Trend 1002 jig - check!

Talk about all the gear and no idea!

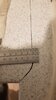
So somehow i managed to cut too deep in the 45 degree female corner of the cut. I dont know how it happened. I used doubled sided tape and clamps, multiple passes going down in 6mm steps. I did the female cut with the laminate facing down. Really annoyed at myself as the practice bits were good

The male cut i worked out the angle manually, using the 9mm offset rule and used the female cut as my "pattern". This side turned out fine.

Question is can i get away with it or any suggestions to correct it? I thought about shaving 2mm off it but think maybe it might throw the corner out. And i have no more worktop!
 

Attachments

  • 20220314_202235_copy_1100x1956.jpg
    20220314_202235_copy_1100x1956.jpg
    116.5 KB · Views: 306
  • 20220314_202242_copy_1016x1807.jpg
    20220314_202242_copy_1016x1807.jpg
    192.3 KB · Views: 288
  • 20220314_202850_copy_1097x1950.jpg
    20220314_202850_copy_1097x1950.jpg
    144.1 KB · Views: 277
Sponsored Links
Next time, cut the mitre first and then the straight cut at the other end, so if you make a boo-boo you can have another go.
Now, use colourfill and that gap will become invisible.
 
Im liking your positive thinking!! I do have the so called "matched" colourfill (probably not) but was affraid to bolt it up thinking its gonna stick out.

What a t*$$er. Got too confident i think!
 
Im liking your positive thinking!! I do have the so called "matched" colourfill (probably not) but was affraid to bolt it up thinking its gonna stick out.

What a t*$$er. Got too confident i think!
It'll be fine.
Put a generous line of colourfill all along the top and front edge of the worktop cuts, bolt them together (don't over tighten) and the colourfill will go overboard.
It dries pretty quickly, so be ready with a brand new stanley blade and cut the excess.
Clean the rest with the supplied solvent on a clean white cloth in a circular motion.
You'll never look at that cut again.
 
Sponsored Links
Thanks guys. And yes your right il look at it every time, for a while but il forget about it eventually. Il get it bolted up then. As it dries quick will i have enough time just to get the edges nice and lined up? Within reason..

One other thing, no solvent was supplied. Is it safe to use acetone with colourfill? Il do a test patch on the worktop first.
 
Three snippets for you -

The guide bushing doesn't alway sit concentric to the router cutter/collet. As installed they can sometims be 0.5 to 1mm off centre, so when setting up for worktop mason's mitre cuts it is worthwhile installing the guide bush slightly loose, centring it on the collet using a centring mandrel (centring cone):

Wealden Centring Cone.gif


This one is from Wealden Tool, but many router manufacturers sell them as well. On deWalt and Elu routers I have always replaced the supplied countersink head machine screws supplied with the router (to install the guide bush) with button head screws, which allow a small amount of lateral adjustment:

Button Head Machine Screw M5.jpeg


If the guide bush is 0.5mm out of concentric you run the risk of each cut being out by 0.5mm - may not sound a lot, but 2 x 0.5mm = 1mm (perhaps by turning the router tbrough 180 degrees in use) and that is noticeable

Secondly, for future reference, the guide bush is 30mm outside diameter, whilst the slot in the jig is about 30.5mm or so (to ensure that the guide bush doesn't stick). You should use this to your advantage by making your incremental depth plunge cuts (3 to 4 of them) with the guide bush running against the side of the slot furthest away from the final cut line, and then at the end making a single pass at full depth with the guide bush running against the side of the slot nearest to the final cut line. That finish cut will be more accurate and a cleaner cut as the cutter is removing the very minimum of material. Cut, say, the male on the far side and the female or the nearside of the jig and you'll have an inaccurate cut

Thirdly, put a bit of wax furniture polish on your guide bush before starting - it'll run more smoothly and it won't stick or jerk in the cut

A difference of 0.5mm is visible, a difference of 1mm or more is very visible to me
 
Last edited by a moderator:

DIYnot Local

Staff member

If you need to find a tradesperson to get your job done, please try our local search below, or if you are doing it yourself you can find suppliers local to you.

Select the supplier or trade you require, enter your location to begin your search.


Are you a trade or supplier? You can create your listing free at DIYnot Local

 
Back
Top