McCulloch spark plug

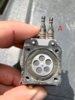
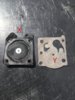
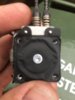
Since my last post above ive tried to start the item every now & then and quite often now it will start briefly run a second or two then die.
I noticed a slight drip from the exhaust which was black runner fuel i assume ?

Ive removed the exhaust / cleaned it and replaced.
Still not a correctly working trimmer.

Does the sympons above point to anything why it starts then dies,when i say start thats after say 5 pulls.

Just nice to get it running on its own even if rough so i can then adjust the carb etc.
Im wondering if the coil isnt producing a spark which is either good enough or at all.
Can quite see even in the dark & spark plug tester is now in the post
 
Sponsored Links
Time for a carb strip down, I feel.....if you can get it running for a few sec, grabbing the choke level may well keep it running for a while. The ignition system is fine.
If you do split the carb, Im afraid the gaskets and diaphragms may split so prepare for new.
You may get a replacement carb cheaper from GHS Ltd.
John :)
 
Gaskets etc now ordered.
I did take it apart last night & clean with carb cleaner but will do it again.
 
Question please.
Ive now got it apart again & cleaned with carb cleaner.

With with regards the item in the photo should there be a small ball bearing etc.

I have the following.
1 x screw
1 x needle valve
1 x pin
1 x plate which connects to the needle vale & then the pin fits through it.

I was thinking that somthing should go where the red arrow shown in photo is pointing because there is a hole in the plate as if it should rock on a bearing etc.
Also there then is an empty space under it so why even drill out the space is not is to go there,same for the plate why the hole if there no use for it ??

Thanks
 

Attachments

  • 5410.jpg
    5410.jpg
    212 KB · Views: 69
Sponsored Links
Sorry you are correct and my mistake.
There is a spring & now refitted.

Now just to cover something else to cover my tracks as i cant go by how i took it apart should the owner have taken it apart.

The 2 fuel pipe connections.
We have one marked red & one blue.
Which is inlet & which is return ?

The one marked with the blue arrow.....If i put my tongue over it & press the primer bulb then the pressure in the primer bulb raises & becomes hard to press.
When i remove my tongue the pressure then comes out of that pip & the bulb is soft once again.

I dont see any kind of reaction at all from the lower pipe connection.

Both pipes are the same diameter.
One is fitted to the main carb body where the other can be removed with the primer bulb plate.

I can then continue once advise so i then cover all my tracks.

Thanks for your time.
 

Attachments

  • 5412.jpg
    5412.jpg
    113.8 KB · Views: 60
Last edited:
Thanks.
So red is the return.

I have attached 3 new images.
Looking at photo A & B which way round is correct.

Then once I have that the correct way around which is fitted first X or Y
 

Attachments

  • 896558F8-9F9F-43C6-B31C-FCC89FEF23CD.jpeg
    896558F8-9F9F-43C6-B31C-FCC89FEF23CD.jpeg
    257.3 KB · Views: 70
  • ABB8185A-9DC1-4529-B6BF-64976EA80F1B.jpeg
    ABB8185A-9DC1-4529-B6BF-64976EA80F1B.jpeg
    279.7 KB · Views: 62
  • 3CC26251-34A0-4510-8231-5EC8EFDA3427.jpeg
    3CC26251-34A0-4510-8231-5EC8EFDA3427.jpeg
    479.8 KB · Views: 71
Thanks.
So red is the return.

I have attached 3 new images.
Looking at photo A & B which way round is correct.

Then once I have that the correct way around which is fitted first X or Y
Hell, this is getting like University Challenge .......
The diaphragms fit close to the carb body, with the gaskets next.
A is almost correct but the diaphragm is upside down.
John :)
 
The diaphragm is either fitted like A or B due to the two locating pegs.
So when you say A is nearly right but upside down then it must be fitted like B
 
So this is the correct way to fit the diaphragm as shown in attached photo correct ?

Then the flimsy brown gasket.
I’ve positioned it in every possible way but it doesn’t line up with all 4 holes unless it’s raised / dished etc.

So starters for 10 we have w the hump one end & the protruding part the other end.
 

Attachments

  • 23A56E35-CFC9-4117-B19C-AA9E3BA20423.jpeg
    23A56E35-CFC9-4117-B19C-AA9E3BA20423.jpeg
    119.2 KB · Views: 70
  • DAD94586-44A9-4E55-9F98-BE1CC3FCB1EF.jpeg
    DAD94586-44A9-4E55-9F98-BE1CC3FCB1EF.jpeg
    244.6 KB · Views: 58
The first picture shown here is correct, now add the gasket.
The other photo is of the pump diaphragm and that fits direct to the carburettor body so those U shaped flaps cover corresponding drillings in the carb.
John :)
 
So this is the correct way to fit the diaphragm as shown in attached photo correct ?

Then the flimsy brown gasket.
I’ve positioned it in every possible way but it doesn’t line up with all 4 holes unless it’s raised / dished etc.

So starters for 10 we have w the hump one end & the protruding part the other end.
First picture is correct, can you post picture of the pump side of the carb where the brown gasket fits
 

DIYnot Local

Staff member

If you need to find a tradesperson to get your job done, please try our local search below, or if you are doing it yourself you can find suppliers local to you.

Select the supplier or trade you require, enter your location to begin your search.


Are you a trade or supplier? You can create your listing free at DIYnot Local

 
Sponsored Links
Back
Top