
You are using an out of date browser. It may not display this or other websites correctly.
You should upgrade or use an alternative browser.
You should upgrade or use an alternative browser.
New soil stack - not as easy as I thought...
- Thread starter ChrisKingston
- Start date

Post some pictures furher back so that we can see a bigger picture.
Andy
Andy
Post some pictures furher back so that we can see a bigger picture.
Andy
That's the access with approx position of new stack. Can't really move the wall or fence, though can dig up more of passage to make it longer.
On my question about whether you should worry about taking bits off side of foundation...
Have also found these smaller inspection chambers that are only 250mm wide https://www.travisperkins.co.uk/250...r-with-base-and-integral-shaft-4d960/p/758749
That might just fit. If I go for an inspection chamber, I have to sit this and the rest bend on 100mm of concrete?
So cut old pipe out, get rapid set concrete in, wait hour to set, then put new chamber in? Just wondering total time drain will be out of action
That might just fit. If I go for an inspection chamber, I have to sit this and the rest bend on 100mm of concrete?
So cut old pipe out, get rapid set concrete in, wait hour to set, then put new chamber in? Just wondering total time drain will be out of action
Would a 300mm chamber fit?
I would make the hole longer so it it easier for you to work/stand in, also dig down and around the pipe at least 200mm underneath it for more wiggle room. Then use pea single under the chamber and then fill around it once fitted.
Andy
I would make the hole longer so it it easier for you to work/stand in, also dig down and around the pipe at least 200mm underneath it for more wiggle room. Then use pea single under the chamber and then fill around it once fitted.
Andy
Oh that's great if you don't need to concrete under it. And I've seen people just put an old slab under rest bend.Would a 300mm chamber fit?
I would make the hole longer so it it easier for you to work/stand in, also dig down and around the pipe at least 200mm underneath it for more wiggle room. Then use pea single under the chamber and then fill around it once fitted.
Andy
I bought a 320mm inspection chamber to offer up and not sure it quite fits. I think the 250mm like at Travis Perkins would do though.
I'm guessing you're in Herts Andy so might not be worth you coming to Kingston for a job this small, but let me know if you'd take it on (or anyone else in this side of London)
I would suggest you remove the fence cut the hole longer and wider, just don't go over the boundary line, fit the new inspect chamber and pipework then refit the fence. Allow 1 day when the house is empty, send the wife and kids to the outlaws. It might even be best to do it on a weekday just incase you need any extra materials but make sure you have all the materials before you start.
Sorry most of our work is in the clearing of drains and manholes.
Andy (Herts)
Sorry most of our work is in the clearing of drains and manholes.
Andy (Herts)
I've just offered up the 320mm inspection chamber and it's better than I thought:

And yes TS gave me a 30 not 45 bend, although I'm wondering if it could work to get rest bend right against wall.
And yes TS gave me a 30 not 45 bend, although I'm wondering if it could work to get rest bend right against wall.
Last edited:
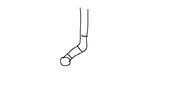
No, what I'm suggesting is, come down vertically with the new Stack, fit a junction into the existing pipe, then use a slow radius bend on the bottom of the stack to angle it across to line up with the main run. You haven't got enough room for a chamber, and I think it'll cause more issues that it solves, provided the existing run is accessible, and you fit an Access Point on the new stack, then I don't think you need to do much more.I can't quite picture this, you mean run another whole 110mm underground pipe the 6-7m to the main drain? That would be a lot of digging!
Excuse my poor artwork.
Attachments
Thanks Hugh, that is very similar to what I first thought! But I read that a long soil stack coming into an unsupported join like that might get damaged over time with the force of the water (and other stuff) falling from height (at least 4m and maybe even 7m if we go up again).
If I can squeeze an inspection chamber in, what issues might it create?
I'm going to have a go at it tomorrow. Couple of final questions (before I try at least!):
- I'm measuring the circumference of the clay pipe at about 435mm, which would put the diameter at 138mm, just larger than the normal clay adapters that go up to 136mm. Is that close enough? If anything I'm likely to have overmeasured it slightly. I can't see a bigger adapter anywhere for clay.
- Seems to be ok to put 320mm small inspection chamber on pea shingle. Would it help if I put some dry cement in with the pea shingle, then watered it once everything is in place? Or could that mess things up.
Massive thanks to everyone for the advice so far. I'll post some pics of how it goes in case other people are trying to do the same.
Have dug a bigger hole now:

But there is the water main running right where I'd be trying to bring the new soil pipe through:

Lead pipe is just under an inch in diameter by look:

What a pain. It's an old lead pipe I want to replace and run a different route eventually but that is another big job.
My ideas are:
1) cut out this section of lead pipe and make a small detour in new piping. But getting a mains water fix on to an old lead pipe? Do those lead-loc things work?
2) Try to chase out a route for the new soil pipe just next to the lead pipe (even bending it by few cm). But that is going to be very careful work with an SDS and what feels like pretty solid concrete.
3) do something more like Hugh drew above and try to come over the pipe with a branch only (no inspection chamber or rest bend), taking out less of the foundations too
What do you think?
But there is the water main running right where I'd be trying to bring the new soil pipe through:
Lead pipe is just under an inch in diameter by look:
What a pain. It's an old lead pipe I want to replace and run a different route eventually but that is another big job.
My ideas are:
1) cut out this section of lead pipe and make a small detour in new piping. But getting a mains water fix on to an old lead pipe? Do those lead-loc things work?
2) Try to chase out a route for the new soil pipe just next to the lead pipe (even bending it by few cm). But that is going to be very careful work with an SDS and what feels like pretty solid concrete.
3) do something more like Hugh drew above and try to come over the pipe with a branch only (no inspection chamber or rest bend), taking out less of the foundations too
What do you think?
Last edited:
I would go to Screwfix and buy a 45 degree junction, a rest bend and a pile of 15 and 30 degree single/double socket bends (on sale or return), a length of black soil pipe and an access socket and a tub of silicone grease. You have all the dimensions to hand, dry assemble something that fits the space with the straightest run possible. Personally, depending on the heights, I think you'll have to go behind and under the lead pipe to ensure the run is fully rodable or you might end up with a sharp bend to drop down to the pipe - but it looks in good condition and they're pretty durable so you should be able to excavate round it with care.
I would (excuse my drawing) aim for something like this:

I don't do much drainage and always find it difficult to visualise it in all dimensions and get the angles right without the trial and error so I always get it right before I break into the drain. I generally start with something cumbersome and finesse it with a few swaps, twists and turns. If all else fails - it works but the stack entry isn't quite in the right place that's easily sorted later above ground.
Presumably you know how to cut the clay with a 4" grinder? Cut a rectangle along the top, carefully remove it to allow you to cut lower down through the pipe.
Get an end cap as well, then if you're a bit stressed after getting the junction on just cap your new connection and have a beer! It's easy from this point, just tweak your dry run assembly till it all lines up. Make sure all the fittings are fully engaged (witness marks) and none are under stress.
Oh, and a few brackets for the soil stack so you know how far from the wall you need to finish.
Although you appear to be doing outside of the regs, I would buy a bung and do a basic leak test. I'm not an expert on the regs but believe that using the 45 degree junction means you don't need an IC.
Don't worry about the footings, there'll be plenty left.
I would (excuse my drawing) aim for something like this:
I don't do much drainage and always find it difficult to visualise it in all dimensions and get the angles right without the trial and error so I always get it right before I break into the drain. I generally start with something cumbersome and finesse it with a few swaps, twists and turns. If all else fails - it works but the stack entry isn't quite in the right place that's easily sorted later above ground.
Presumably you know how to cut the clay with a 4" grinder? Cut a rectangle along the top, carefully remove it to allow you to cut lower down through the pipe.
Get an end cap as well, then if you're a bit stressed after getting the junction on just cap your new connection and have a beer! It's easy from this point, just tweak your dry run assembly till it all lines up. Make sure all the fittings are fully engaged (witness marks) and none are under stress.
Oh, and a few brackets for the soil stack so you know how far from the wall you need to finish.
Although you appear to be doing outside of the regs, I would buy a bung and do a basic leak test. I'm not an expert on the regs but believe that using the 45 degree junction means you don't need an IC.
Don't worry about the footings, there'll be plenty left.
Massive thanks for that!
I'm planning something fairly similar with a 45ish degree section under the ground, using a 135 branch+access cap to make that bit roddable. The main fall from 1st/2nd floor stack will hit the 45bend embedded in concrete as pipe goes into ground (and not the buried branch between the old clay pipes). I think I can come in front of the lead water pipe just:

Going to try cutting the clay tonight if weather holds. 4" diamond blade in a grinder, chop top half out like you say (access to sides is v limited).
Have got pea shingle, are there any minimum depths below or above a new branch like this?
Thanks again
I'm planning something fairly similar with a 45ish degree section under the ground, using a 135 branch+access cap to make that bit roddable. The main fall from 1st/2nd floor stack will hit the 45bend embedded in concrete as pipe goes into ground (and not the buried branch between the old clay pipes). I think I can come in front of the lead water pipe just:
Going to try cutting the clay tonight if weather holds. 4" diamond blade in a grinder, chop top half out like you say (access to sides is v limited).
Have got pea shingle, are there any minimum depths below or above a new branch like this?
Thanks again
Sorry but you seem to 90% of the way there so why not do it properly,
Get the rest of that foundation broken out and a proper rest bend put in to meet the branch then above ground level have a roddable access.

You want to end up with something like that but yours will go into the branch not an ic.
Don't worry about the water pipe too much, get your grinder and cut a channel either side of it, break up and remove everything up to the channel and the pipe should come free enough for you to complete the job.
Get the rest of that foundation broken out and a proper rest bend put in to meet the branch then above ground level have a roddable access.
You want to end up with something like that but yours will go into the branch not an ic.
Don't worry about the water pipe too much, get your grinder and cut a channel either side of it, break up and remove everything up to the channel and the pipe should come free enough for you to complete the job.
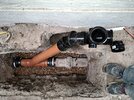
Chopping old pipe went well. Adapters fit pretty nicely. Dug up a bit of cement underneath and replaced with pea shingle.
This is just dry fitted:


I will probably just tighten clamps and block it for tonight. Any problems with this setup?
The 112.5 black branch will have access cap on which gives pretty good rodding access down this new slope.
If this is good, how much of hole should I fill with pea shingle, mud and concrete on top?
I can sit the black branch piece on a blob of cement too, then put a clip right after it up wall.
Thanks so much for advice, even to have got this far without messing up is great.
This is just dry fitted:
I will probably just tighten clamps and block it for tonight. Any problems with this setup?
The 112.5 black branch will have access cap on which gives pretty good rodding access down this new slope.
If this is good, how much of hole should I fill with pea shingle, mud and concrete on top?
I can sit the black branch piece on a blob of cement too, then put a clip right after it up wall.
Thanks so much for advice, even to have got this far without messing up is great.
Attachments
DIYnot Local
Staff member
If you need to find a tradesperson to get your job done, please try our local search below, or if you are doing it yourself you can find suppliers local to you.
Select the supplier or trade you require, enter your location to begin your search.
Please select a service and enter a location to continue...
Are you a trade or supplier? You can create your listing free at DIYnot Local
Similar threads
- Replies
- 1
- Views
- 2K
- Replies
- 8
- Views
- 2K
- Replies
- 5
- Views
- 2K