
You are using an out of date browser. It may not display this or other websites correctly.
You should upgrade or use an alternative browser.
You should upgrade or use an alternative browser.
Not sure how to tackle this
- Thread starter Kinso89
- Start date
- Joined
- 31 Oct 2019
- Messages
- 1,423
- Reaction score
- 225
- Country

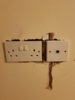
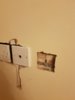
Christ that's a bit of a mess
I'm truly hoping a pro didn't chase those sockets?
If it was get him back to make good his work
I'm truly hoping a pro didn't chase those sockets?
If it was get him back to make good his work
What would you expect when retro chasing? Scribed in with a Stanley knife?Christ that's a bit of a mess
No, it needs a plasterer to make good around the back boxes once the fronts have been removed. It's what happens in the building trade. You need to get out more.If it was get him back to make good his work
")
Remove the fronts and make good. Fill with a backing plaster or dab then skim. Piece of pi$$.more professional way of doing it?
Yes I'd do that with Toupret and feather it in.
There is a big chunk of plaster that will need to come off too by the look of things, plus any other loose.
Then care with the finish and emulsion as otherwise you end up with a dead smooth patch that stands out a mile.
There is a big chunk of plaster that will need to come off too by the look of things, plus any other loose.
Then care with the finish and emulsion as otherwise you end up with a dead smooth patch that stands out a mile.
I'm truly hoping a pro didn't chase those sockets?
It looks quite neat work to me.
It only looks rough because the sockets have been wired in as a tempory measure......its just not a finished job, electricians arent plasterers.
- Joined
- 31 Oct 2019
- Messages
- 1,423
- Reaction score
- 225
- Country
But why wasn't it chased out to the size of the backbox?
By making the hole too large in the first place you're making more work for someone
I hope you're not telling me every electrician can't plaster and make good their chases?
By making the hole too large in the first place you're making more work for someone
I hope you're not telling me every electrician can't plaster and make good their chases?
Looks fine to me - you need a bit of a gap around them to position them correctly and to be able to get a bit of plaster between the box and existing plaster. As said, plaster first then filler but just make sure the back boxes are deep enough and are at least just below the finished surface of the existing plaster.
I'm not telling you anything other than you are clueless about the building trade. But I bet you're good at digging holes.I hope you're not telling me every electrician can't plaster and make good their chases?
- Joined
- 31 Oct 2019
- Messages
- 1,423
- Reaction score
- 225
- Country
I'm not telling you anything other than you are clueless about the building trade. But I bet you're good at digging holes.
I would be embarrassed to call that my work, I'm more than capable of chopping a chase for a back box , getting it straight and without the need to make good around it and I have done plenty of times.
Are you?
- Joined
- 26 Aug 2016
- Messages
- 6,830
- Reaction score
- 1,009
- Country
just as a reminder, the OP asked this:
And to get back to the original question, as a DIY person, what we did on our own chases full of loose crumbly lime plaster, I painted some watery PVA all over, let it dry, and then my wife used scrim tape in places where necessary with easi fill, and blended it in then painted the whole wall (colour change) So far it's all still intact.
as far as we know they did it themselves after all this is "DIY"not. anyone who feels the need to show off their superiority there are other forums you can do it onHow would you tackle this situation please?
And to get back to the original question, as a DIY person, what we did on our own chases full of loose crumbly lime plaster, I painted some watery PVA all over, let it dry, and then my wife used scrim tape in places where necessary with easi fill, and blended it in then painted the whole wall (colour change) So far it's all still intact.
painted some watery PVA all over, let it dry, and then my wife used scrim tape in places where necessary with easi fill, and blended it in then painted the whole wall (colour change) So far it's all still intact.
What's the purpose of PVA please and what do you mean by blended in?
- Joined
- 26 Aug 2016
- Messages
- 6,830
- Reaction score
- 1,009
- Country
the pva was just because the wall was crumbling so bunging in filler it just fell out again, much like a greased and floured cake tin nothing can stick. With the pva all the loose stuff was held in place long enough to slap the filler in the hole and go solid.What's the purpose of PVA please and what do you mean by blended in?
Blended in just means get a nice smooth edge between the filler and the original wall. If you use normal skim gypsum plaster you have to skim the whole wall, but with the filler you can press harder and get a feathered edge. And if necessary sand the bumps off later.
the pva was just because the wall was crumbling so bunging in filler it just fell out again, much like a greased and floured cake tin nothing can stick. With the pva all the loose stuff was held in place long enough to slap the filler in the hole and go solid.
Blended in just means get a nice smooth edge between the filler and the original wall. If you use normal skim gypsum plaster you have to skim the whole wall, but with the filler you can press harder and get a feathered edge. And if necessary sand the bumps off later.
Thanks John. So would you unscrew the sockets, make good and then rescrew back on the wall once set?
DIYnot Local
Staff member
If you need to find a tradesperson to get your job done, please try our local search below, or if you are doing it yourself you can find suppliers local to you.
Select the supplier or trade you require, enter your location to begin your search.
Please select a service and enter a location to continue...
Are you a trade or supplier? You can create your listing free at DIYnot Local
Similar threads
- Replies
- 3
- Views
- 8K