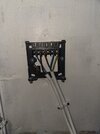
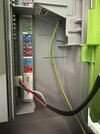
Looks like it'll be either the white plug in connection next to the yellow, the yellow one or possibly the dark blue one. Can you take better photos? Is the dark blue one OpenTherm?
I have seen that board before, but guessing can cause a lot of damage. The Nest Gen 3 can work on 24 or 230 volt switching, or OpenTherm, but some boilers can only use their own analogue controllers, and the Bosch analogue controller I looked at was like the Nest in that it did not connect to TRV heads. Clearly designed for open plan homes where one thermostat can control the whole home.
I moved to Drayton Wiser, think it allows up to 9 devices to tell the hub with in turn tells the boiler to fire up, but my house has the radiators under the window, I know the idea, but that's when the heating is running, and we do have summer where heating is not required, but a north facing outside wall can still get cold, and end up firing the central heating when not required. So the idea of having all linked TRV heads seems good, but in practice if the radiators are not on an internal wall, then a wall mounted thermostat can work better. The Wiser will allow either.
Honeywell EvoHome was the first I saw, it came out before we all walked around with a phone glued to our ears, so had a good HMI (Human Machine interface)
the latter ones often need a phone or computer to control them. Nest Gen 3 actually not too bad, you can do most things with the dial, but Energenie was rotten that way, you can only set the TRV setting with a phone or computer, hardly any option to set on the device.
But, Nest had so many what seemed good ideas, which simply do not work. Anti-legionnaires was firing it up when not required, so disabled, the learning bit went completely daft, so disabled, the geo fencing needs one to be far too close before putting heating on, and turned off the heating in a storm when the EE mast went down, so disabled, the energy used is useless as it only shows when boiler is switched on, not how much it is using, reminds me of the IHD with smart meters. What is required is to monitor more than one room, and only the USA version has that, so all in all, a bit useless. It does allow one to wire a C Plan boiler, but since
@DIYron26 is using a combi boiler, the DHW part of the Nest will not be used.
So

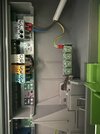
in real terms only two wires to boiler, same applies if using OpenTherm, but different two wires, but there is a reason why installation manuals are written, and best it to look in the manual for the boiler, most available on line, but need make and model of the boiler to know which terminals are used,
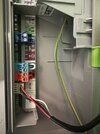
@Stuckinarut likely correct for OpenTherm if an OpenTherm enabled boiler, if not one of the links will be removed and thermostat contact wires will replace it, but I can't say which, as you have not said what the boiler is, so can't look it up, can't even check if now cover has been removed it needs a gas safe guy to test it.