rising damp, penetrating damp, percolating damp, who else wants to get creative?

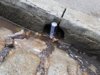
There has been some light rain this morning. The area under where the old square bit of downpipe is joined by the new, vertical round pipe is dry. Not a certainty that that joint ok (bigger volume of rains could see water going down the downpipe and then overflow from the square opening), just an indication that the join is OK.

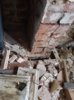
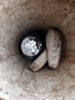
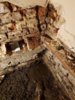
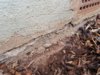
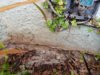
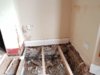
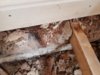
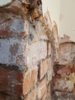
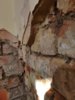
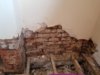
In the attached pictures you can see that there´s actually a slate DPC; further, there is a plastic DPC inside as can be seen (last picture), but that sits only on the bricks/rocks where the joists are sat on. That section of bricks/rocks is an extra layer of bricks next to the internal skin (or maybe it is simply the foundation? I have never ripped up a ground floor before). As it can be seen in that last picture, the joists are sometimes even longer than the strip of DPC, totally useless.
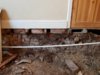
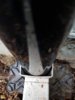
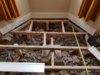
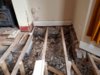
I also attached pictures of the internal bay and a wider angle of the corner mostly affected by damp.

The outside soil level is 1 to 3 cm higher than the internal joist level, at measured in the bay window. I think this is a signal that I should start digging!
 

Attachments

  • 20190912_090238.jpg
    20190912_090238.jpg
    582.3 KB · Views: 281
  • 20190912_090338.jpg
    20190912_090338.jpg
    636.6 KB · Views: 283
  • 20190912_090401.jpg
    20190912_090401.jpg
    585.1 KB · Views: 292
  • 20190912_091120.jpg
    20190912_091120.jpg
    345.5 KB · Views: 278
  • 20190912_091149.jpg
    20190912_091149.jpg
    244.8 KB · Views: 282
  • 20190912_091204.jpg
    20190912_091204.jpg
    389.9 KB · Views: 271
  • 20190912_091238.jpg
    20190912_091238.jpg
    346.4 KB · Views: 296
Sponsored Links
Think you could do with lowering the outside level to be at least two courses lower than the DPC.

On you image of the air vent, is this vent under the floor or in the room?
You need ventilation under the floor to stop issues with rot etc.
Id also chop the render back, to two courses about the slate/DPC as well whist I'm at it.

Could do with proper sleeper wall building for joists and remove all the kak.

Sorry if this has all been mentioned before.
 
No need to lower front garden - or dig a French drain. You already have the slate DPC above ground level.
Just remove any render that bridges the slate DPC.
As you remove the joisting you could also remove all rubble from the soil surface.
Cap the joist tails with DPC material before sitting them in the walls.
All joists sitting on masonry must have DPC's below them.

The hallway should have some kind of permanent access from below or above - hallways are often missed on inspections, and can silently have joist seats rotting, and a total lack of through ventilation.
The main floor(s) also need a permanent access trap.
See joist span tables for whatever joist sections you need.
I'd demolish the front hearth fender walls/masonry, remove any soil filler, and rebuild with all joist trimming 25mm min from rebuilt hearth.

Examine nail and screw heads in the other room suspended floors - look for rusting stains - rust indicates excessive condensation below the floor.
Use 3:1 mix of sand and lime render to replaster - skim with a remedial finish.
 
Sponsored Links
MrChibs About outside level being two courses, totally happy to do that and it feels like the sensible thing to do.

Albeit, when you start reading about it, it all doesn't make sense.
Rising damp is a myth; yet we buil DPCs. DPCs are supposed to avoid rising damp (which doesn't exist). Yet, don't have your outside level within 15cm of the DPC, otherwise you have rising damp; even though you have a DPC. :confused:
I guess DPC breaks/deteroriates with time, so being away from it is the bakup plan when the DPC fails, but still.

The plan is to build some more sleeper walls / brick pads and have the joists sit on them and so decouple them from the house walls.

bobasd Well, about the front level, see above. It is all a contradictory faff. Even when looking at the glorious pavingexpert .com, whcich I swear by, he says to leave the outside level 150mm below DPC (and it is in some Building Reg Act of 1900 something anyway). Anyway I guess it won't hurt having the outside level a bit below DPC rather than really close to it.
Will look into removing some render, need to get my SDS out.
The plan is to remove rubble from underside and as stated above, build more pads (with DPC) so that the joists are decoupled from the house structure.
Not sure about permanent access? Do you mean like a hatch?

catlad Windows seem fitted decently to me, not sure what to look at specifically.

Anyway, been digging up a bit outside along the outside wall and been hacking off the render in the front corner. Interestingly, the render seems quite dry-si to the side; it is really, really thick render, horrible (look at pictures).
The bricks under it feels also really dry but the mortar joints are all gone (damp soil basically). I also found a couple of wood chunks between brick joints, even though dry, they were totally rotten.
Interestingly, you can appreciate from the picture how someone has attempted to do a DPC injection.
Also, I have been removing the skirtings in the bay window (the only 3 airbricks are all in the bay window) and the airbrick are literally sitting opposite and no channeling, really badly done. In the middle one, behind the skirting board and in front of the back of the airbrick, there was a loose brick going from side to side. Total madness!
 

Attachments

  • 20190915_104656.jpg
    20190915_104656.jpg
    437.2 KB · Views: 256
  • 20190915_104711.jpg
    20190915_104711.jpg
    283.3 KB · Views: 263
  • 20190915_104739.jpg
    20190915_104739.jpg
    292.5 KB · Views: 258
Forgot to ask, when hacking off those slabs of plaster I can see three different types of plasters.
One is pink-ish and I believe this is finishing plaster. One is grey and I imagine it is concrete based plaster? What is it used for?
Then there was also a greenish plaster, is this by any chance lime plaster?
 
I've been through this type of thing not that long ago, ventilation commonly buggered around with and blocked up.
I managed to add extra vents on the side, so there is a good cross flow.

Were the wood chunks in the mortar on the inside, if so, were probably used to attach the old skirting boards, if on the outside, they want binning and re-pointing.
I'm re-pointing bits of a 1900 built building at the moment with a weak mix, 1 cement and 6 sand... as recommended on this site, I was dubious as it's considered weak... I've been surprised now it's dry, seems strong and not crumbly.

I think your colour coding for the finishes are pretty much correct.

When I replace some floor joists, I cut slots into mortar line and used masonry joist hangers and cemented them in, with the addition of sleeper walls and noggins, it's all solid. 147x47 size at around 400mm centres. This also allows for rockwool insulation to be added (cheaper than PIR, but you need twice as thick).

Keep going, good pics.
 
Some updates, I don't even know where to start to be frank.

After having removed an Ikea Kallax (open shelf kind of furnishing) from the wall adjoining the stairway in the back room, it was evident that the walls were very damp. This prior to the prolongued wet spells of this week just gone. (see picture 1). It is obviously an ongoing issue and it is even more disconcerning as this is an internal wall. No known pipes, but a known poor ventilation in the sub-floor void (see diagram, that wall rest on a sleeper wall in the sub-floor void which is contained in a "closed chamber" made of sleeper walls. Only one air brick, matched by one on the living room side, but it doesn't look like much air is going through there).

I bought some cheap-o hygrometers with probes, very handy. I started using them the other day, so during / at the end of this week wet spell. They seem quite accurate, at least when compared to my other thermo/hygrometer. The disconcerting thing is that, not that they read 99% humidity (to be born in mind, actually 99% is the maximum they will ever display! :ROFLMAO: 
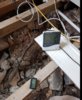
) when stuck in bricks / in between bricks, they actually read 99% also when simply dropped onto the sub-soil! This after three weeks of total aeration, as I removed the boards 3 weeks ago!

I removed all joists from the floor yesterday and I can clearly see that there are puddles on the sub-floor soil. Not sure whether this is always there or it is just the effect of this week wet spell and it has saturated the clay-ish earth.

Now to the other point of extreme upsetness (after discovering the wet patch in the internal room in the back room).
We were aware that a wet patch appeared behind / under the radiator some months ago (in June I reckon), apparently after a week of very heavy rain.
No leaks were found back then, the patch shrunk a bit but it stayed on the wall since then.
Now that I removed the joists I can clearly see how the sleeper wall is (sort of) dry. The first course of bricks (embedded in the soil) is obviously wet, but all of the bricks above are dry to the touch (even though a probe into those bricks still reads 99%). These pictures have been taken also yesterday, at the end of this prolongued wet spell.
This picture clearly proves to be that "rising damp" is a bloody myth.
Bricks don't sucks water up, and neither do concrete blocks (those concrete blocks I have in the middle of the room also show the same phenomenon, the course embedded in the soil is wet of course, but above that, they are all dry. Also, the woods sitting on these concrete blocks (showing no sign whatsoever of DPC) are bone dry.

Another shocking picture, also taken yesterday. This is the wall adjoining the hallway.
As you can see (looking bottom-up), wet bricks in the soil, dry bricks above, random wet patch starts showing (just on the left of the door). That wetness is clearly coming from above down, not from bottom up. To be noted, all the wooden wall plates under the joists are rotten.

Summary: Lot of wetness, very damp soil, definitely a lack of air circulation in the sub-floor. But somehow and I really cannot explain to myself why and how, the wetness seems to be coming from the walls that are plastered. Or at least so I am inclined to think at the moment.
How could that be possible. I know cement render is bad and it wicks moisture in, but if it is this bad, how come it is still so wide-spread and used? Could the cement render alone cause all this wet mess anyway? Where is it wicking moisture from anyway? Seemingly not from the ground, as the bare bricks below floor level are dry. From the atmosphere? Sure it would more look like condensation/mouldy patch rather than a widespread wet patch. Clueless.
 

Attachments

  • 0 diagram.jpg
    0 diagram.jpg
    82.6 KB · Views: 274
  • 2 probe chimney breast.JPG
    2 probe chimney breast.JPG
    105.3 KB · Views: 271
  • 1 dining room wall.JPG
    1 dining room wall.JPG
    27.3 KB · Views: 266
  • 3 probe soil.JPG
    3 probe soil.JPG
    116.4 KB · Views: 254
  • 4 puddles.JPG
    4 puddles.JPG
    132.3 KB · Views: 267
  • 5 radiator wet patch.JPG
    5 radiator wet patch.JPG
    80.6 KB · Views: 264
  • 5 under radiator.jpg
    5 under radiator.jpg
    277.6 KB · Views: 254
  • 6 hallway wall.jpg
    6 hallway wall.jpg
    274.5 KB · Views: 261
you mentioned mortar joints gone between the bricks. This seems quite common around leaking drains, I've always assumed the persistent water washes away lime mortar. I like to expose all the damaged part of the wall, hose out all the mud from the joints, and pack full depth with cement mortar. You can get pointing guns now that may make it easier, but i don't think underground joints need to be as elegant as those on show. Since they are underground there is no benefit to a porous, breathing lime mortar.

I'd expect you to find signs of a leaking drain while you're doing that. For example I was once working in a hole when my neighbour finished her bath and pulled the plug. My hole filled with warm foamy water.

The water in the chimney breast seems severe and surprisingly high. I'd suspect a rainwater or plumbing leak above, but chimneys tend to hold water-absorbent salts. If you hack off the plaster the brickwork may show a damp pattern that tells you where it's coming from. Shovelling out the rubble under the floor will help, and chimneys sometimes don't have a dpc, so damp can rise from the rubble under the hearth. If the chimney is both open and unused, you can, after digging out the hearth, open ventilation from the floor void and up the chimney. Your house looks like it will benefit from lots of ventilation. If the fireplace is still in use, you can put a grille in the floor immdiately in front of it, so incoming air to feed the fire won't cause draughts in the room. This was done in some very grand old houses, often with a duct, but in your case the air from under the floor will do fine.

You have a slate DPC, and slate lasts about three million years, so unless it has been bridged it will still work as good as new.

Your house is so wet that I can't stop thinking there must be a leaking water pipe under the floor, but I suppose it could be entering below ground level from outside. Did you say there's no water meter?
 
Last edited:
I thought my floors were bad! While the floor is up, if not done already, clear out all that rubble and dust. You might need a small skip! You want to allow air to flow as good as it can, and rubble blocks air flow and dust soaks moisture.

How old is the house? The suspended floor looks newish, which suggests somebody replaced rotten timbers before.

And dig - my house had/has a path built up to level with damp course, over some air bricks. There is a permanent wet line inside on the concrete subfloor. That will send moisture into the rubble and dust too - vicous circles. Basically, if everything is clean and well venitlated under the floor, the house can cope with a small leak as it will evaporate before it has time to do any damage. I plan to dig down to below the level of the concrete subfloor - I think 3 courses below the airbrick.

Curious to know the cause of he puddles though!
 
JohnD yes, I should start hacking off the plaster to expose all of the affected areas (I did start already couple weeks ago in a little corner), however I am afraid that once I start, I will have to hack off the plaster in the whole room.
I also feel that the water in the chimney breast is quite high and fear could be coming down from the chimney stack, however really no sign of dampness on the first floor, but who knows, maybe there is a very unobstructed passage for the water to precipitate down to the ground floor, hence no signs of dampness on the first floor. The chimney breast has a stove and it is used every so often during winter months. Do you think your suggestion of a vent at the bottom drawing air from underneath the floor would work well with a stove? I would think so, as the air is drawn into the stove itself from some vents at the bottom.

There is slate DPC, however that's on the outside skin, on the inside skin I cannot find signs of DPC.
Yes, our house is very wet and it is disheartening us. To be said, on the first floor everything is fine and dandy.
I also suspect there's maybe a leak on some utility pipe, I will need to start digging. There is a water meter, it is outside approximately three meters away from the front door.
Tonight I will clear the rubble from the area, it has been long overdue but I had to remove the joists first for ease of operations.

jonbey Always look at miseries of other people, so you will realise how little your miseries are!
As said just above here, I hope to clear rubbles tonight, indeed the logistic of it daunted me, we are not hiring a skip, it's either trips to the tip or amassing it in the back garden (or in the middle of the room for now, untile the next weekend comes)

The house is from 1890. Indeed some one had a go at the floors already, less than 20 years ago (judging from newspapers remnant and age of timbers). The floor has always been crap, bouncy (really undersized joists had been used) and slopy / not level. Really a bad job.

I had ideas to dig a french drain on the front, but was advised over here as probably useless in this situation. Still have to hack off some of the concrete render on the outside to a certain height, to avoid water wicking, however the wetness is such that I don't think that's the issue.

I would love to know what the puddles origin is too!
To be noted, the puddles are in the lowest depression of the soil, meaning it is maybe simply the water table level after it rains?
 
There is a water meter

that's good. Take a look at it with a torch. Rub the glass clean with a rag, if it is the sort I am used to there will be an air bubble under the glass. All the time water is flowing, the bubble will turn. If it still turns when you close the indoor stopcock, there is a leak between that stopcock and the meter. If not, but it turns when you open the indoor stopcock, water is passing somewhere in the house. Look at the loft tanks, if any, especially the small one to see if the ballcock is dripping or running (meaning it is making up water coming out elsewhere). The small one, if any, tops up the radiators and boiler.

Sometimes the leak is at, or close to, the meter, where the old pipes were jiggled about. You may notice wet ground round it. But the meter pit can also collect rainwater. Have a look at the neighbours' meter too, with their permission, or while they are out.

The puddles say "pipe leak" to me.

As for the floor grill, I think it will be useful in front of a stove, although they do not suck as much air as an open fire (provided you have a register plate)

Is the soot dry or damp?
 
Last edited:
our water meter is a new one, installed last year or so. Took a look ( can see a picture for yourself) the meter doesn't run so I suspect there is no leak, or if there is one it should be very very minimal. Notably, there's water at the bottom, is that normal? The depth of the water sort of coincides with the level of the deepest part of our sub-floor soils, where we had paddles.

We don't have loft tanks or any water upstairs at the front/ in the loft. We have waters going upstairs at the back of the house, but they run in very far away positions and they have been recently installed. We had a lot of damp way before that.

My direct neighbour doesn't have a water meter out, my other direct neighbour their water meter cap was hard to lift, literally couldn't lift it.

You asked about the soot being dry or damp, do you mean the soil of the sub-floor area? Generally damp, not everywhere though.

It started raining earlier on, medium intensity.
Had a look long look at our downpipe (which were installed last year, to be reminded). They look perfect to me. Could see some drippings from gutterings of neighbours down the road, not from ours.
Where the new circle guttering enters into the old square downpipe (some posts ago we were discussing about that), there is definitely no leak, went with the phone and videoed it for 30 seconds, not a single drop.
You can see a water level inside the square downpipe (see pic) but it seems like it never rises when the rain intensity increases. Even if it overflow, it will be limited in water volume and time.

As it was mentioned by @bobasd a while ago, indeed the render at the bottom of the front gets a lot of splashback water, see mud on the render in picture. That will need to be hacked off but again it doesn't explain the extent of dampness in the house.

An interesting discovery I have made meanwhile messing around with water meters on the outside.
My old square downpipe discharges water on the sidewalk, as all the other neighbours' downpipes do too. the water then run off across the sidewalk to fall onto the road itself. The section of the road is humped (not sure if there is a better terminology to describe what I mean) and the water thus run off along the side of the road as the road is on a very gentle slope. At the end of the road there are manholes/griddles.
As you can see from the picture, aligned with the current downpipe exhaust hole (the one above in the picture), there is a hole into the sidewalk itself. It looks like water is running into it (or out from it, find it hard to believe)
If the water runs in, which seems very likely it does, it means a portion of all the rainwater collected along the road falls back into our front garden and perhaps travel to our sub-floors?
Only a handful of neighbours have this hole in the sidewalk in front of their property. I can imagine it is a old downpipe hole?
If I stick a 10 inch long screwdriver into it, it sinks very nicely in the soil, meaning to me it is all wet, permeable matter.

little video of the water flowing:
https://streamable.com/xmqat
 

Attachments

  • 2.1 water meter.jpg
    2.1 water meter.jpg
    140.9 KB · Views: 265
  • 2.2 downpipe.jpg
    2.2 downpipe.jpg
    92.9 KB · Views: 267
  • 2.3 mud splashback on render.jpg
    2.3 mud splashback on render.jpg
    420.2 KB · Views: 275
  • 2.4 downpipe holes.jpg
    2.4 downpipe holes.jpg
    391.7 KB · Views: 280
  • 2.5 downpipe holes screwdriver.jpg
    2.5 downpipe holes screwdriver.jpg
    393.6 KB · Views: 264
"the meter doesn't run so I suspect there is no leak, or if there is one it should be very very minimal."

The numbers on the meter are measuring large amounts of water, and it's difficult to spot a small persistent leak (unless you turn off the indoor stopcock and go on holidayfor a week). So if there is a bubble, it's better at showing small movement. Your meter is not the same design I'm used to. It doesn't seem to have a shaft or T-handle for the built-in stopcock, unless that's under the ?slices of bread? If there is a bubble, on ours, it would be in the middle of the glass window.

Yes, there is often water at the bottom of a meter pit, they can fill up with rainwater. If you have a wetvac you could suck it dry and see (in dry weather) if it starts filling up again with clean water. mud on top of the dial suggests that the water level has previously been at or above that height.

I've seen those pavement drains before, round here they have an iron liner, tilted slightly down towards the road, and a gulley or entry point for the downpipe against the wall of the building. I believe they can get choked. My BiL had one that was completely blocked and his house suffered long-term wet at the corner where the downpipe went into the ground. He raked it out and jetted it, I think.
 
That's not entirely correct, the last black digit of the water meter represents 1 m^3 of water (1000 litres), so the unit (in red) represents 1 litre; we have been away for 72 hours and the meter hasn't even moved half a position (took a picture before and now), so of there is a leak down from the meter onwards, it must be 200 ml or less per 3 days, thus very negligible. If we will be away for longer in the future, I will take other snapshots to exclude a leak with the utmost certainty.

Actually when we left in the morning, the water meter tip was already empty, it hadn't rained the whole night so it suggests it is indeed rainwater - coming from the surrounding soil?
Regardless of the above, the focus is now on that pavement drain ( the initial bit is not line; anyway on Saturday I will start a massive dig-up of the front garden, hoping to find that there is indeed an old downpipe connected to that pavement hole, which terminates into some sort of open gully and that would explain why we have so much water accumulating in our front garden.

Interestingly the other night, before leaving home, I started digging in the incriminated corner of the house (top right in my floorplan sketch, coinciding with the downpipe / potential old buried broken downpipe).
After a bit of digging, I had a wee, wee stream of water coming off the sleeper walls into the subsoil of the floor void. Also, the soil is extremely hard in that corner.
https://streamable.com/z379i
The stream can be "seen" if attention is paid at how the water whirl in the puddle.

To benchmark, I started digging in the bay window, much softer soil, I could dig much deeper and yet I could not find any water as such (even though the soil was saturated).
Gives an extra +1 to the assumption that there is an open/broken pipe channelling all that rainwater from the street down in our garden.

I am really hopeful that Saturday I will get answers at last!
 

Attachments

  • 3.1 puddle internal corner of downpipe.jpg
    3.1 puddle internal corner of downpipe.jpg
    236.5 KB · Views: 249

DIYnot Local

Staff member

If you need to find a tradesperson to get your job done, please try our local search below, or if you are doing it yourself you can find suppliers local to you.

Select the supplier or trade you require, enter your location to begin your search.


Are you a trade or supplier? You can create your listing free at DIYnot Local

 
Sponsored Links
Back
Top